Inside My 4×4 Sprinter Camper Van Conversion by Outside Van
Tour my third Sprinter Van conversion and learn what I like and don’t like compared to my previous two converted Sprinter Vans.
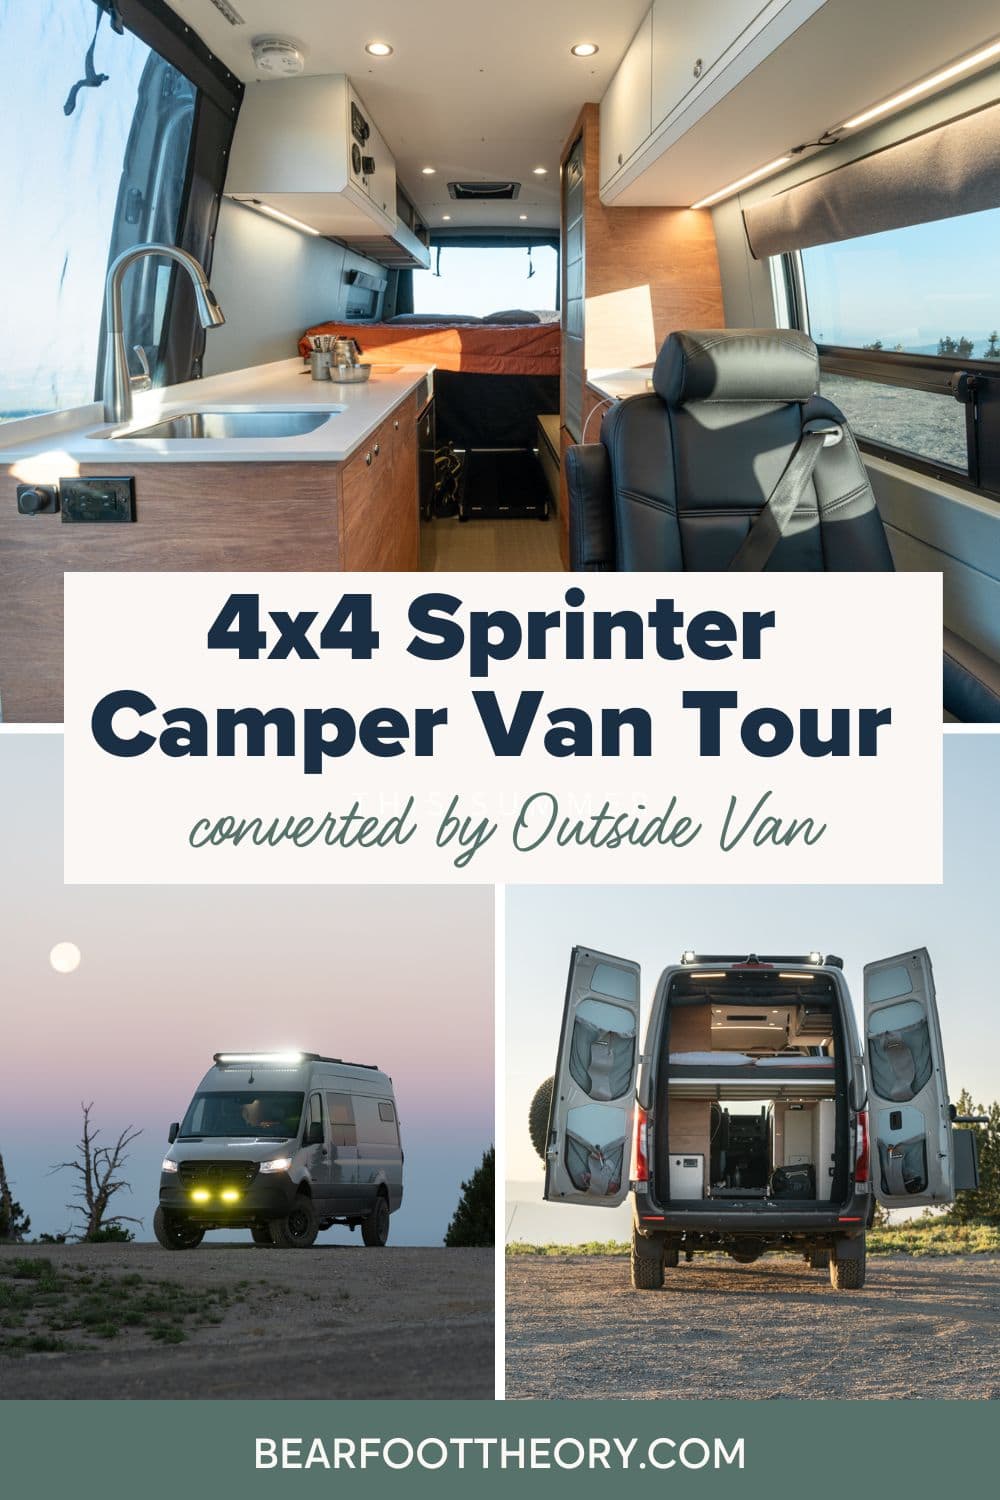
Since 2016, I’ve owned three custom Sprinter camper vans, each with its own unique layout and design. My first 144″ Sprinter was built by a small, inexperienced company in Santa Barbara. While it looked great in photos, it quickly became a nightmare in terms of functionality and durability.
After that frustrating experience, I decided to work with Outside Van, a highly reviewed van conversion company based in Portland, Oregon. The result was my second Sprinter van I absolutely loved—so much so that I returned to them for my third build.
So, why the need for a third van? At the time, my partner and I were planning to start a family, which meant we needed a new layout that could accommodate a third seatbelt for a future kiddo.
This third conversion—nicknamed “Wombat” and built on a 170″ 4×4 Mercedes Sprinter chassis—was a culmination of everything I’d learned over years of living and traveling on the road. After two prior builds, I knew what worked, what didn’t, and how small design changes could make a huge difference in daily life.
In this post, I’ll walk you through the design, layout, and materials of my latest van conversion, as well as share my experience working with Outside Van.
This post may contain affiliate links.
Sprinter Van Video Tour
You can watch the full walk-through of my new Sprinter Van in this video tour.
Save this post!
Enter your email & I'll send this post to your inbox! You'll also receive my weekly newsletter full of helpful advice for planning your adventures.
Priorities for this Sprinter Van
We typically spend 6-8 months a year living full-time on the road. When designing the layout for this third Sprinter van, I had several key priorities in mind to make life on the road easier, especially with the potential addition of a little one to our family. Here’s what I focused on:
I again chose a platform bed in my third Sprinter Van conversion
Missed the video tour in the introduction? You can take a full tour of my third Sprinter Van conversion here on my YouTube channel.
What I loved about this Outside Van
Before I get into the full tour, I want to share what I really loved about this van, as well as some things that didn’t work out so well for us.
Pre-baby, this van worked out beautifully for us. We took it up to Canada for the summer and then drove all the way across the US for fall in New England. Here are some of my favorite things about this van:

My Least Favorite Things About this Van
Once our baby came along, the shortcomings of our layout became a bit more clear. . Here is what I wanted to change and ultimately what led me to sell this van:
The Chassis
I had been very happy with my previous two 4×4 Mercedes Sprinter Chassis. We took our previous van to some pretty crazy places. We drove over rocky 13,000 foot passes in Colorado, chased powder, camped off hundreds of dirt roads, and more. So I didn’t hesitate to choose the same exact chassis for this van conversion.
This Outside Van was built on a 2021 170″ 4×4 Sprinter Cargo Van. I’ve written a comparison of the 144″ vs 170″ wheelbase and the pros and cons of the different van chassis if you’re trying to figure out what vehicle is right for your van conversion.
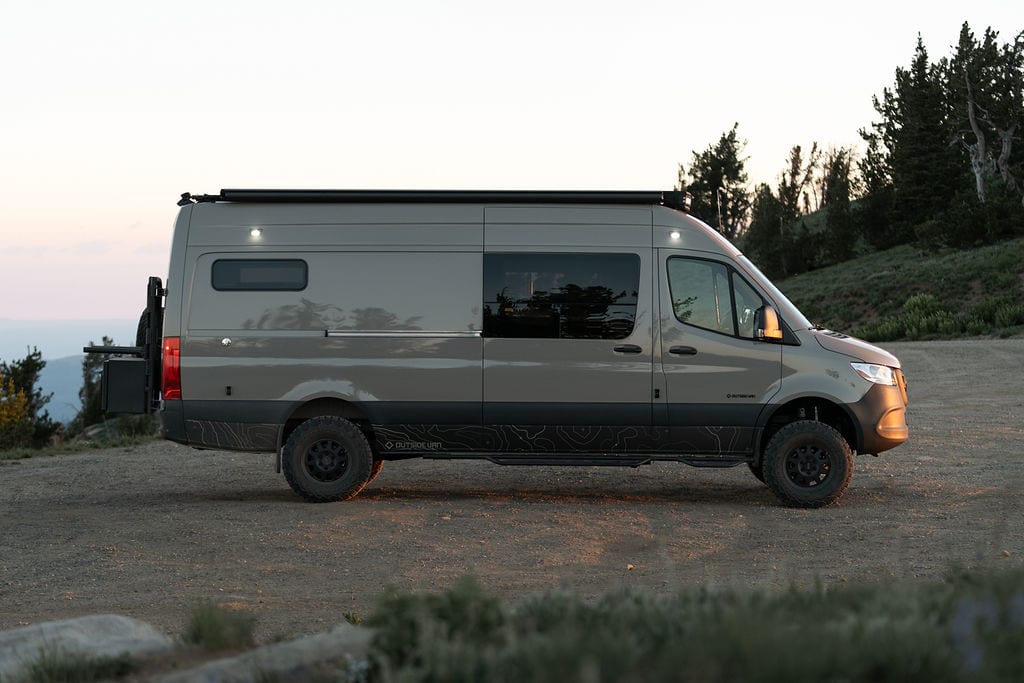
I also chose the high roof cargo 2500 170″ wheelbase again. The 170″ gives us plenty of room to live comfortably for 6-8 months at a time, and store all of our gear without feeling cramped with two dogs.
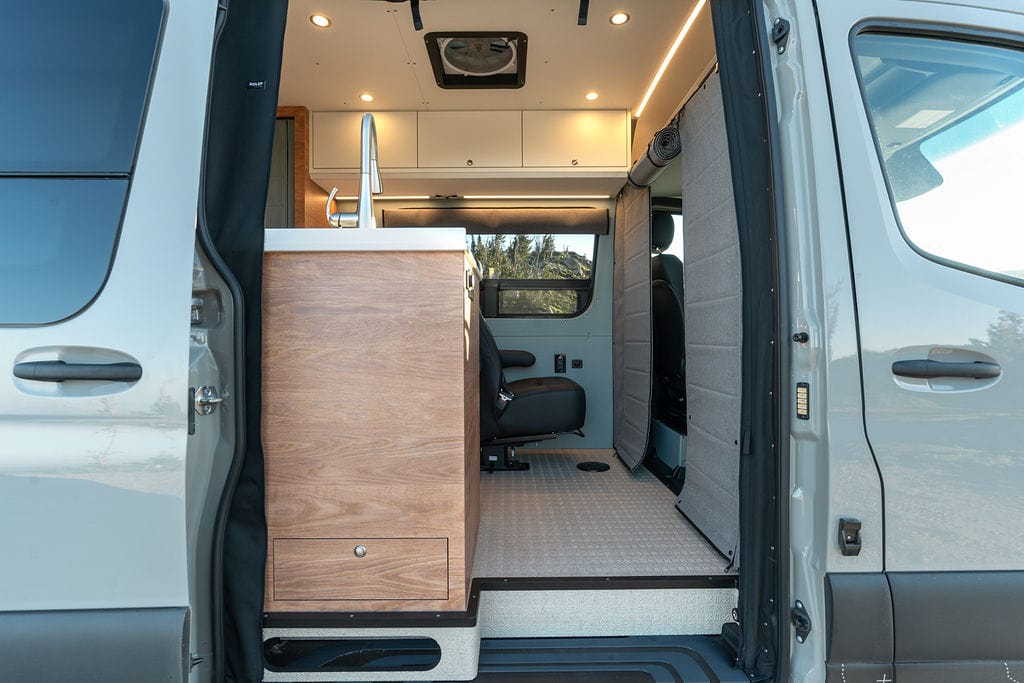
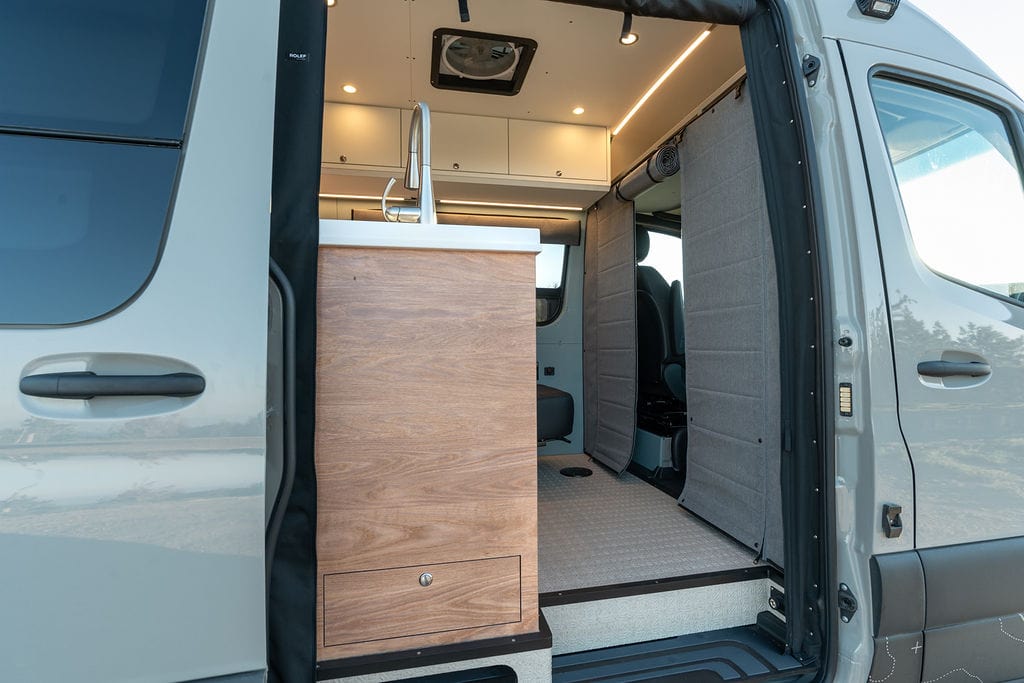
Van Walls
The walls in my third Sprinter Van conversion, including the closet door shown below, were made out of Sileather. Sileather is a synthetic, eco-friendly material that is vegan, VOC-free, and fade proof.
The best part is it’s waterproof, and in order to clean it, you just need to wipe it down with a damp cloth – even bloody mosquitos wipe right up. It’s perfect for people with dogs, as dog hair doesn’t stick to it. I would definitely use this material again!
Behind the walls there is sound dampening, insulation, as well as a custom infrastructure that Outside Van has developed to reduce the twisting and flexing of the van interior, making their builds more durable. The van was incredibly quiet when we drove. There were no rattles or other noises from the cabinets or other components, making for a very peaceful ride.
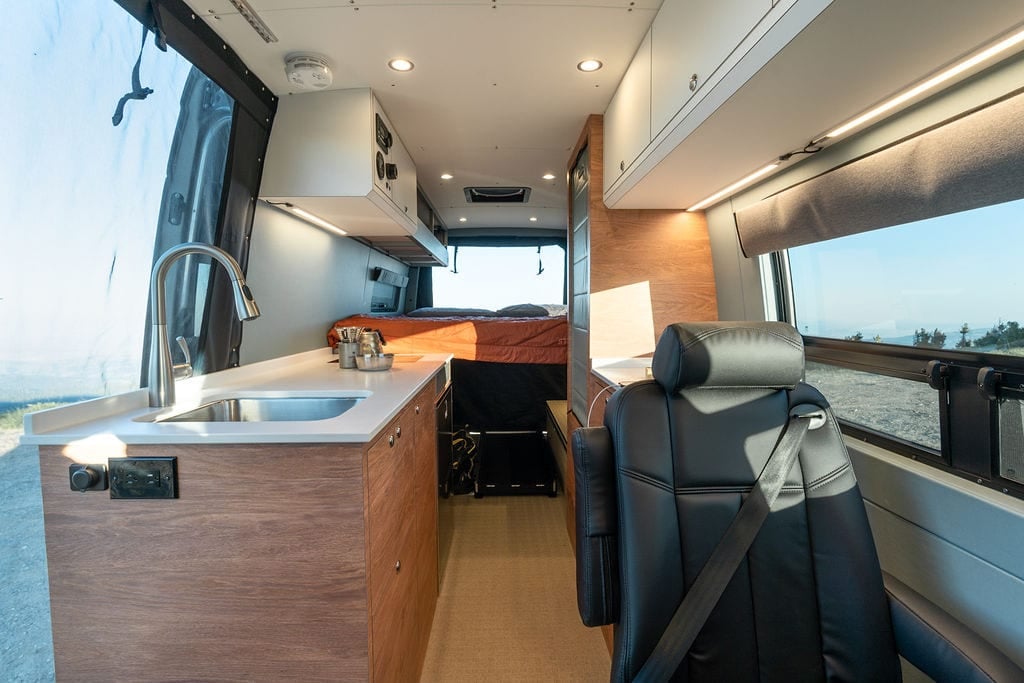
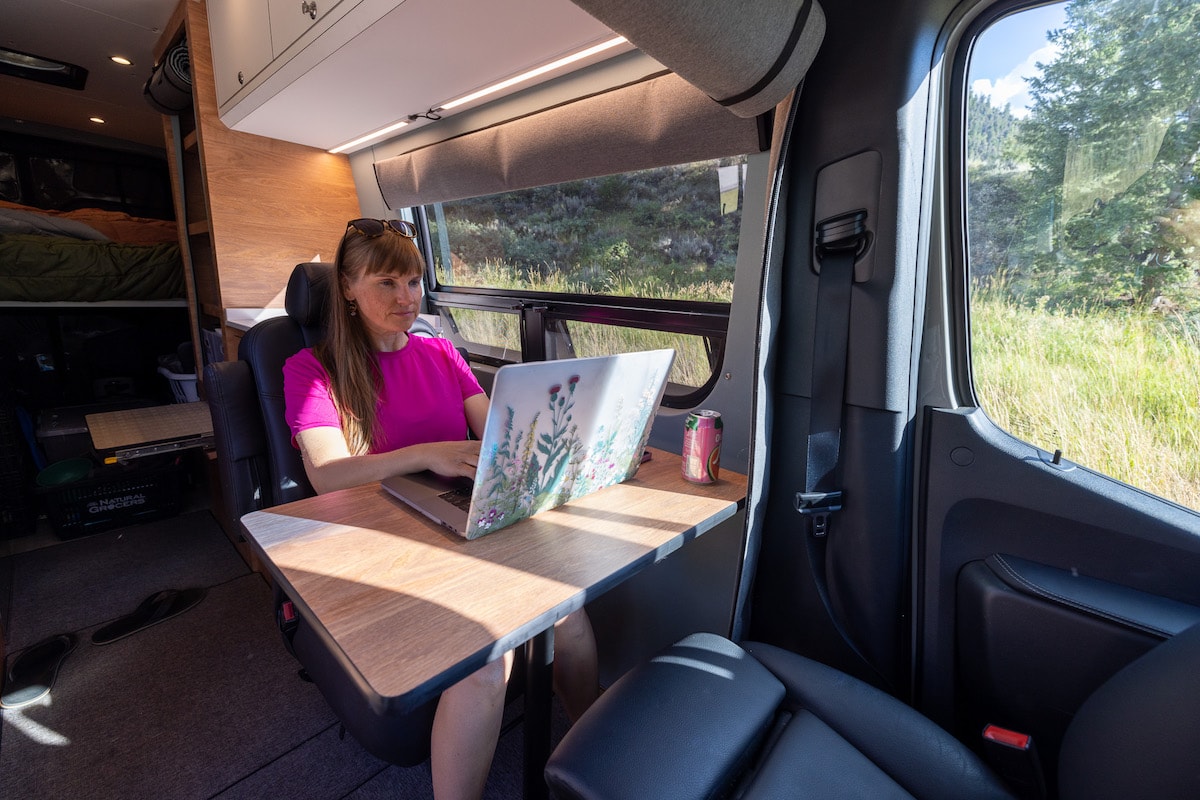
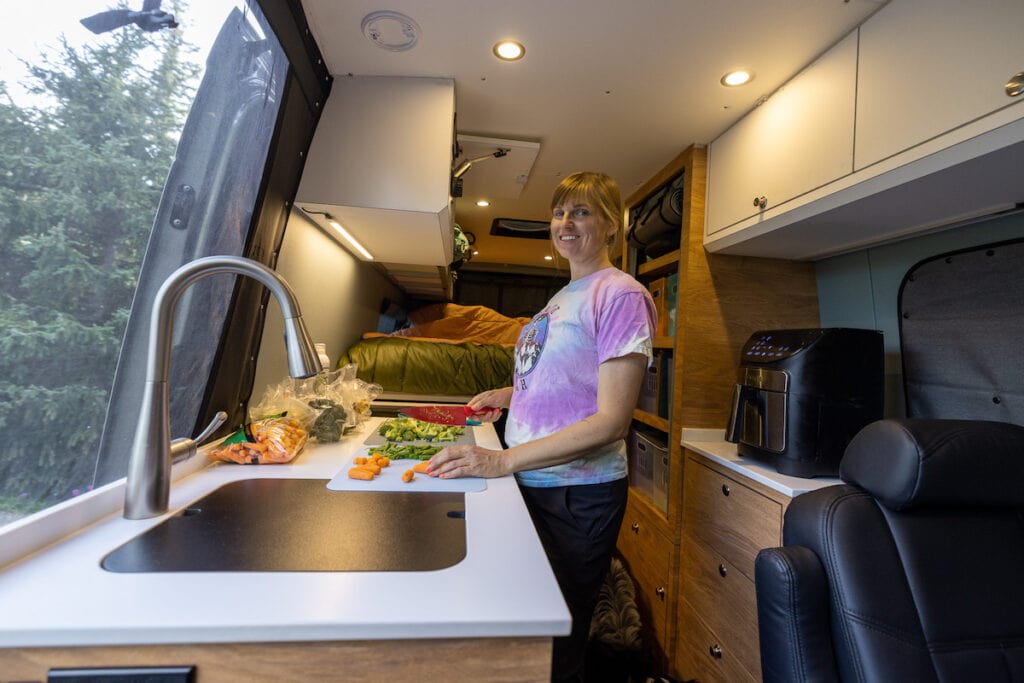
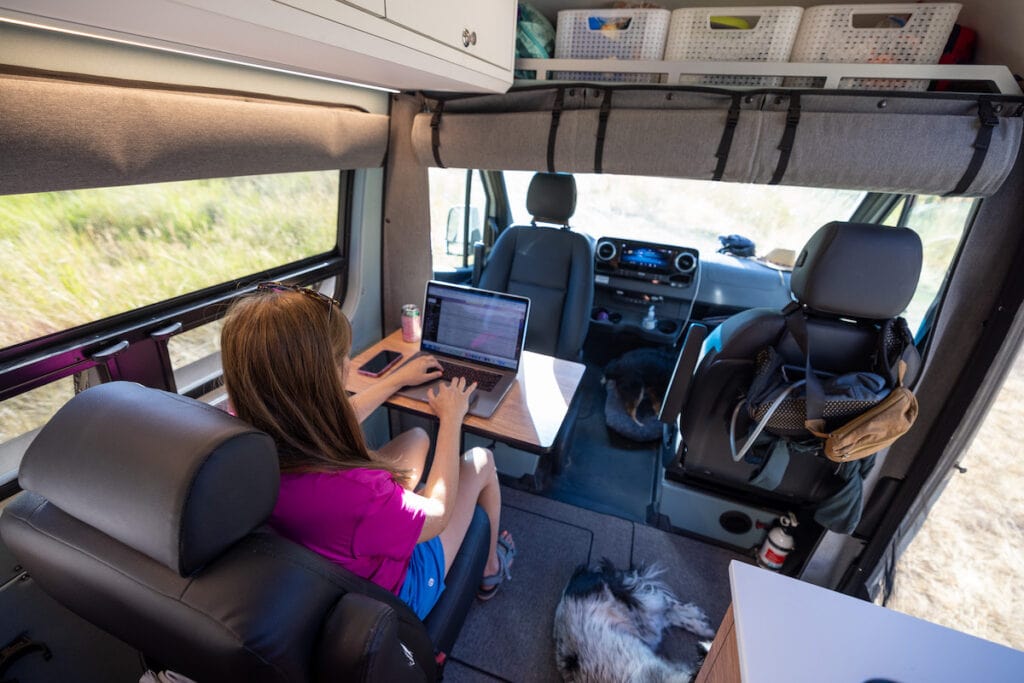
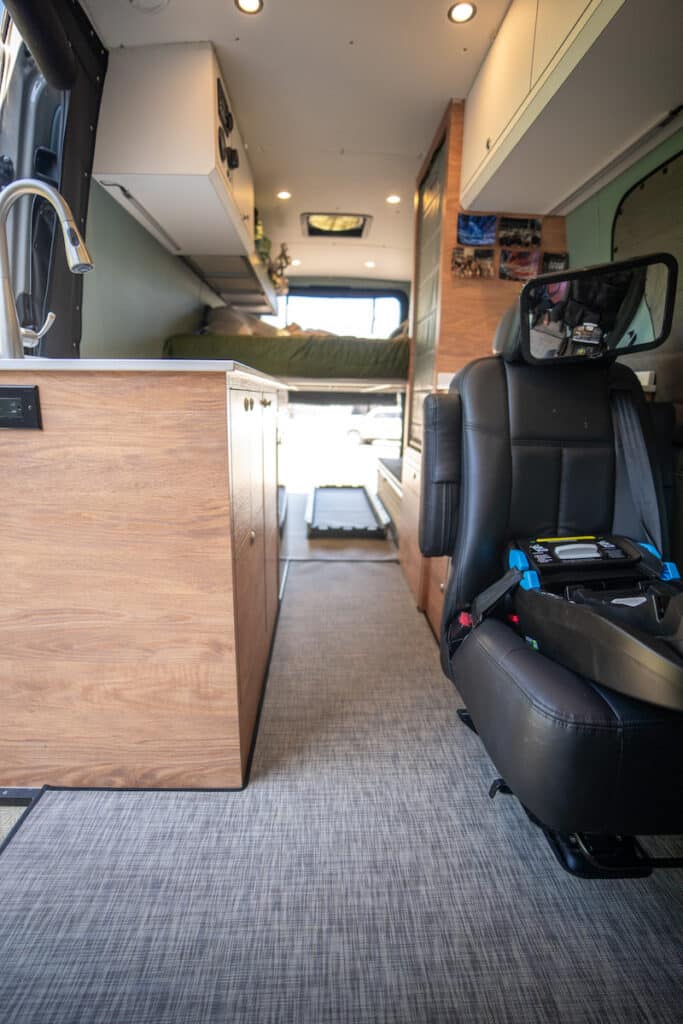
Seating Area & Workspace
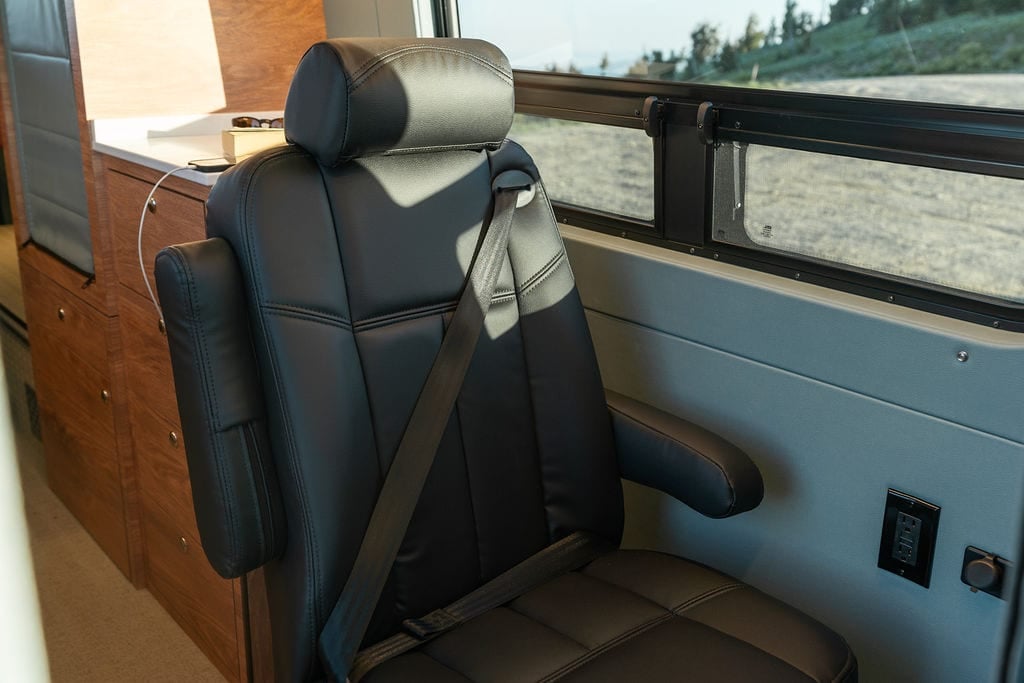
To accommodate a future kid, I had a captain’s chair installed behind the driver’s seat. Since we didn’t have space for a dinette or any other seating, this captain’s chair also doubled as my work chair. This worked ok pre-baby, but then I realized that we’d have to remove the car seat in order for me to sit here and work.
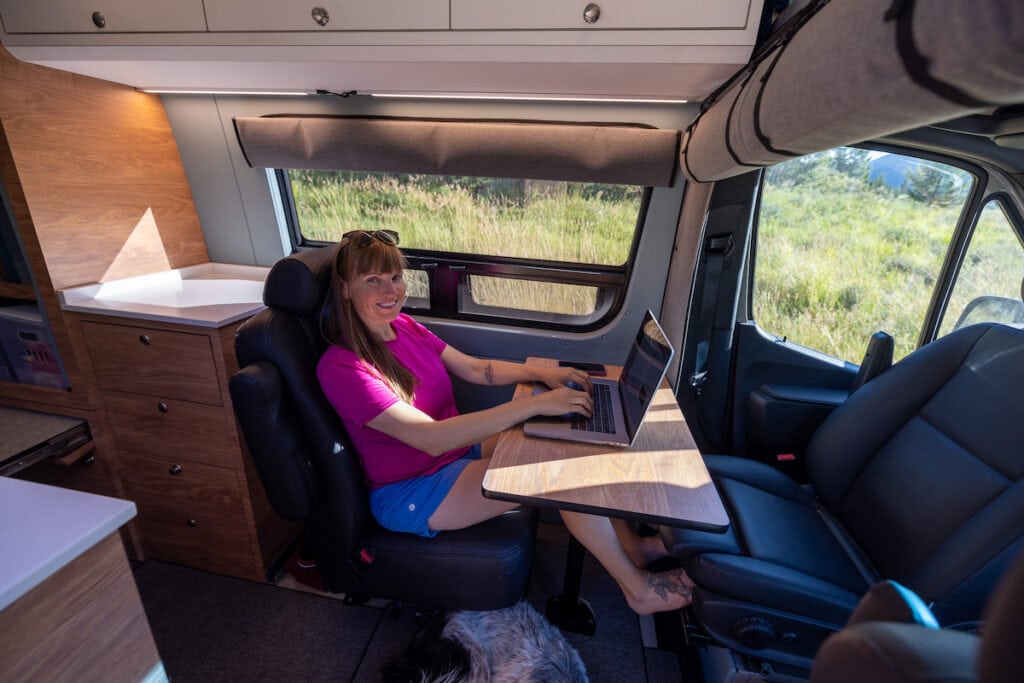
To set up the table, the table leg quickly popped into a base on the floor. When we were in motion, the table stored behind the chair so it was out. of the way.
One positive thing about this work station was I liked having a more ergonomic chair to sit in while I work compared to the dinette cushions in my last van (that always bothered my back after a while).
To create additional seating or a dining area, we swiveled the drivers seat and passenger seat.
Cabinet & Galley Materials
All of the cabinetry in the van is made of 13-layer marine grade plywood which was treated so it wouldn’t expand in heat or distort over time. Marine grade plywood is the standard used in boats and is made to withstand a bumpy ride.
All of the cabinet and drawer faces are covered using a high-quality laminate made by Wilson Art, which gives all of the wood in the van a nice finish while protecting the marine-grade plywood underneath. Laminate is lightweight and way more durable than regular wood.
I chose the Monarch Alona Grain for the lower cabinets and the Traceless Snow White Velvet for the overhead cabinets. The Traceless is not supposed to show fingerprints, but being white, it still shows dirt very easily, so I’m not sure I’d go with the white up top in the future.
Outside Van uses dovetail construction for their drawers which are made out of antimicrobial and eco-friendly bamboo. All of the drawers have a slow closing mechanism to prevent them from slamming shut and have push locks to keep the drawers and cabinets from opening while I’m driving.
In my experience with both of my Outside Vans, cabinetry is one of Outside Van’s strong suits. The cabinets were incredibly durable and able to withstand some pretty rocky roads without showing any signs of damage.
To keep this driver’s side galley organized, I purchased these custom drawer inserts from Inhabit Design Works in Portland that come with two mugs, four plates, four bowls, a Japanese knife set, salt and pepper, and some open space for addition cooking tools.
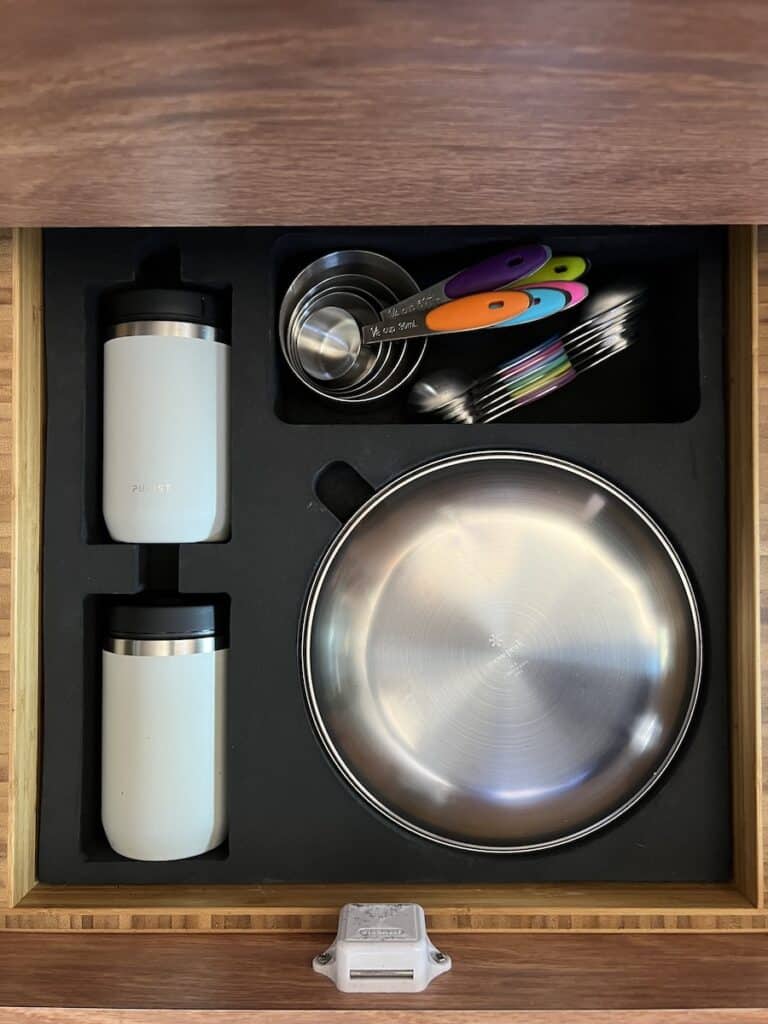
Custom Galley
I chose to have the custom galley come out into the slider door to maximize the use of space in the van. I loved being able to look out the slider door while doing dishes, but this definitely contributed to the cramped feeling inside the living area.
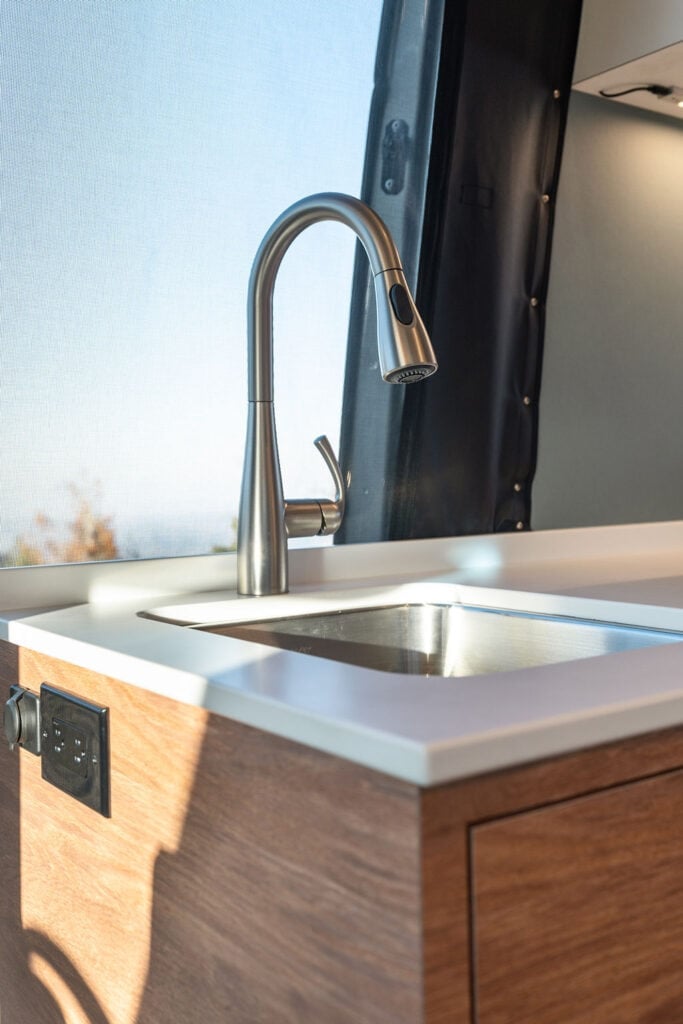
The white galley countertop is made of a material called Corian in the glacier white color. Corian is a durable material that can withstand normal wear and tear, although I did notice some small scratches develop over time. The Corian was also very easy to clean, and I loved the modern look it gave the van.
Need inspiration for your own van kitchen? Check out these creative van cooking spaces.
Induction Stove
The one burner induction stove in this van conversion is the True Induction single burner stove which requires 1800 watts to operate at maximum temperature.
Having a one-burner induction makes it very convenient to prepare simple meals and boil water without having to set up our propane and two burner gas stove outside, which we still cook on for more complex meals.
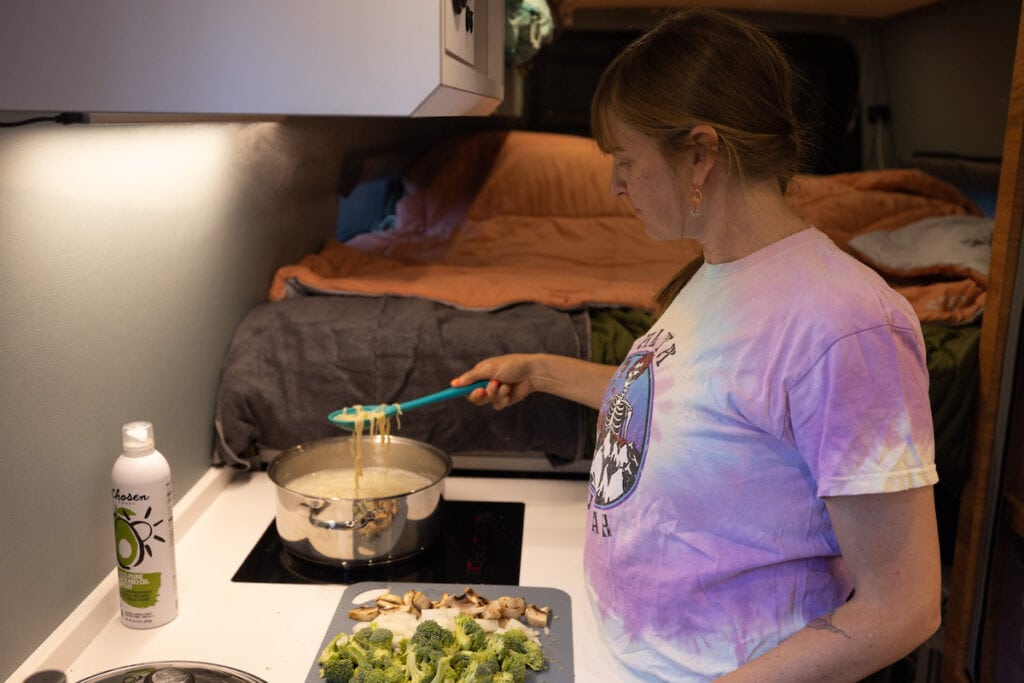
While you do need a robust battery bank and inverter to run an induction stove, they have a lot of benefits. The True Induction stove in my Sprinter Van heats up and cools down fast, so you aren’t likely to burn yourself. Induction stoves are also easy to clean and safer since you aren’t combusting gas inside the van.
One other thing Outside Van did is made the induction stove completely flush with the countertop, so when the stove isn’t on, it basically serves as normal counter space for chopping, etc. The induction stove is also especially useful for van life in winter or when we are stealth camping.
Refrigerator
The fridge in my Sprinter conversion is the Isotherm 4.6 cubic foot Cruise Elegance 130. While it takes a bit of Tetris, we could fit about a week’s worth of food in the fridge.
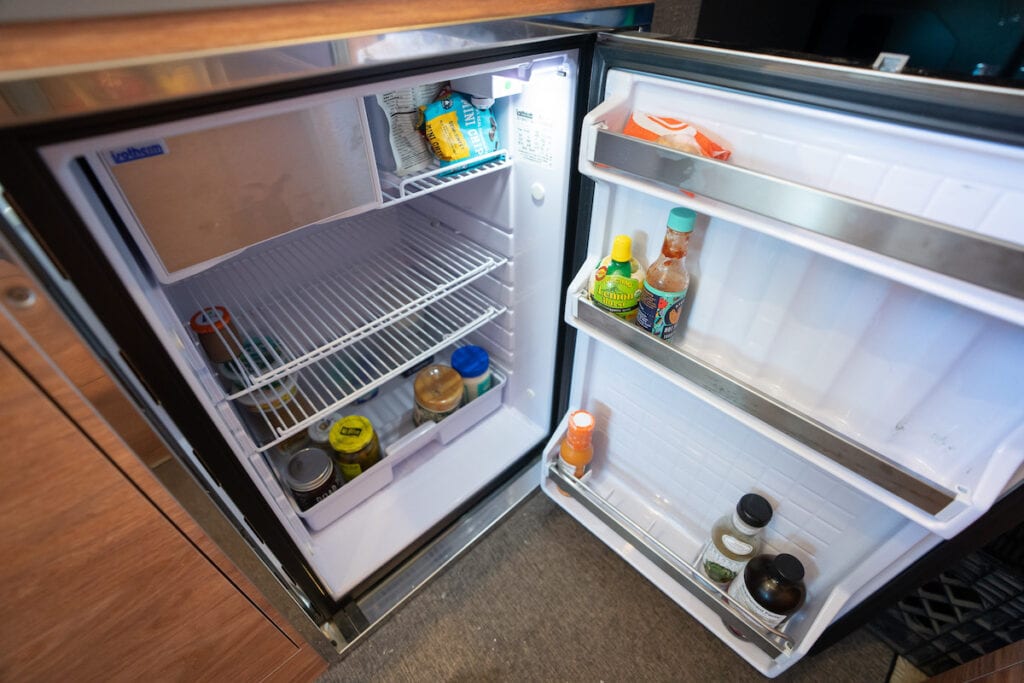
I do have two complaints about the fridge though. First is that after about 6 weeks, the freezer starts to ice up and the entire fridge has to be turned off and defrosted. This is a pain when you are traveling without access to a real refrigerator where you can store your food during this defrosting process.
The second issue is that produce seems to go bad a lot more quickly than it does at home. I think that’s because the fridge gets packed so tight that there isn’t much air circulation.
Check out my comparison of upright fridges vs top loading chest style refrigerators.
Sink
For the sink, we have a nice pull-down faucet and a large, round stainless steel under-mount sink. I wanted a sink large enough that would make doing dishes very easy. Outside Van also created a cover that sits flush with the sink and creates a flat surface for additional prep space.
Trash Can Compartment
When many people are converting their Sprinter Van, trash storage is an afterthought. In my first Sprinter, I thought, “I’ll just hang a bag somewhere off a hook.” Well, once I realized that (1) it allowed smells to permeate the van, (2) it wasn’t dog-proof, and (3) it was ugly to look at.
So I decided having a dedicated place for trash cans was essential.
I had Outside Van build an enclosed trash can compartment that was customized for two tall kitchen trash cans – one for garbage and another for recycling.
Having it all behind a closed door keeps the smells more contained and it also prevents the dogs from sniffing around and getting into trouble when they are left alone. I hindsight, this was a lot of space to allocate to trash, and I would have created a smaller cabinet for this purpose. On the plus side, it meant we could go a long time before we needed to find a dumpster.

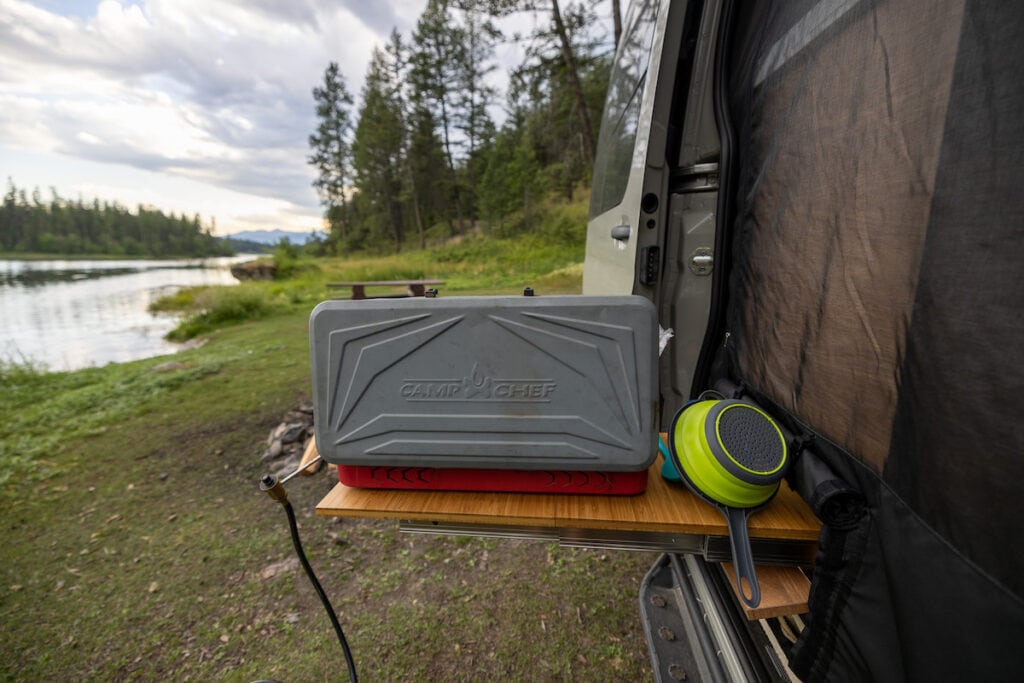
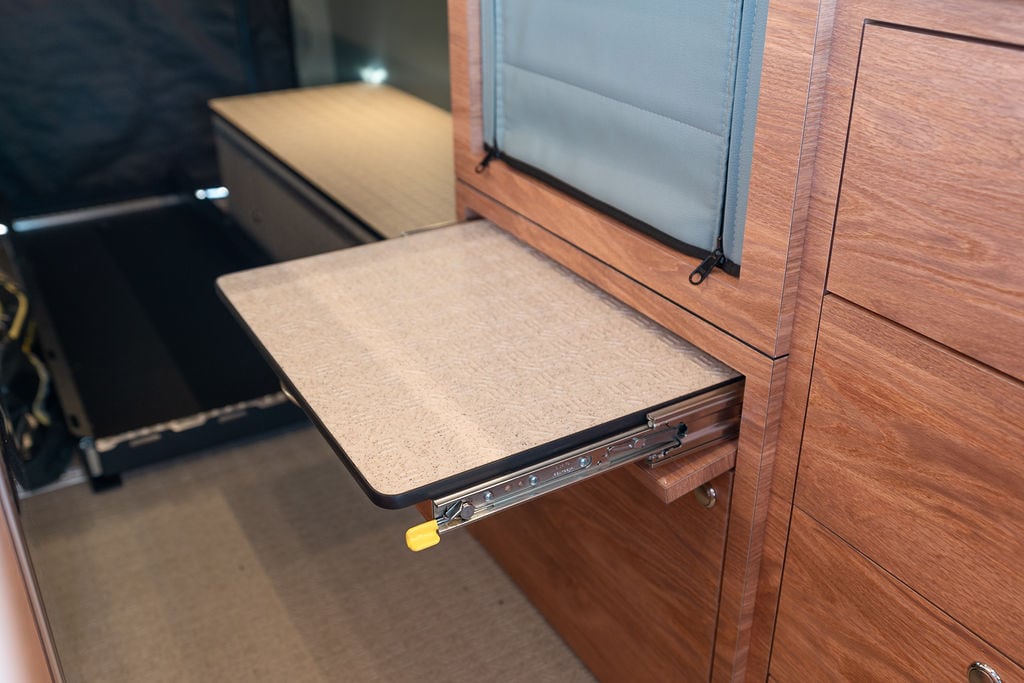
Slide Out Outdoor Cooking Table
On the outside of the galley, we had a slide out cooking table for outdoor cooking. This allows us to leave our portable camp cooking table at home.
We used this table a lot. It was even nice for putting out snacks after a long hike.
Driver’s Side Galley
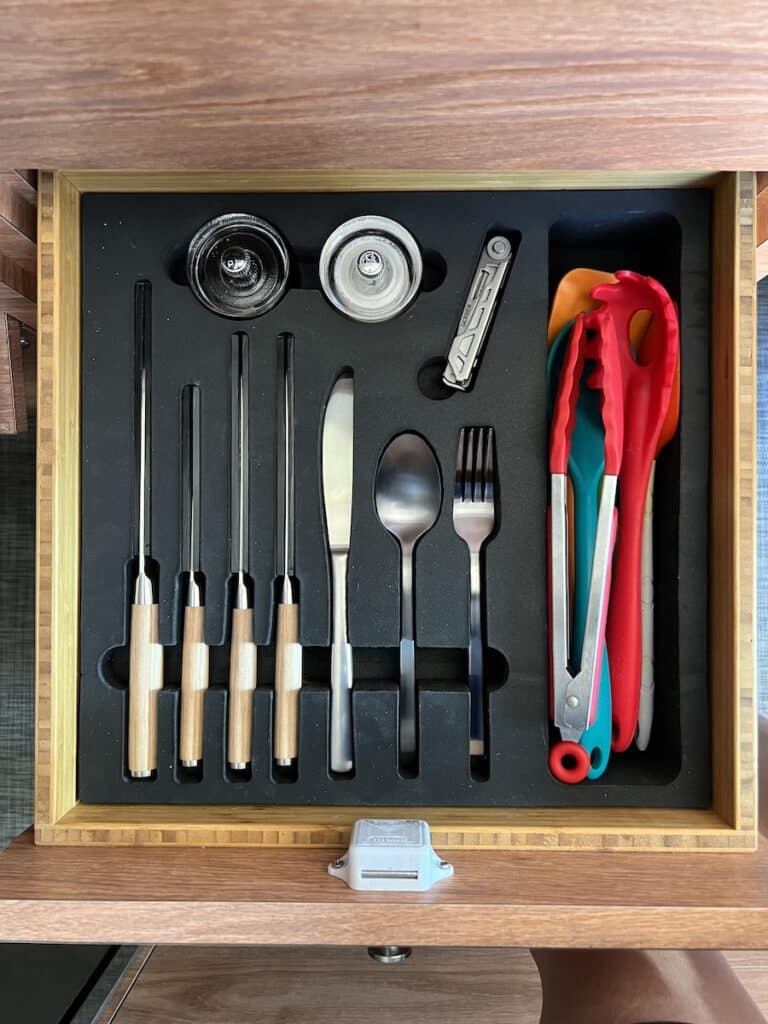
On the driver’s side of the van behind the captain’s chair, there is a smaller cabinet with four drawers. This is where we store our cooking utensils, spices, and tupperware, and there is also a junk drawer for random items (another essential in my opinion). This area is nice not only because of the additional storage, but it also provides extra counter space.
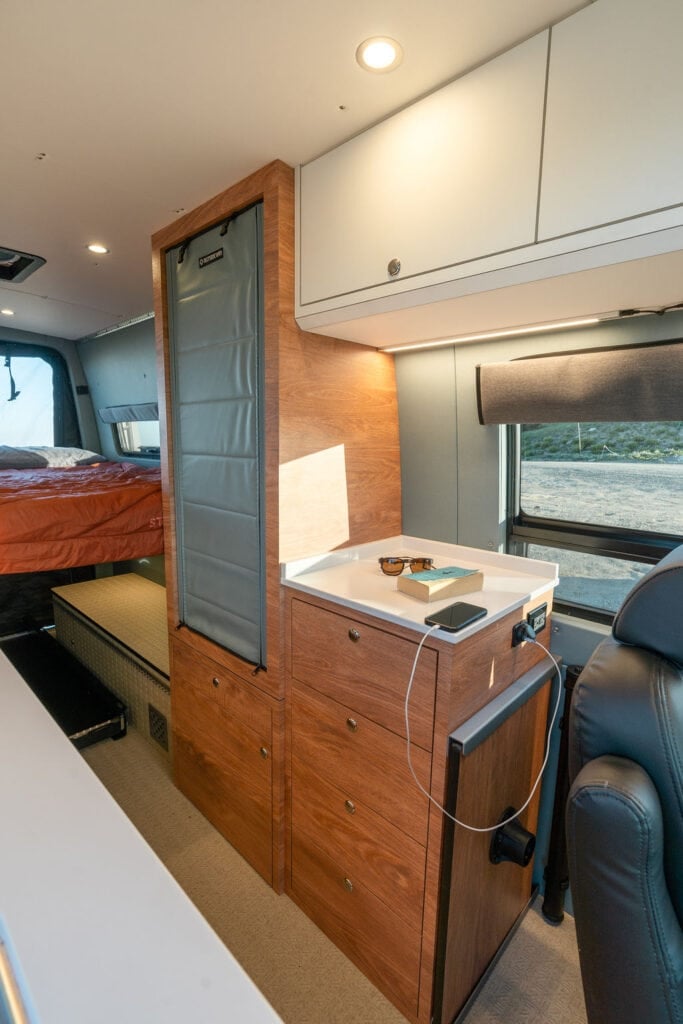
You’ll also notice in the above photo that the table top and leg are stored on the front side of this driver’s side galley, which gives the table a home and keeps it out of the way when it’s stowed. The table smoothly slides in and out and is very secure when we drive.
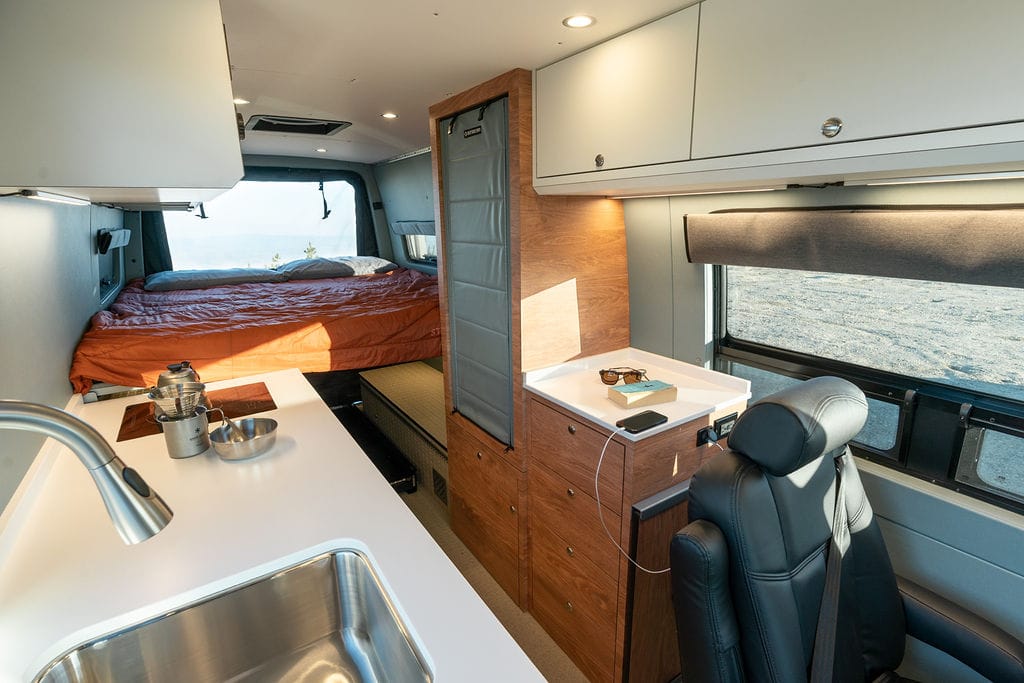
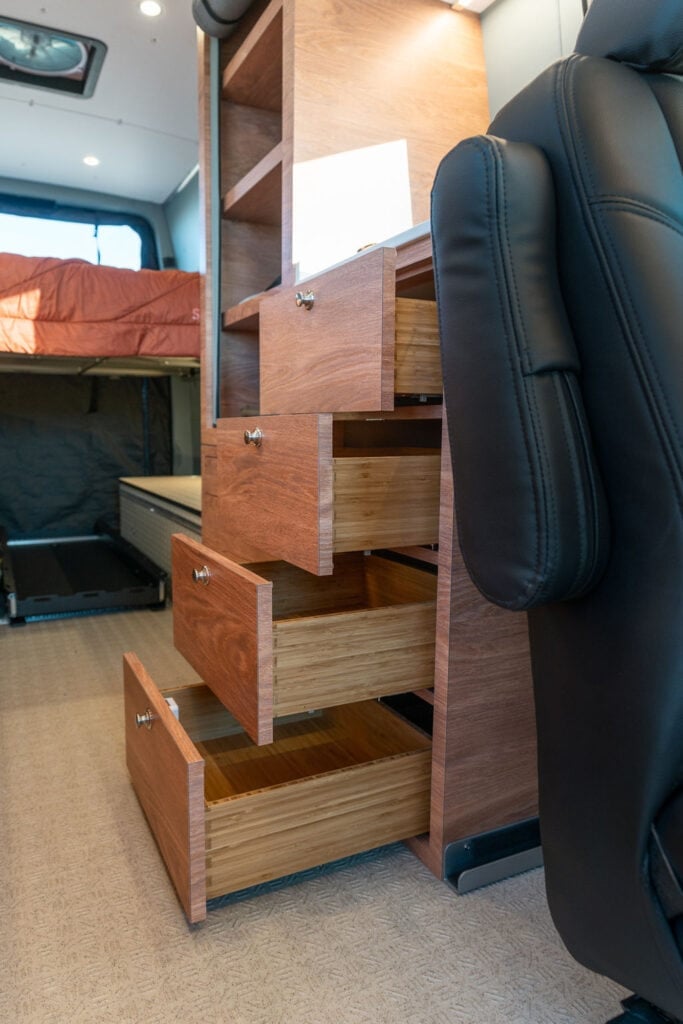
Custom Floor to Ceiling Closet
Moving further back in the van, we have a floor to ceiling closet. This isn’t for clothes, although you could store folded clothes in here if you wanted. Instead we are using this space for food, smaller items, work stuff, and some of our cooking appliances like our blender.
I measured the dimensions of each shelf, and then I went to the Container Store and found some lightweight bins that would help keep this space organized. The handle on the bins make it easy to pull them out and get what we need, and each shelf has a lip that prevents the bins from sliding around.
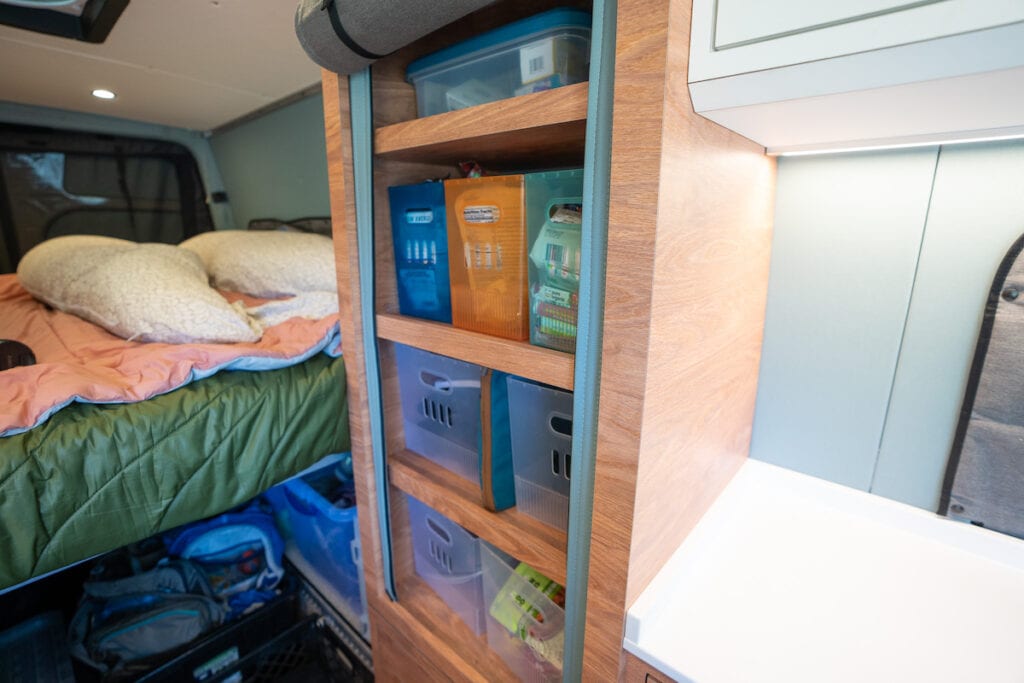
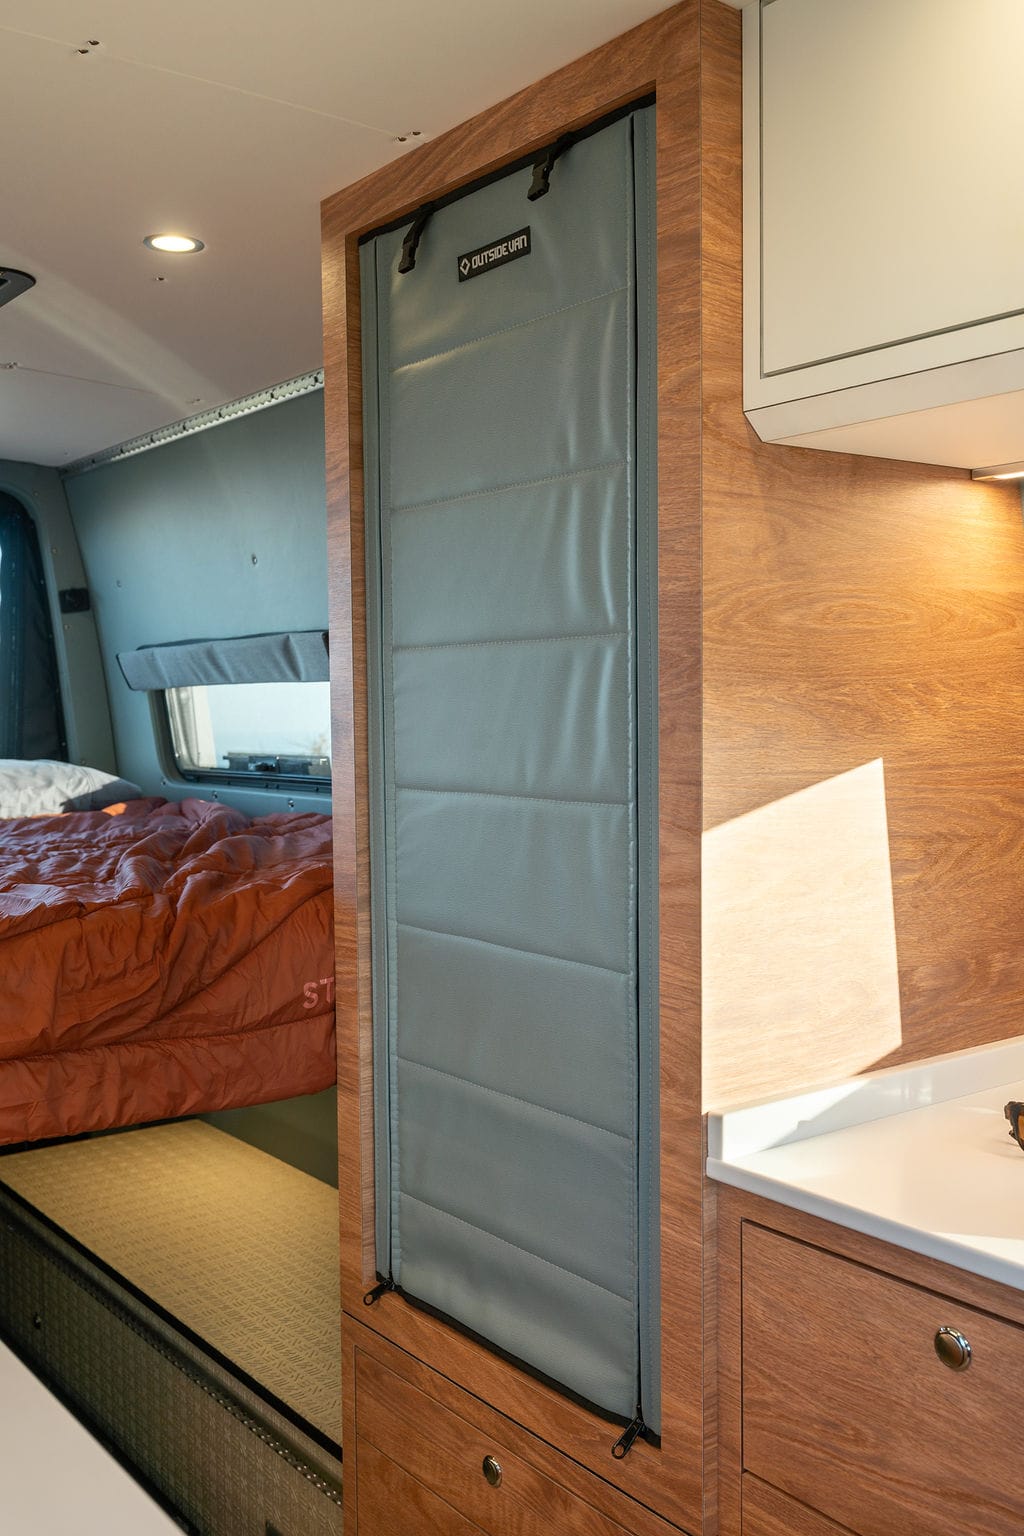
The door of the closet is made of Sileather. It’s soft and it zips and rolls up, clipping at the top. I chose a roll up door instead of a door that swings open for two reasons.
First, this roll up door is lighter-weight than a door made out of wood, and it’s always good to cut weight wherever you can. Second, having it roll up means I can access the inside of the closet from the bed or from the front of the van anytime. A swing out door would have only allowed access to the closet from one side.
This is the first closet of its kind that Outside Van had built, and it may be one of my favorite features of my van conversion.
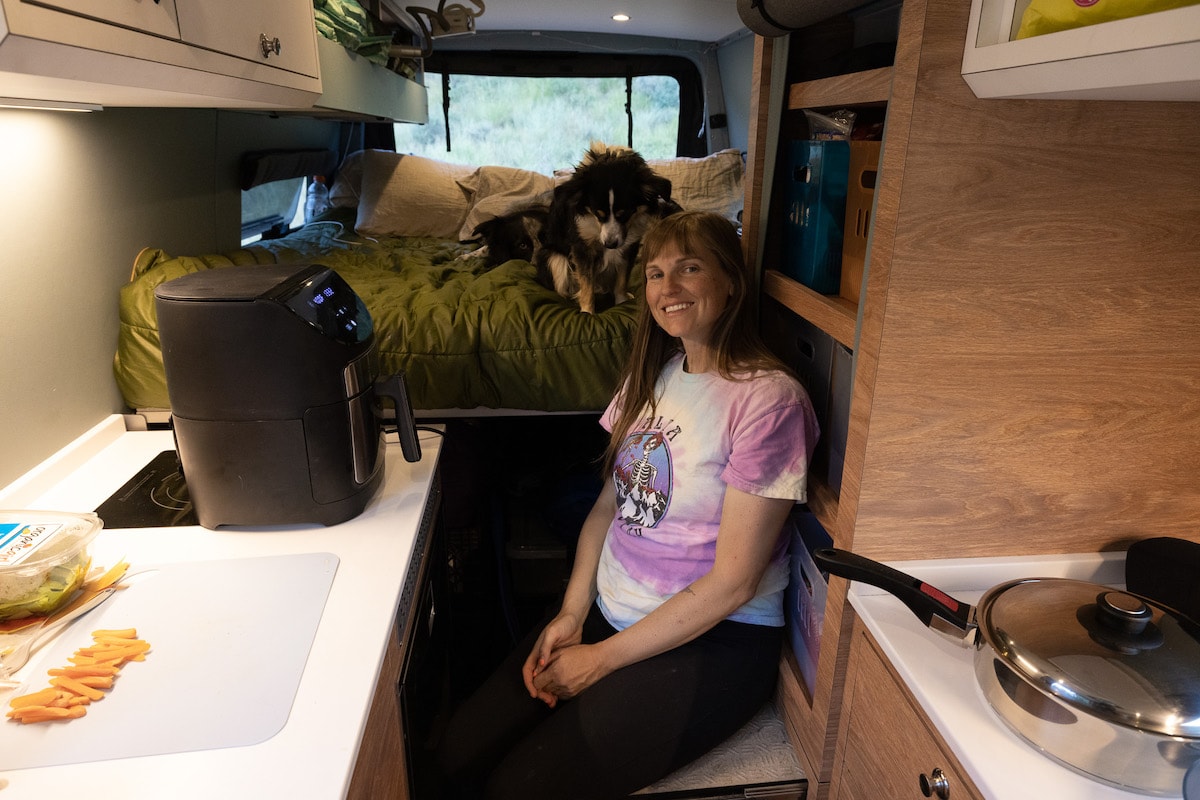
When I was designing this van, I wondered how we (and our dogs) could easily get up onto the bed. Outside Van came up with this genius idea to have a pull-out step directly below the closet. This step is the perfect height for climbing in and out of the bed and also serves as an extra seat that has come in handier than we expected when cooking or putting on our shoes. The step has a load rating capacity of 300 pounds, and we leave it out when we are driving since Charlie likes to ride in the bed.
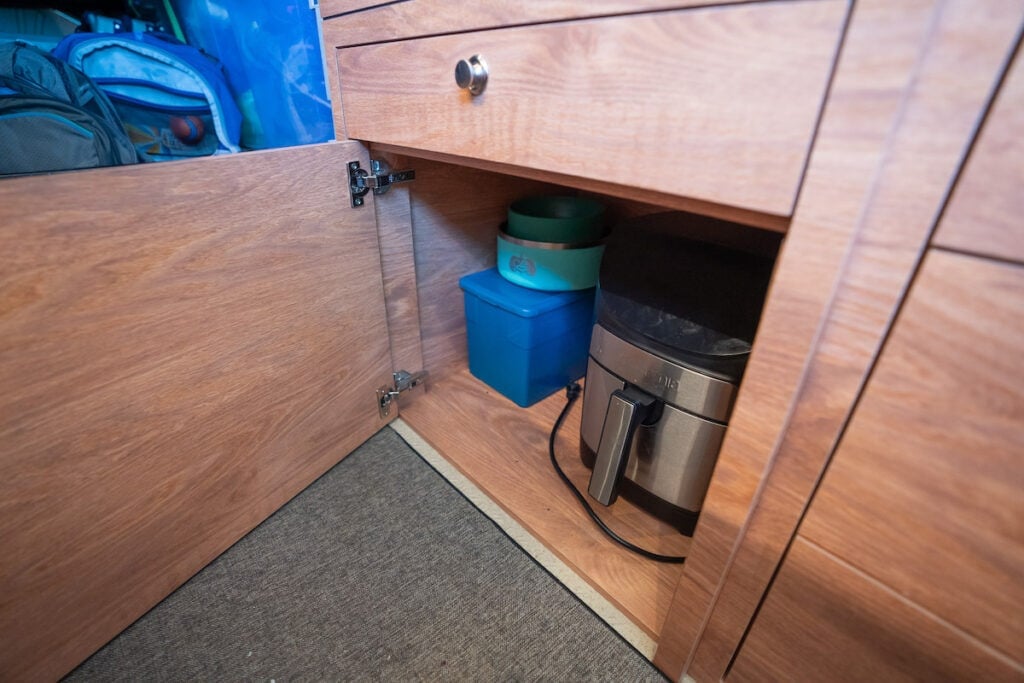
Below the step is a large open cabinet. We designed this cabinet to be big enough for a portable toilet if we decided to have one (check out the best campervan toilet options here).
After much debate, we decided to stick to our old system of using pee jars and a wag bag toilet, so instead we use this area to store our dog food and our air fryer. And yes, we bring our air-fryer – it requires 1500 watts at the highest temps, and we can bake, make toast, cook tofu, and more with it.
Overhead Cabinets
On both sides of the van, there were overhead cabinets. On the driver’s side, we had one above our galley where we store cooking ingredients, oils, soap, and more. We like to keep stuff up here in a lazy susan for easy access.
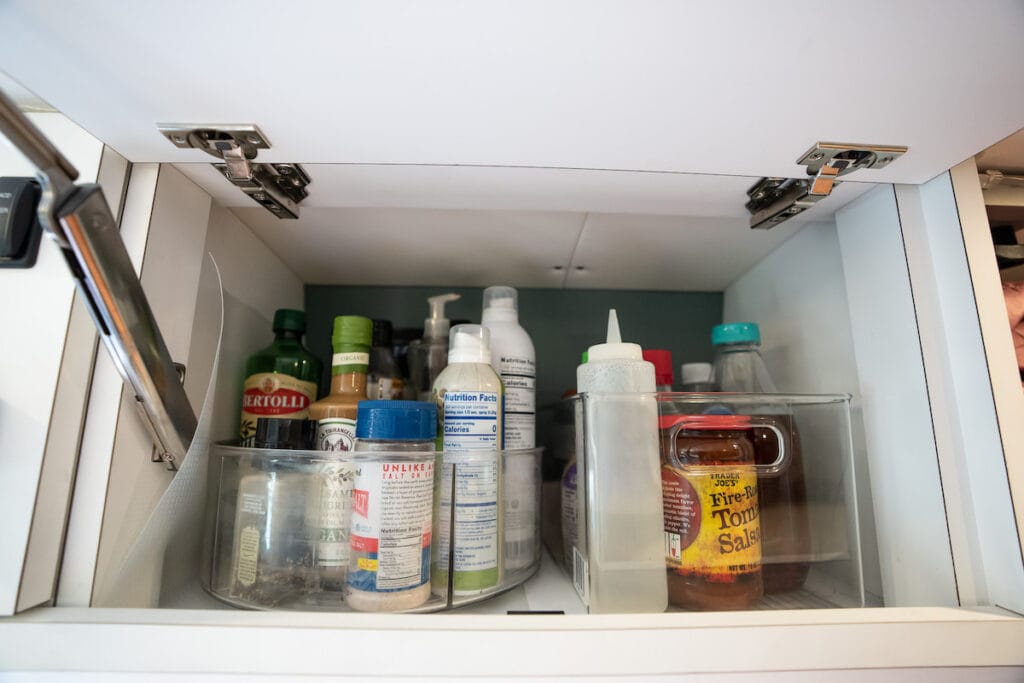
On the driver’s side above the third passenger seat we have a long overhead cabinet. This is where we store our dinnerware, coffee and morning beverages, paper towels, and toiletries.
Three-Panel Bed
Next, at the rear of the van was Outside Van’s standard three-panel aluminum platform bed that goes all the way to the back doors with Outside Van’s exoskeleton cabinet for clothing storage. The bed was a queen-sized bed. While we never once removed the bed, the bed panels could also be removed we needed to use the back of the van for something.
I chose a custom 4″ latex mattress which was a pricey upgrade. Unfortunately, I didn’t find it comfortable and thought Outside Van should have offered something much better for the price point. It was one of the things I regretted most in the van. In order to make it more plush, we added a 3″ latex topper and lost 3″ of headspace in the process.
My comforter is the Original Puffy Blanket by Rumpl. It’s a great option for pet owners because it’s machine washable and dog hair doesn’t cling to it.
Exoskeleton Cabinet Clothing Storage
On the passenger side of the van, I have what Outside Van calls an exoskeleton cabinet which is open with no cabinet face. This style of cabinet is stuffable, removable, modular, and more lightweight than traditional cabinets. We use this exoskeleton cabinet to store packing cubes containing all of our clothes.
We each have one packing cube for pants, one for shirts, one for underwear, and one for socks. Check out my full van life clothing packing checklist.
The open-style cabinet has its pros and cons. I like that it’s easy to stuff a jacket in there or quickly grab something. At the same time, unless you are super diligent about putting your clothes away in your packing cubes, it can quickly look messy and unorganized, which was always the case for us.
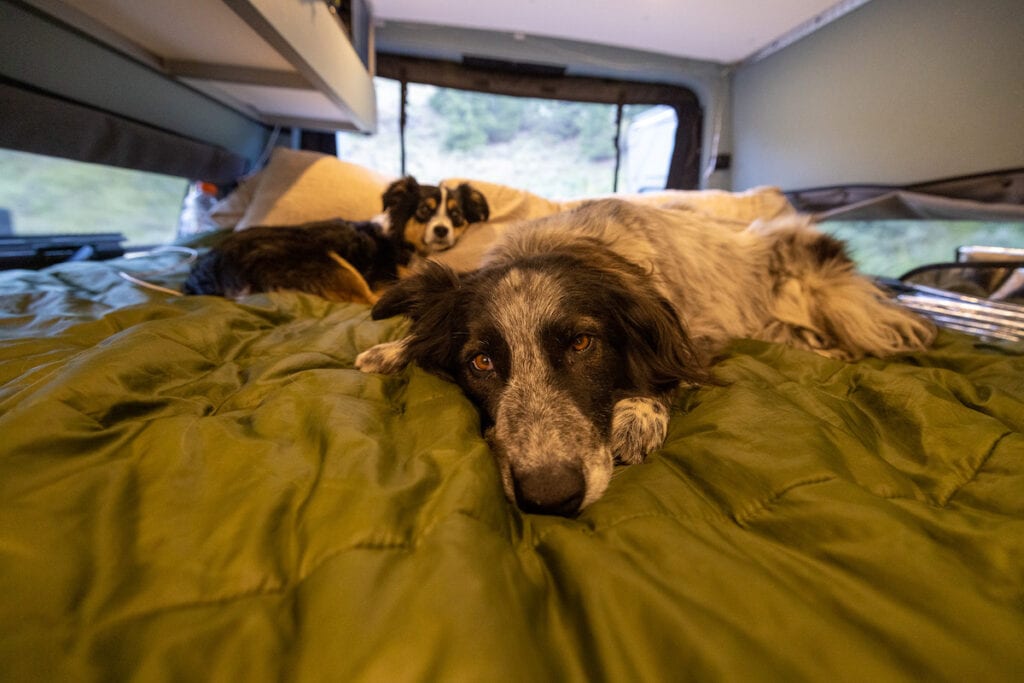
This cabinet hung over Ryan’s side of the bed, and our dog Charlie generally slept underneath it.
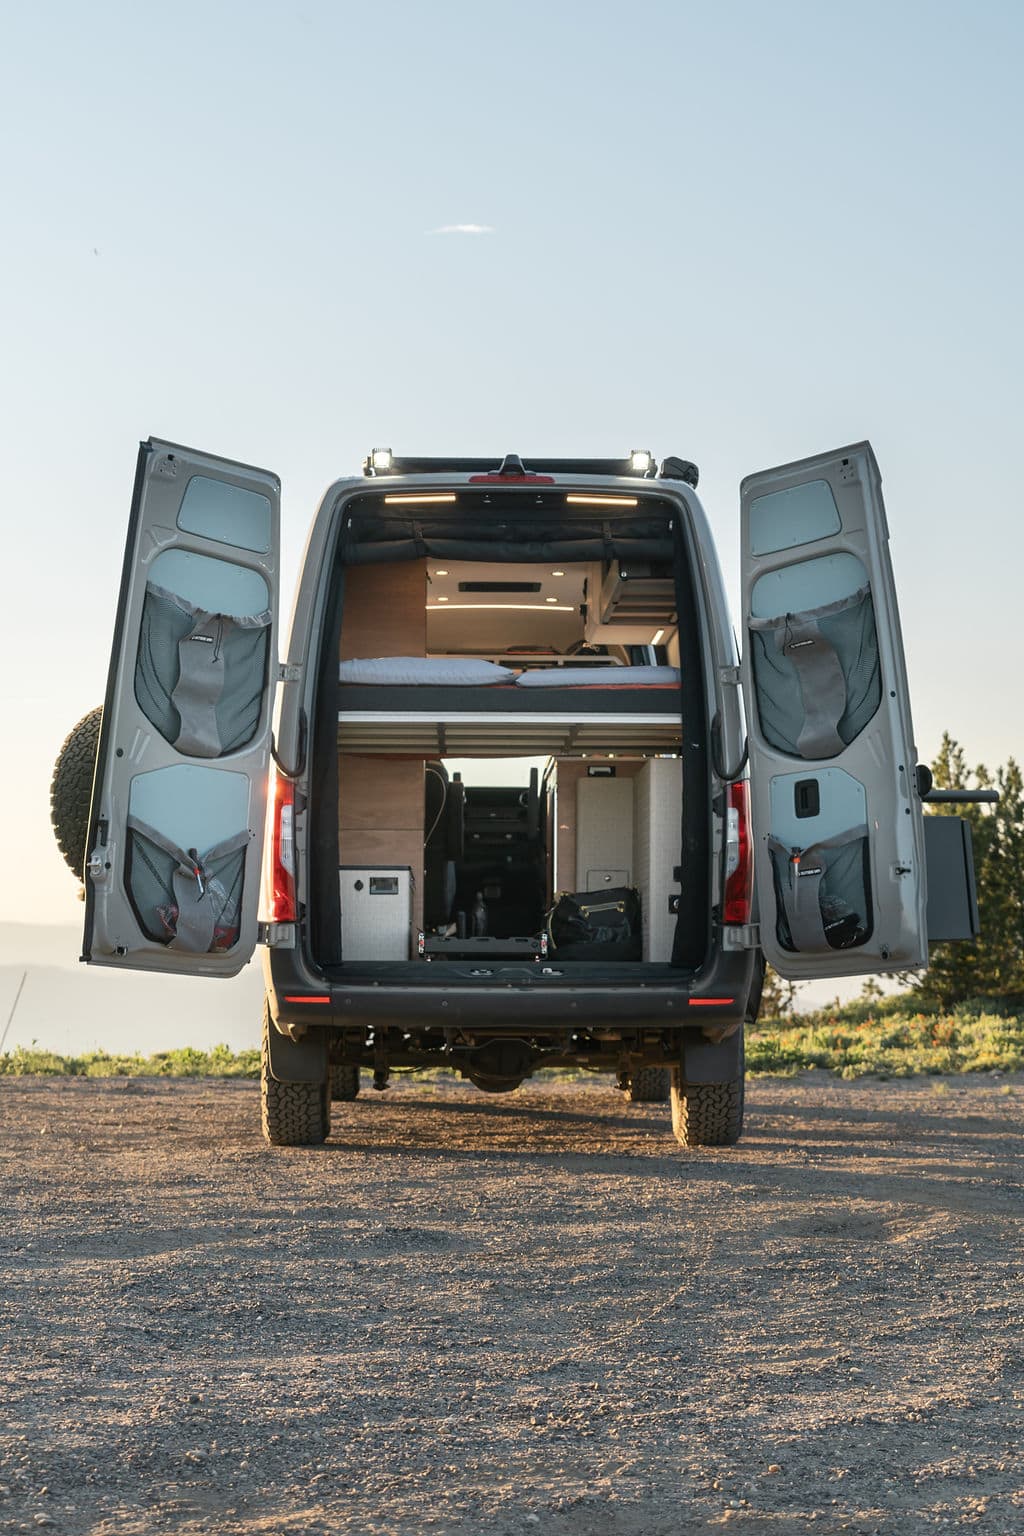
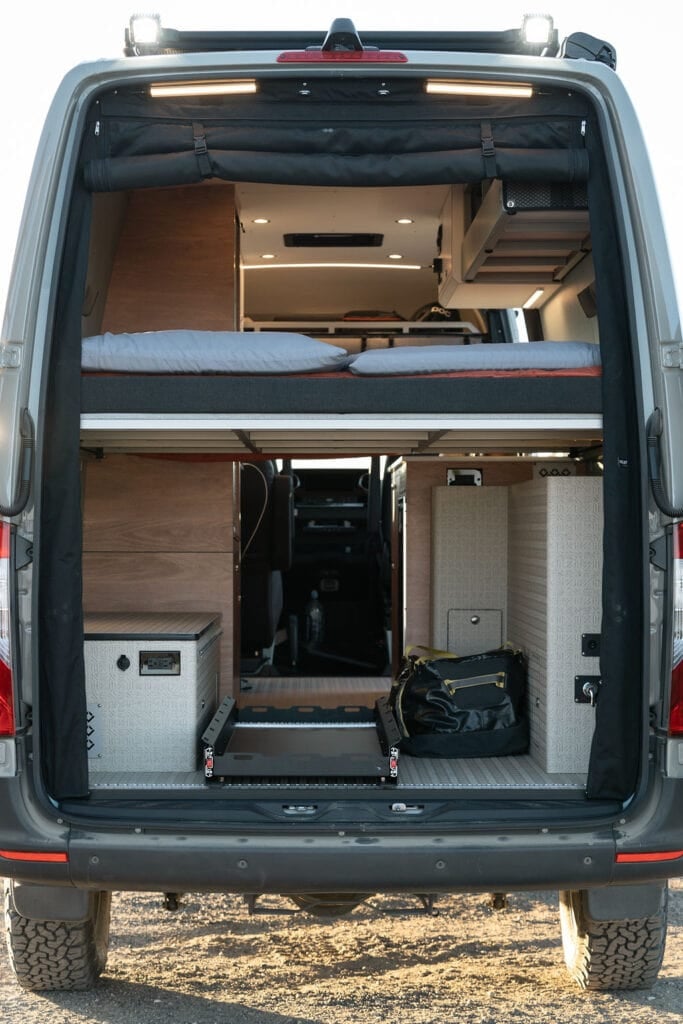
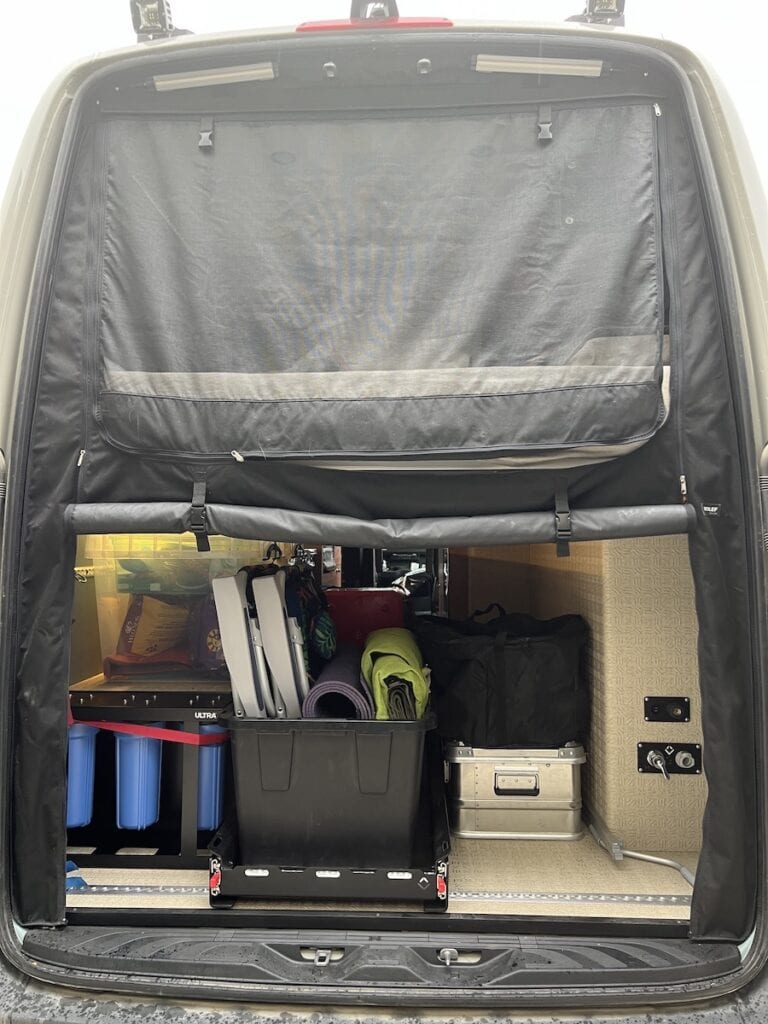
The Garage
Underneath the bed is a ton of storage in the area called the van garage. Just like I did for the closet, I measured this space carefully and then went to the Container Store and got lightweight bins that fit perfectly in the area. I like storing stuff in bins because they are easy to pull out and swap out what’s in them based on the season and the specific gear we need. The bins also don’t add a lot of extra weight to the van like a robust drawer system would.
Our garage had room for all of our camping and outdoor gear, shoes, extra dog and people food, Starlink, and other miscellaneous gear, with lots of room to spare.
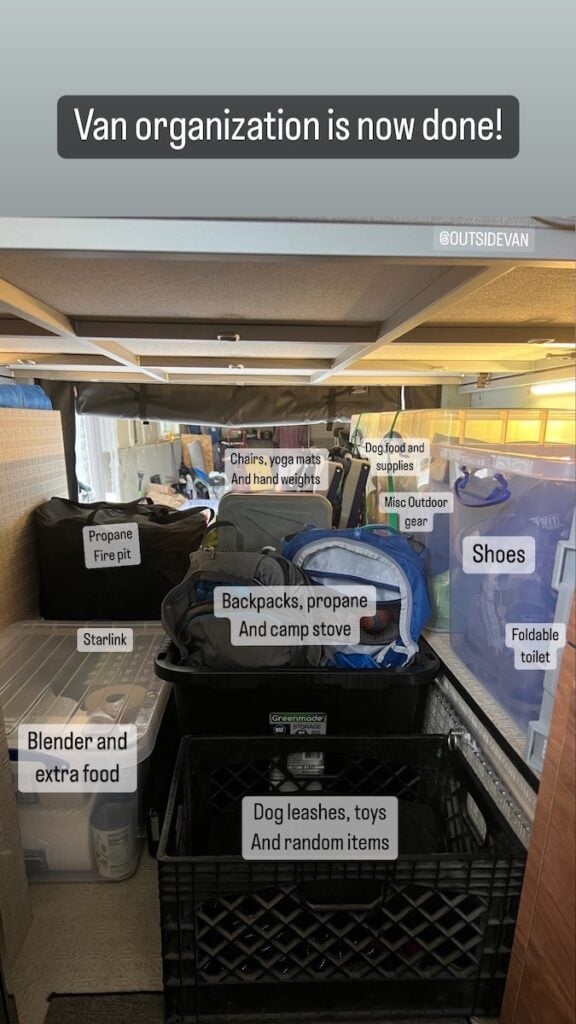
Outside Van also built a custom slide-out gear tray that could we can use for more bins, additional gear, or mountain bikes. The gear slider made it so much easier to load all of this stuff into the back of the van. It also allowed for easier access to gear bins without having to crawl around under the bed.
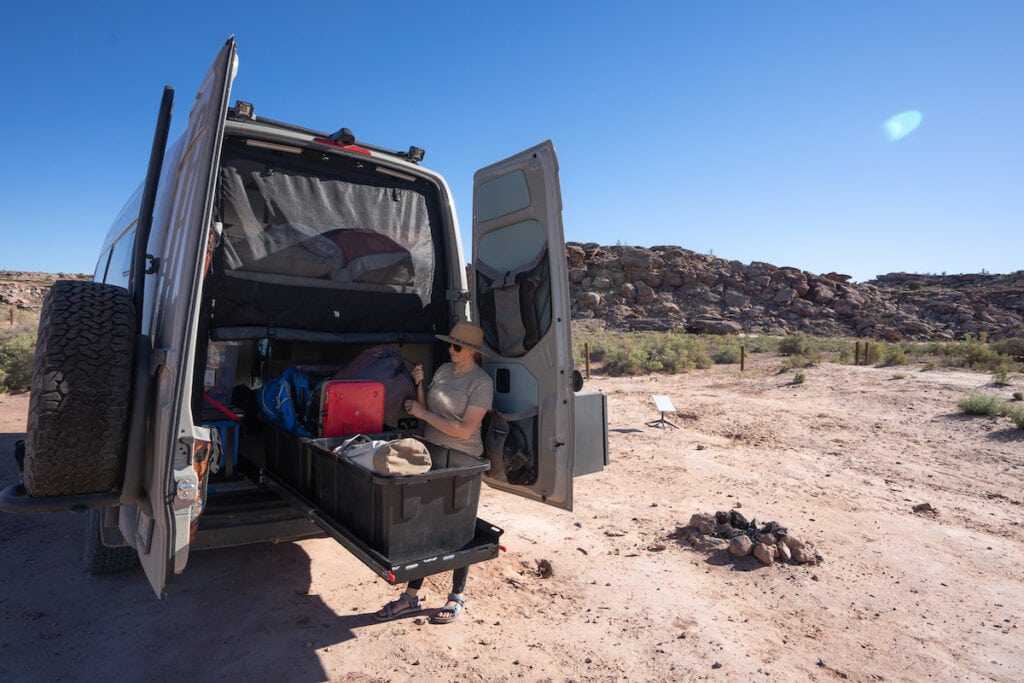
Everything got secured in the garage using Mac’s Versatile Tie Down System – basically a version of L-Track. Using Mac’s tie-down rings, we cinch all of our bins up using straps or bungees so nothing moves while we are driving. For bikes, we could use a fork mount to secure them to the gear slider.
We could access the garage via the back doors or from the inside of the van which was a necessity for me. I didn’t want to have to go outside to the back of the van every time I needed to access something under the bed.
Our electrical system (driver’s left side cabinet) and plumbing (passenger right side cabinet) were also under the bed.
Electrical System
In my very first van, I was always worried about power. I didn’t have enough battery storage or solar, and it was super stressful. This taught me that it’s better to overestimate your power needs, which is what I’ve done ever since.
Lithionics Battery System
In this Sprinter Van conversion, we had two 315 Ah Lithionics lithium batteries, for a total of 630 Ah bank. The battery capacity was easy to monitor with a screen right above our galley that told us how full it was.
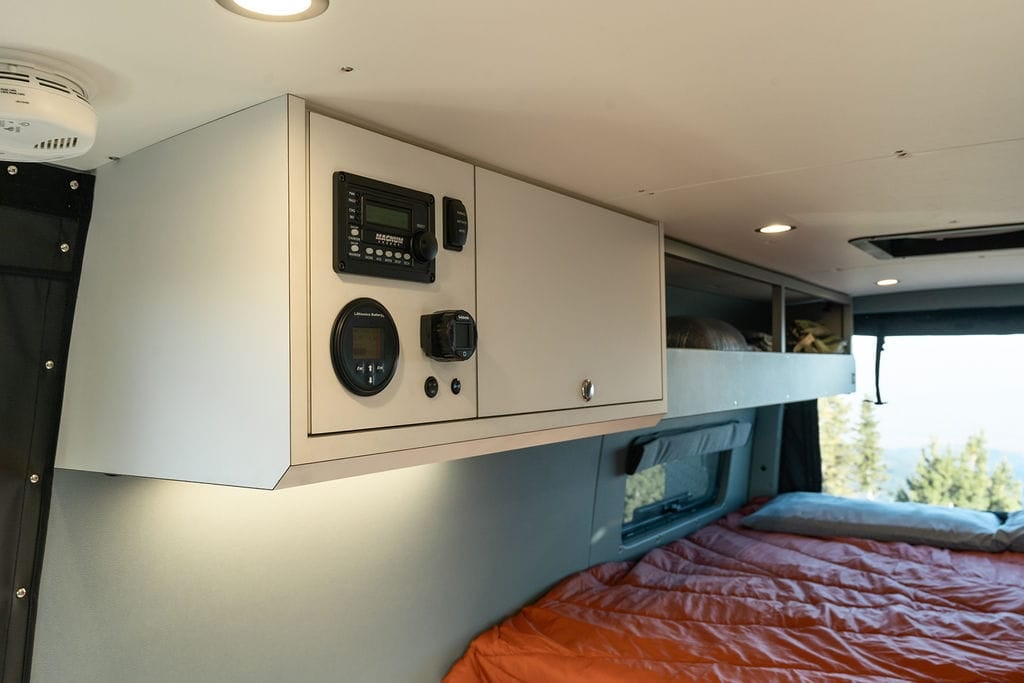
With lithium batteries, you can use 90% of the battery capacity before you need to charge them (unlike AGM where you can only use 50% before you risk damaging the batteries).
To prevent damage, each Lithionics battery has a safety mechanism built into it. Once the batteries were depleted to the 10% mark, the system would shut off as a reminder that the batteries need to be charged. And giving the batteries some juice was as simple as turning on the ignition in the van since the batteries could be charged by the secondary alternator.
The Lithionics batteries also had an internal heating blanket that automatically turns on if the temperature of the batteries ever drops below 34°.
This power system was one of the best parts of the van. Our batteries rarely dropped below 75% capacity which meant we never had to worry about running out of power.
Secondary Alternator
In this van, I decided to install a secondary 280XP Alternator Kit with a Wakespeed Regulator. This secondary alternator is dedicated to charging the house batteries, which begins as soon as the vehicle engine is turned on. It charges the batteries extremely fast.
In my experience so far, this method of charging could add 10% charge for every 20 minutes of driving, so we almost always arrived to our campsite with our batteries completely full.
Solar Panels
On the roof, I had 310 watts of solar panels made by Zamp Solar – two 90-watt panels and one 130-watt panel.
Due to the increased capacity of my batteries and the efficiency of the secondary alternator, I was able to get away with less solar and gain back some roof space. The main purpose of the solar was to keep my batteries topped off if we are parked for several days.
Roof Rack
My solar setup on the roof is secured to a custom-made Outside Van roof rack. The rack is very low profile, so you can barely see it from the ground, and it has a walkway down the center of the van that I use to hang out or access the solar panels for cleaning. It works out great as a platform for taking photos too.
Another neat feature of the roof rack is it has four rows of Mac Track which makes it very easy to secure gear to the roof of our van.
Inverter
The final piece of our van’s electrical system is the inverter. This van has a 2000 watt Magnum Pure-Sine Inverter which converts power from the batteries to AC power, which is required to run the induction stove and other things that plug into the 110 outlets.
There was 6 USB outlets and 6 regular 110 outlets, including two 110 outlets in the garage that we use to charge our e-bikes. They are located all throughout the van so charging was always convenient.

Temperature Control
The temperature in our Sprinter Van is controlled with two ceiling vans, window vents, and a diesel-run heater. Perhaps another mistake, but I opted against a rear AC in my Sprinter Van conversion because this would have required an even bigger battery bank for camping off the grid.
Outside Van did do a few things though to keep the interior of the van comfortable, even on hot sunny days. I share some additional tips for keeping your van cool without AC here.
Vented Windows
First, all of the windows in the van conversion opened up to allow for better airflow.
Ceiling Fans
The van had two Maxx Fans – one above the galley and one above the bed – and these created effective airflow in the van. We typically had one pulling air in and the other pushing air out.
Insulating Window Shades
All of the window shades in my Sprinter van conversion were made of a Sunbrella material with a layer of closed cell foam in the middle. This helped insulate the van from the heat in the summer and prevented warm air from escaping through the windows in the winter.
The shades were very simple to put up and take down via the snap buttons and most of the time, we drove with the shades down in order to keep the sun out.
I also had a full set of window coverings for the front windows. We used these every evening for privacy and to block out the morning sun.
To help regulate the temperature when we are out on hikes or away from the van during the day, we used this insulated soft wall curtain that separates the cab from the living area. This soft wall is extremely effective at keeping the heat in the cab from entering the back of the van.
Heater
My Sprinter Van utilized a diesel heater to heat the air in the van. This produced a significant amount of heat in as little as 6-8 minutes.
It also has a timer mode that allows you to set a day, time, and duration for the heater to run, even when you are not there. On a ski day, this allows you to go out and return to a warm van without having to heat it the whole time you are gone from the van.
Plumbing System
All of the plumbing was contained inside the van, rather than having tanks and pipes running on the outside. That way the system is more insulated for four-season use.
Water Tanks
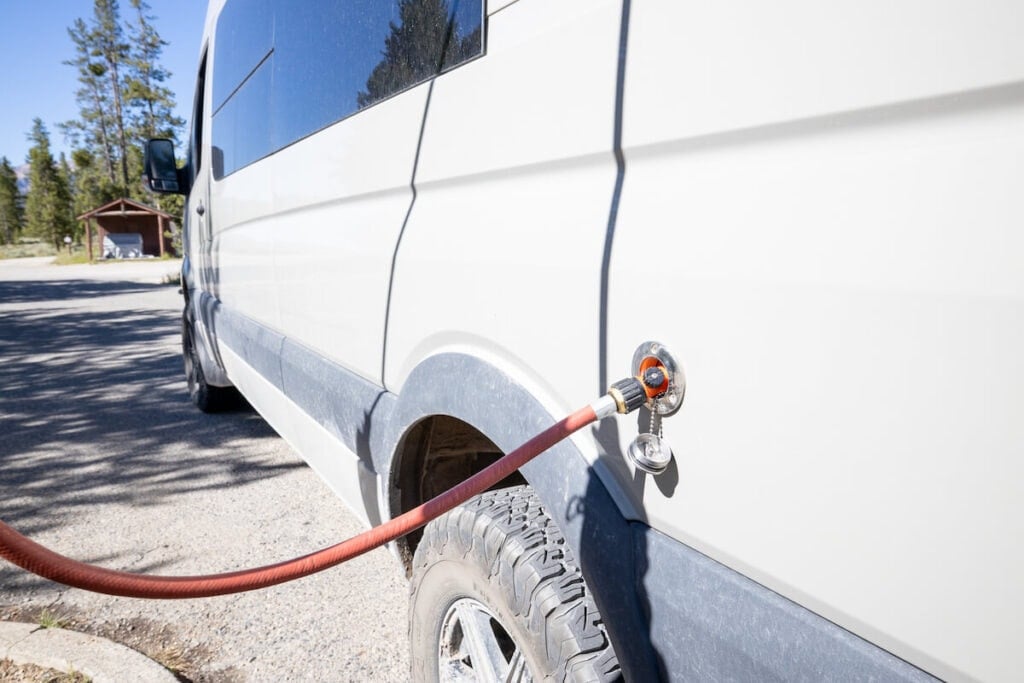
I had a 25-gallon water tank inside a driver’s side cabinet in the garage which lasted us between 5-7 days (without using the outdoor shower).
To fill the tank, we simply ran a hose from the spigot to the van. When filling up, we used a three-stage Clearsource Ultra RV Water filter system to filter out viruses, bacteria, sediment, bad taste, and even heavy metals.
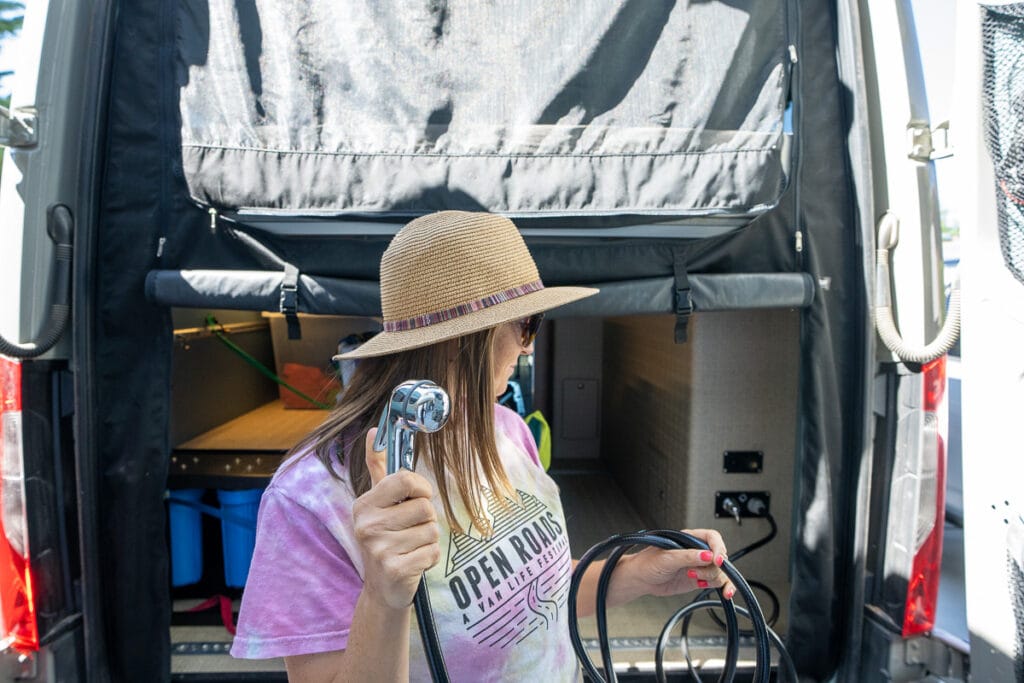
Water Heater and Outdoor Shower
In this van, I had the Rixen Espar Hydronic system to heat the hot water. The biggest perk was I had unlimited hot water available within 5 minutes of starting the unit.
Since we only had 25 gallons of fresh water, I opted against having an indoor shower in this van. I preferred to save my water supply for drinking, dishes and other uses so I could stay out in nature for longer periods of time.
We did have a hot water hookup for showering outdoors, but I never really used this again because we preferred to conserve as much as possible.
Collapsible Toilet
In my first Sprinter Van, I had a Thetford portable toilet. It did the trick, but I hated using it for #2 because dumping it was gross. Plus, finding a dump every 5 days to empty the toilet was a hassle.
In my second and third van, I ditched the casette toilet and instead relied on pee jars for #1 and this foldable Go Anywhere toilet that utilizes wag bags for #2 when a public toilet wasn’t available. The toilet folds up really small so it doesn’t take up as much room as a cassette or composting toilet. Once you’re done doing your business, the bag just goes in any outside trash can.
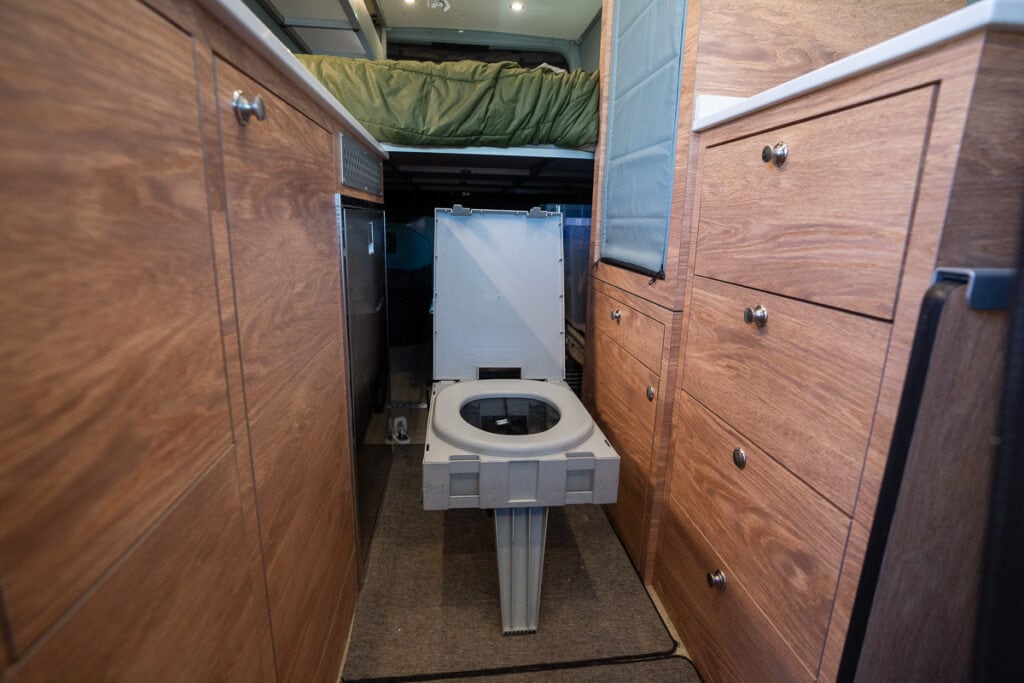
The bags do get pricey, and I’m not crazy about the plastic waste, but for the occasional use, it worked out great for us. The space we saved by not having a normal toilet was worth it to us at the time, and I enjoyed not having the toilet-related chores.
Read next: Compare the best toilet options for van life.
A note on toilets: When at dispersed campsites, I used to dig a hole and go poop outside according to Leave No Trace principles. However, as our public lands are becoming more crowded and over-used, I no longer feel that this is a responsible option for people who spend significant amounts of time on the road. That was a big factor in our decision to start carrying the Go Anywhere toilet that we have in our van.
Sprinter Van Floor
I’m convinced that there are very few flooring options that stay looking clean when you are living in and using your van conversion for outdoor adventures – especially if you have pets.
In this van, I chose a Lonseal vinyl product that has a little texture for grip, but no grooves that trap dirt. When it was clean, it looked fantastic, but with dogs it was nearly impossible to keep it looking nice.
As far as floor installation, the first thing Outside Van does when building their floors is to remove the factory floor. They then build a new floor out of marine grade plywood and adhere a layer of high-density vinyl to the top. This is slightly heavier than the factory floor, but it’s a little thicker and way more durable, so there’s no flex in the floor when you place heavy features on it.

Inhabit Designs Custom Floor Mats
After a year of traveling in this van and once again mostly hating the floors (just like my previous two vans), I decided to get a set of custom floor mats made by Inhabit Design Works. They are made of a woven vinyl called Chilewich, a material that was designed with the marine industry in mind.
After spending a few months in the van with these mats, I can say it’s one of the best upgrades I’ve ever made in any of my vans. I went to their shop in Portland and they measured the floor area in my van and a week later, I went back and they installed them. They fit the space perfectly.

These mats are removable, waterproof, and can be cleaned by hosing them down. We put them to the test one summer when our dog Charlie got sick all over the floor of our van. We removed the mats, sprayed them off with our outdoor shower, and left them out overnight to dry. When we put them back in the van the next day, the looked good as new.
Due to the color (fawn) and pattern, they cover dirt incredibly well, and I love how they create a soft cushion for underneath my feet.
Read next: A Guide to Floor Materials for your Van
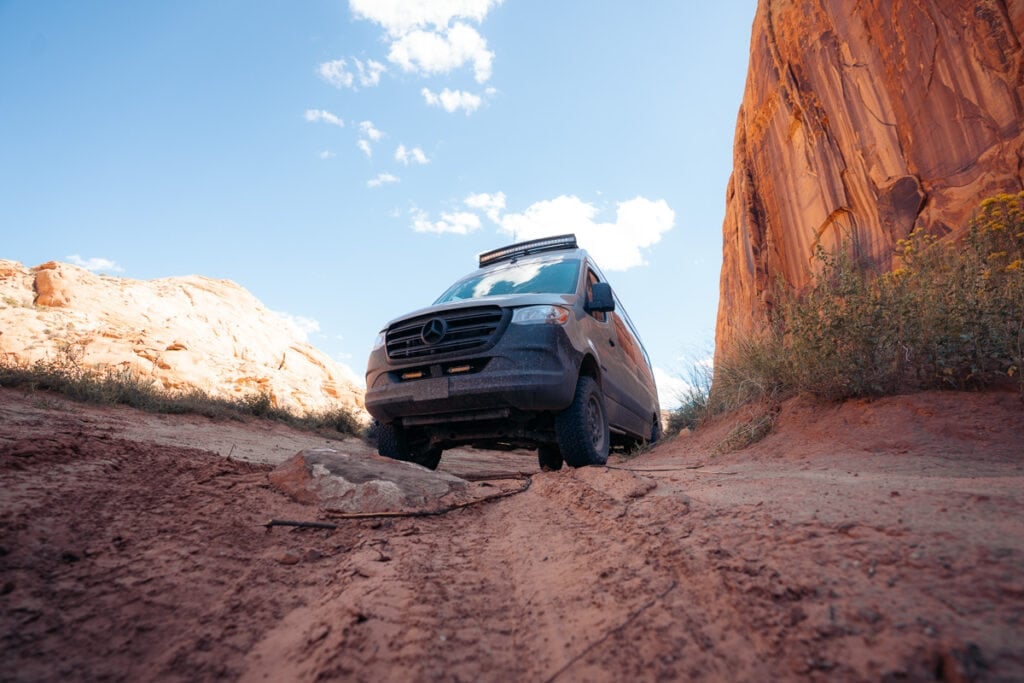
Tires and Suspension
We do a lot of off-roading in our Sprinter Van, so having an excellent all-terrain tire and upgraded suspension was essential.
Tires and Wheels
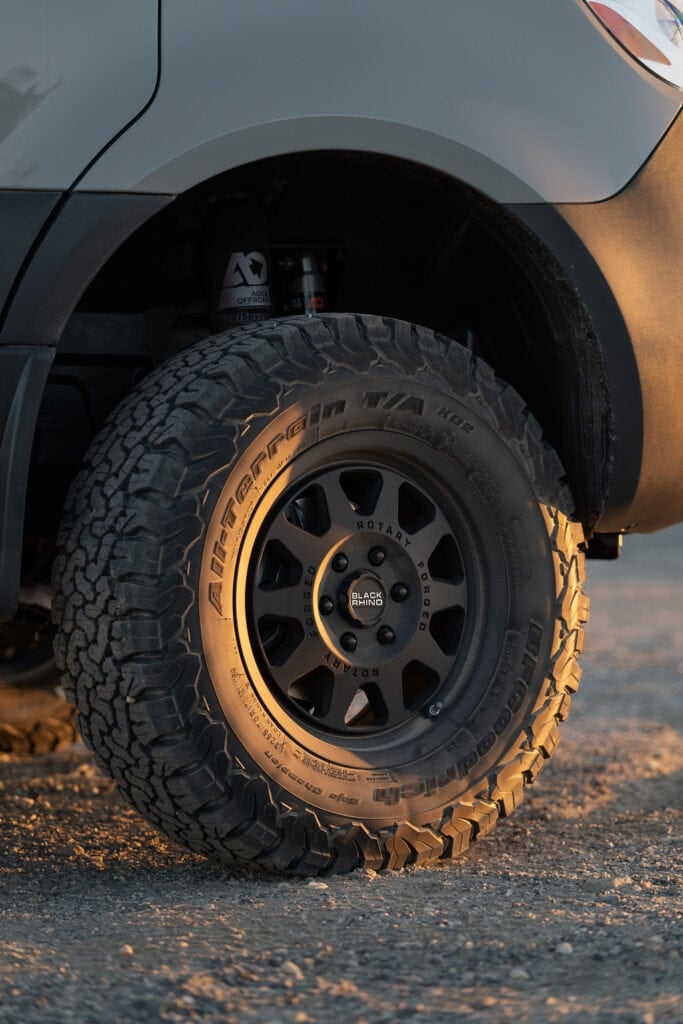
The tires are the BF Goodrich K02 265/70/R17. They perform well on rocky roads, snow, and even in muddy conditions (with the right driving skills).
The wheels are Black Rhino Stadium 17″ Wheels, which are one inch bigger than the stock wheels that the van comes with. I chose these specific wheels because they have a heavy duty load rating at 2,450 lbs/wheel.
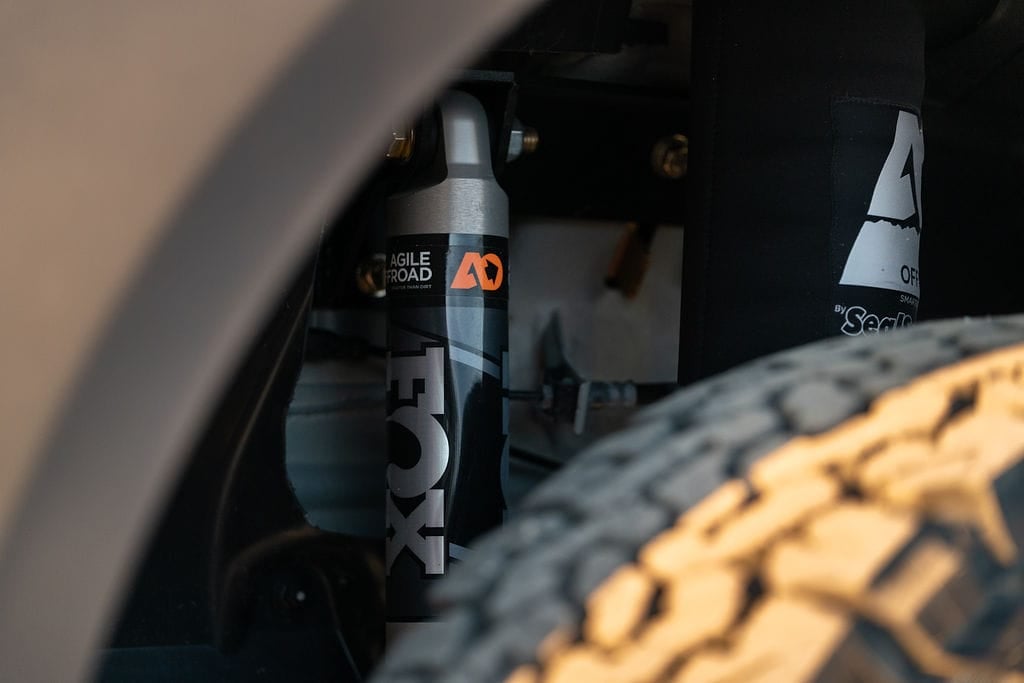
Agile Offroad RIP Kit Suspension Upgrade
The stock suspension that the Mercedes Sprinter Van comes with is not intended for going off-road or handling bumpy terrain. In bumps, windy conditions, or even pulling out of a driveway, a converted Sprinter Van with stock suspension has an unnerving amount of sway.
That’s why upgrading the suspension is one of the best things you can do if you want to improve the performance and overall feel of the ride. Upgrading the suspension is also important when you’ve added a lot of weight to the van.
I chose the Agile RIP Kit for the upgraded suspension package. In the front, a coil over spring was added to the factory McPherson strut, along with an upgraded Fox shock.
The RIP Kit greatly improved how the van handles weight as you shift around corners and improved dampening in the bumps. Overall the van responded more quickly to the driver’s inputs.
In the rear, the factory leaf spring system was replaced with a progressive six leaf spring system, and the system in tuned based on your rear axle weight. This increases the payload capability and gets rid of any sagging in the rear of the van. It also results in a smoother ride due to the progressive nature of the springs.
Finally, there was also an additional Fox shock added in the rear, again for improved dampening of the movement. The result of the shock is that the van sways much less side to side over uneven terrain, especially with the high roof Sprinter Van.
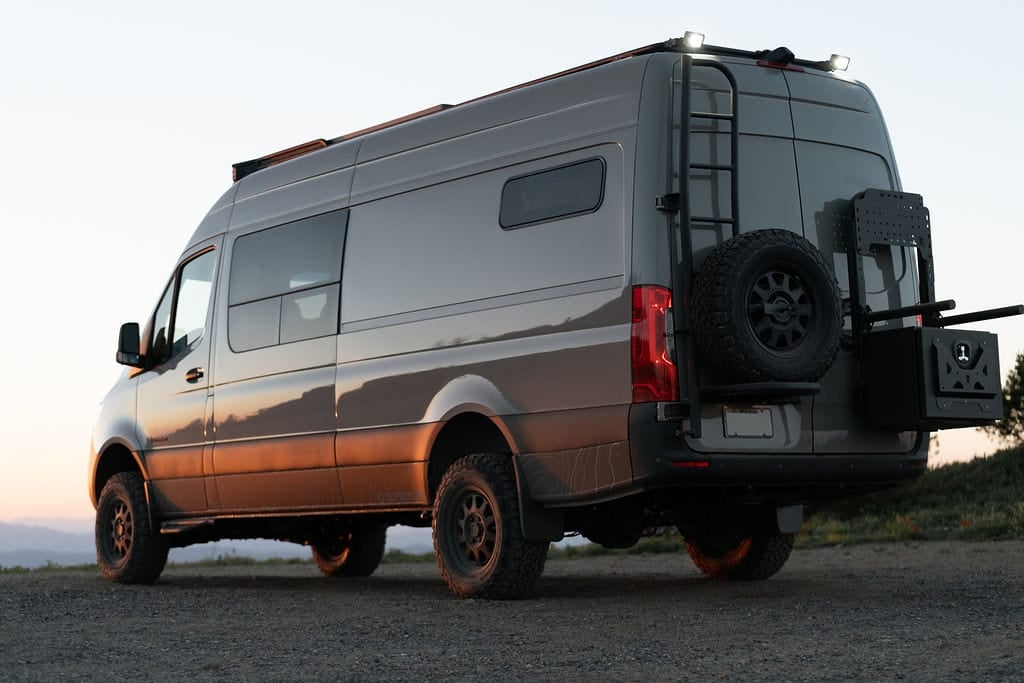
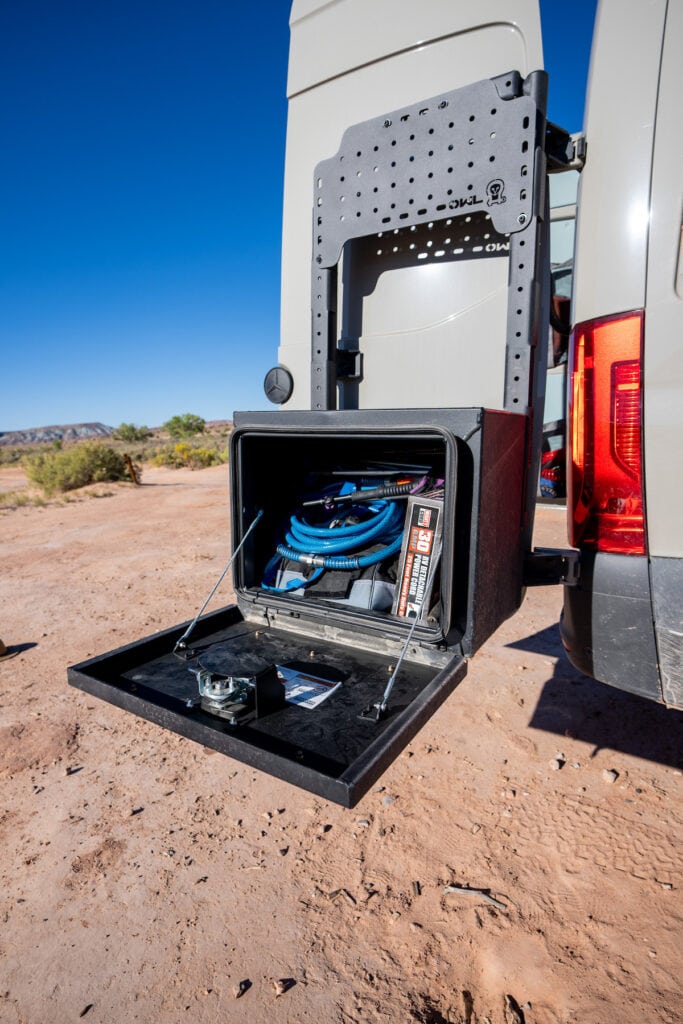
Owl Vans Rear Accessories
All of the rear aluminum accessories on the van are made by Owl Vans. The main reason I chose Owl for my rear accessories is that you don’t have to first swing out the box and spare tire before opening the rear doors. Instead, all of the Owl Vans gear on the rear opens automatically when you open the back doors.

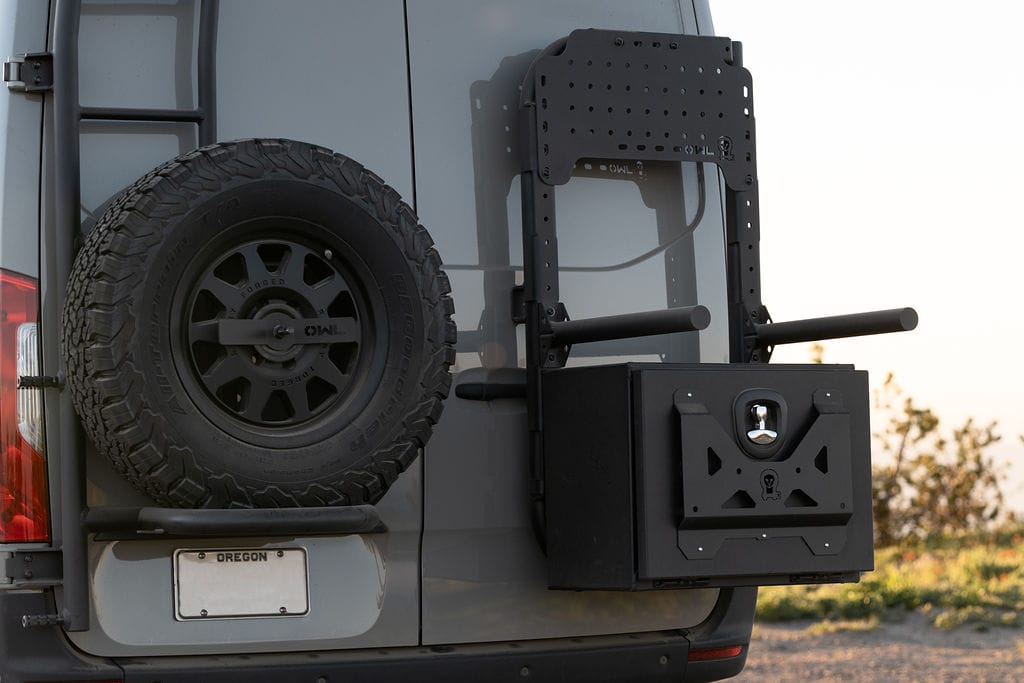
B2 Carrier, Mini Sherpa, and Medium Expedition Box
The B2 Carrier is a modular storage system designed by Owl Vans that can be customized depending on your storage needs. On the bottom, we have the Medium Expedition Box where we store our shore power hookup, hoses, tools, trekking poles, and other dirty gear in order to keep the inside of the van cleaner.
Above the B2 Carrier, we originally had Owl’s Bike Mounting Tubes that would allow us to carry our e-bikes on the outside of the van if we choose using 1Up Bike Trays. The advantage of carrying your bikes on the B2 carrier rather than a hitch mount is that you don’t lose any ground clearance and it also doesn’t reduce access to your back doors.
Also, I like that Owl has designed their bike carrier to handle the weight of e-bikes, which are a lot heavier than normal mountain bikes.
At the top of our B2 Carrier, we had Owl’s Mini Sherpa Plate. This gave us the option to mount a variety of recovery tools – such as an ax, shovel, a spare Rotopax diesel canister, or even our Maxtrax recovery boards if we were to remove the Expedition Box on the bottom.
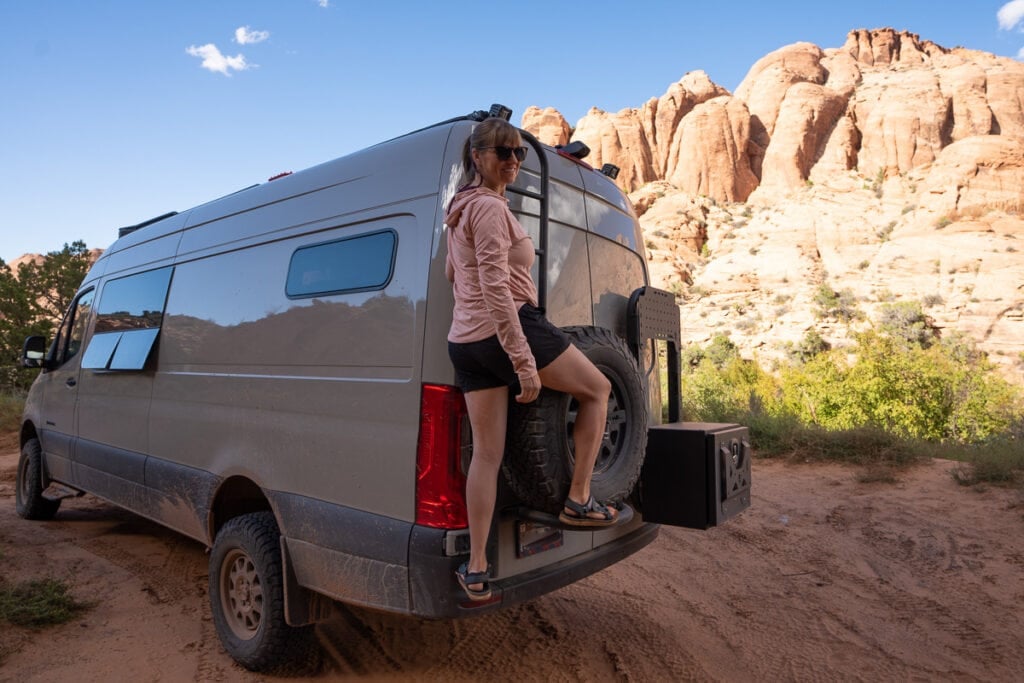
Owl Ladder and Spare Tire Rack
On my previous two vans, I had the spare tire stored underneath the van in the factory spot. With all of the off-roading we do, I decided that having the spare tire underneath the van might not be the easiest place to access it if we got in a pickle on a dirt road.
The Owl Ladder + Tire Carrier provides a solution to this by combining a ladder and spare tire rack on the back door. The tire carrier allowed us to carry a full sized 17″ spare that is identical to the rest of our tires. The ladder/tire combo rack only weighs 25 pounds and again the back doors can open without having to swing out the rack first.
The ladder is streamlined and has pegs that extend below the spare tire rack that you use to get up on the ladder. I will say it’s a little tricker the first couple of times to step up onto than a traditional ladder, but once you get the hang of it, it’s quite easy.
Read next: My full Owl Vans Sprinter Accessories Review
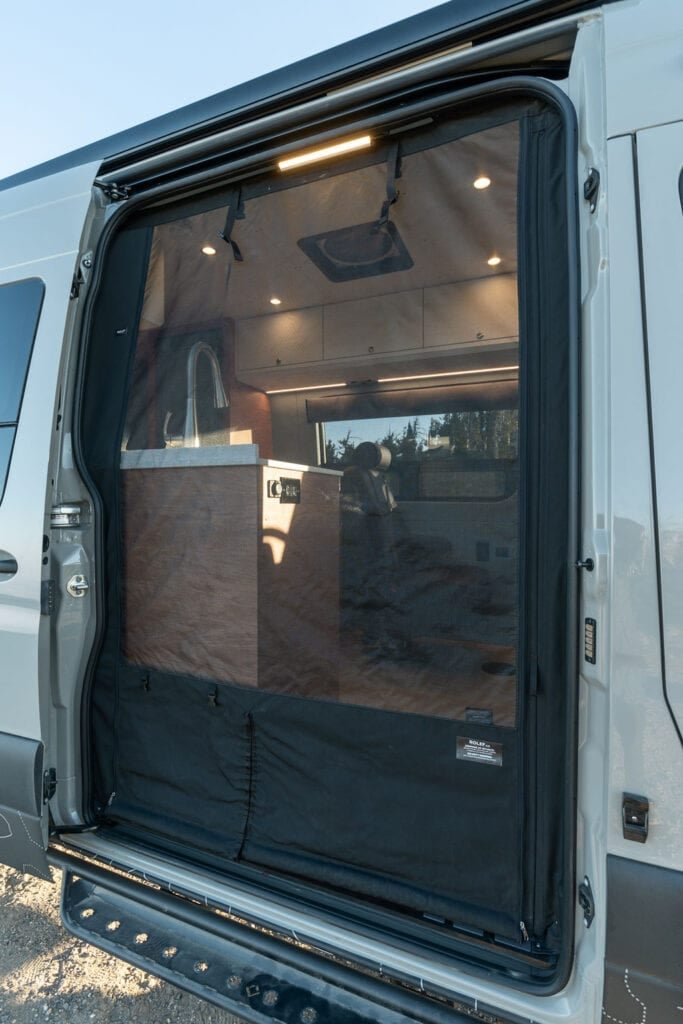
Rolef Bug Screens
I knew I wanted the Rolef bug screens in this van. They are pricier than the other options, but being able to keep the doors open during peak mosquito season is pricesless.
The Rolef bug screens were permanently installed, but I could roll them up when you I wasn’t using them. There are simple clips at the top that hold them up.
On the rear bug screen, the top half is screen, and the bottom half which you can roll up separately is solid. This allows you to access your gear in the garage while keeping the bed area bug free.
On the slider door, when you want to use the bug screen, you unclip it and zip it down. Then to easily get in and out of the van, there is a magnetic strip that allows you to quickly open and close the right side without having to deal with the zipper. It’s a pretty great design and I’m so glad we have them.
Sprinter Van Awning
On my second Sprinter Van, I decided against a permanent awning because I wanted as few things as possible hanging off of the van. Instead, we used the MoonShade which is a portable, budget-friendly shade solution that sets up pretty quickly (you can read my full review of the MoonShade here).
In my third Sprinter, I opted for a Fiama awning. We used it enough for me to consider it worth it, but I think a permanent awning has its pros and cons. It is quick and easy to deploy.
However, with a permanent awning, you have to be very careful and pull it in if it gets windy, and there are also a lot of parts that can break. There is also the added cost of a permanent awning, so you have to really think about how much you’ll use it and whether or not it’s worth it.

Thanks for reading through my Sprinter Van conversion blog post. You can watch the tours of all three of my vans on YouTube so you can see how they’ve evolved over time. Make sure to subscribe so you get notified of any future videos.
More Sprinter Van Tips
Got questions about my third Outside Van Sprinter Van Conversion? Leave a comment below and be sure to sign up for our van life newsletter.
Your customized van is beautiful and highly functional!! It looks fabulous! My curiosity is how much did it cost to build it?
Hi Beverly, Outside Van is one of the more high-end conversion companies that specializes in 4×4. The van costs about 55k and then the conversion all depends on what you want inside.
Only for the conversion ?
Hi Yves, A brand new 4×4 Sprinter Van runs about $50k for the base price, and it goes up depending on what options you pick. There’s not a lot of used 4x4s available because Mercedes just started making them a couple of years back. If you don’t care about 4×4, you can find a used Sprinter for a lot less. The price of your conversion will depend if you do it yourself or hire someone and how complicated your floorplan and systems are. If you DIY, you can build out a Sprinter for as little as $10k. For a professional build, you should expect to pay a minimum of $30k for a basic build. Costs can be as high as $100k for the conversion if you choose a reputable company and add things like a powerful solar and battery system, an indoor shower and plumbing, and the little details (sometimes things you can’t see) that make the van better.
Congratulations !!! It is perfect for that kind of life ….. that you never want to came back …!!!
Regards
I LOVE your new Sprinter van by OutsideVan and we’re considering one.
My question is how much did it cost total?
(Say if I wanted a new van made JUST like yours)
??
Thank so much & I love your blog!
Hi Lisa, it really depends on the outfitter/conversion company you select. Outside Van is one of the higher end conversion companies that specializes in 4×4, and they are very detailed in their quote process. They walk through every single option and then their program spits out a price.
I know, like me, you’re wondering why is it such a big secret what she paid for the van. “The lady doth protest too (often), methinks”. She’s making money off of the people that read her blog or watch her videos from the advertisers so doesn’t she owe an answer to us loyal readers/viewers? One possible explanation for this is she doesn’t want to tell you what she paid because, unethically, many van builders secretly compensate influencers. It’s actually illegal not to divulge compensation if the reviewer says anything positive in their review. Ask her if she was compensated in anyway by Outside Van or any of the suppliers she named and praised including a discount, free items, expedited build date etc. I’m guessing she’ll dodge answering that question directly just like she’s dodged answering the how much did it cost questions. I’m guessing if you contact Outside Vans or the suppliers that she mentions by name and compliments and ask them the same question they won’t answer either. One influencer on mattresses, Sleepopolis, was sued by Casper (Google it) alleging false advertising and deceptive practices and ended up having to sell their platform for half of what it was worth to Casper to settle the suit and they were making millions per year off of it. Nonetheless, since lawsuits are rare due to the expense and a crack down by law-enforcement on this prolific illegal practice is nonexistent that doesn’t seem to have scared any influencers in the van conversion review business. Compensation does not have to be in the form of cash to be illegal if not divulged. The same law applies to the van builder. If they’re ever interviewed about their build and they say how much they like the products from a particular company and they don’t reveal that they’re getting a discount on those products they are breaking the law. After the huge surge in business due to Covid the money and profits at stake have grown exponentially and so have the influencer rewards and deceptive practices. Tip one a builder says that they partner with XYZ Corporation it’s usually code meaning we get a discount And/or other compensationfor appraising and using their products only.
Many people who do use YouTube to discuss their areas of expertise, have a sentence which plays across the screen which says the owner is getting some compensation for the product they talk about. Each business owner is different.
If it is a product I am interested in, I don’t care if there is compensation. Kristen has done this with clothing, I have check stuff out, and often bought thru her site. She has used the product and I liked what I saw. Win-win!
Are we allowed to ask how much for this. Turnkey? My guess is $100000. Up to ?130000?
Yep that’s about right 🙂
Thanks for sharing so many details about your new build out. Many of the features are very attractive. What did the conversion cost or what would it cost a reader to build this van with Outside van?
Thanks!
I’m also curious to the cost of the buildout! I’ve been thinking of doing something similar
Hi Kim I imagine the 50K would include labour? Thank you so much for all the wonderful information!
Hi Kristen,
Beautifully written article! I love your new Van…I was lucky enough to be camping next to you in Quincy and you gave me a tour. So nice to meet you and to see this article pop up in my feed was extra special.
Susan
Hey Susan! it was great meeting you! We enjoyed meeting your husband in Lassen too. Hope you’re having a great winter.
Nice. You should not store more than 1 lb of propane inside. That is very bad.
Very nice van. Has me thinking again before I finalize my design. Is your water pump located inside the tank? (Submerged vs centrifugal or suction? )It is very quiet.
Wow! Just watched the tour and read through this entire post. I’m planning on purchasing a van soon and doing most of the conversion myself and I have to say that of the nearly hundred videos I’ve watched so far yours is just the fourth I’ve put into my YouTube ‘Camper Ideas’ playlist. The combination of aesthetics and functionality in your is exactly the type of approach I’m hoping to do. I’m most excited about the walls! Can you let me know what the exact material / product is that you used? Looking forward to learning more! Cheers and happy adventuring!
Hi Don, great to hear you enjoyed the tour & the post! So great to hear you are going to be jumping into your own conversion. My vans were designed and built by Outside Van. They found a synthetic leather product that is eco-friendly, VOC-free, easy to clean with a damp cloth, waterproof, and fade proof. It’s perfect for people with dogs, as dog hair doesn’t stick to it. If you would like to inquire about buying similar material you’ll need to contact Outside Vans directly and let them know it is Kristen’s van you are modeling your walls after–Kristen was the first person to have white walls made by Outside Van so I am sure they will remember & be able to help you!
Hi again Kristin, another question…
It appears that there is not an awning on your van. Was this something you simply never wanted?
Thanks!
I was actually wondering the same thing. I noticed you had one on your original build. Did you find that you didn’t use it as much as you’d think (or cost would allow for)?
This looks amazing, Kristen! I just bought a tiny Chevy Astro to start out my van life, but my dream is a Sprinter van by Outside Van. Maybe someday. Have fun and I’m looking forward to following your adventures.
Can you send me a link to the water tank setup you have? That looks so sweet.
Hi Rand, Outside Vans put together Kristen’s water tank. Kristen has a 25-gallon water tank inside a cabinet in the garage, alongside the Webasto Dual Top which stores an additional 3 gallons of hot water in the boiler. The BPA-free water tank is permanent, but it can easily be filled using a hose or 5-gallon jugs if she can’t find a spigot with potable water. Water that runs through lines to the sink goes through a three-stage charcoal water filter that ensures the water she + Ryan are drinking is clean. If you have more questions you can contact Outside Vans directly and just let them know it’s my Sprinter Van you are trying to model after.
Hey Kim, what about waste water? is there a tank for that, or does it just dump on the ground? How did you insure it’s not frozen when winter camping?
Can I purchase a duplicate of your van?
Hi Norman, we recommend you reach out to Outside Van directly. Let them know you like Kristen’s van and then you can discuss your needs to create a van that is suitable for you.
Beautiful Sprinter that will bring to you millions of smiles! You have incorporated some very cool features that I have never seen. I always learn something new from Bearfoot Theory. Thank you, Kristen Bor! You are so smart and sweet for sharing your knowledge with us beginners. Happy trails and summer travels to you and yours.
Do you have a winterized water system and waste system.
There is no grey water tank. They do that because it’s just another thing to freeze in the winter. The clean water tank is located inside the van, which is insulated. But when I’m not using the van in the winter in Utah, I empty the tanks just to protect it. If I was using the van on a regular basis, then I’d just keep the Webasto running on low to keep the temps at a safe level.
Ballpark what does a van such as this cost? We are seriously considering something similar and would love to have a number so we can start planning!
Thank you for sharing (both of your vans). You have a beautiful new van. My wife and I are planning on getting ours next year. Outside van was my first choice for our build after looking at other builders, and contemplating on do it myself. Your experience with your builds is greatly appreciated.
I’m in the process of building out my own van & I really like the look of your leatherette walls & ceiling. Can you tell me what that material is?
Hi
First off, Thanks for so many inspirational videos!
I’ve never owned an RV/van, so I am gathering info. Comparing RV vs Van at the same price point, did you consider getting a MB chassis Class C based RV instead? Like the Jayco Melbourne prestige or the Winnebago View/Navion. About 3ft longer, same width, but with home-like comforts and similar price to van+custom work.
I am trying to find a way to purchase the stuff you made your walls out of. Do you know how I can get some?
Hello Kristen…
So by the looks of your tattoo, I deduce we have the same GREAT musical tastes! lol 🙂
…Wondering if you’ll be at the Ace Hotel for the Wolf Brothers tour? I’ll be in the front row! 😉
In any event, had a Sprinter Sportsmobile conversion a few years back. Currently considering the Winnebago Revel 4×4 because of the head and passenger seating arrangement. (Only concern would be the many warranty issues associated with many reported deficiencies associated with conversion build and assembly) Kinda sad that so many of the production Sprinter conversions don’t account for a small family by offering any seating adjacent to the cab. That said, your Sprinter looks perfectly suited to your lifestyle and situation.
If you ever plan a trip out to the San Juan Islands or Flagstaff, I’d love to play host.
Happy trails and enjoy the lifestyle!
…Cheers
I am curious, the down payments, plus the monthly payments needed through the bank? I guess it depends on each individual credit?
Nice setup you have there, I like the style.
I loved the aesthetics of your last van and love this even more! I curious the width of the dinette? It looks different in each picture I look at. Thanks 🙂
Hi I’m curious as to the dimensions of your galley? (Height/Width/Depth) as well as your bench seat dimensions? (Length/Depth)
After OSV installs the insulation and walls what is the interior width of the van at the floor and the usable length from behind the front seats to the back of the van?
Also, if you had the dimensions of your previous vans shower and toilet so u know how much space they take up.
Thanks!
Aaron
Dear Kristen,
I’ve been following you religiously and finally found my 4×4, 144, low top Sprinter. I’ll be starting my build in Sept and am hoping to get more information on your water filtration system; brand of BPA water tank and filtration system. Thanks for pioneering the way!
With gratitude, Rolo
Thank you for your education around your adventures with your vans. I am slowly building mine out and have enjoyed reviewing your blogs for direct insights. Im a big fan of Outside Vans work, Im builder so Ive also been enjoying my own process, although a mix of trial and error. Question on your walls, did they use marine ply for those as well, then wrap? The material you used for them have answered some of my design cross roads , Very well thought out, Thank you again for sharing!
Michael
We also got the Webasto Dual Top heater, and I’m in the middle of installing it now. How do you like it?
Could you direct me to the synthetic leather that was used on your walls? We re just beginning our conversion.
Hi Terra, The material is called Sil-Leather. Hope that helps!
Your new Sprinter looks great!
What is underneath the bench seat on the driver’s side? It looks like it is vented for some kind of electrical equipment
That’s where all the fuses are.
Thanks so much for posting all of the detail on this build! I just started my second conversion, this time coincidentally the same color as yours, though the baby 144wb version. Could you share the manufacturer of the high density vinyl on the forward part of the cabin? I was about to settle on Lonseal vinyl flooring, but like the pattern on yours even more!
About Sileather. Love ur van. My wife white walls in our Sprinter van but we can’t find a US supplier for Sileather – not Amazon, not Ebay. Any ideas on how to buy Sileather?
Hi James! I would recommend contacting Outside Vans directly and seeing if they can offer you any retailers/suppliers.
Do you have a second alternator hooked up for charging your house batteries?
No I don’t. The batteries are just charged off the regular car alternator. There is a separator though…so the alternator first charges the car battery and then once that’s full it charges the house batteries. Hope that makes sense!
Very nice van. My wife and I are doing a van conversion with Outside Van as well. We have been thinking about going with the SiLeather for the walls. The choice of color and ease of cleaning are appealing. How have you liked the material in your van? Any feedback would be much appreciated.
Regards,
George
Hey George – The Sil-Leather is holding up great. I love how easy it is to clean. You’re going to be so stoked on your outside van. their work is amazing. Have fun out there!
Beautiful van…and well thought out. Thanks for sharing.
Curious now that you’ve had the van a bit, what you think of the high density vinyl weave flooring in the cabin? Really like the look and thinking of using a similar approach in our upcoming build. If you still like the option, can you share specifics on the actual product/supplier?
Hey there – I actually wouldn’t the do the floor in the front again. It looks great and I like the texture, but the grooves in the floor make it very difficult to clean.
Beautiful van and a wonderful, detailed blog post! I’m curious what make and model your seat swivels are for the driver and passenger seats. I like that they not only swivel, but also slide forward & back. Thanks for the tour!
Great build Kristen. Very similar design that my wife and I came up with that we are planning for our build. Do you find accidentally hitting your head on the overhead cabinets above the bed? Did you explore any other clothing cabinet options? Whet height is the garage and what thickness is your mattress pad. Do find you have enough head room to comfortably sit upright in the bed? Did Outside van provide you with schematics of your electrical and plumbing systems you could share? Again…great build!
Thanks,
Jonathan
Hey there! Ryan sleeps on that side of the bed, but there is enough room that he doesn’t actually have to sleep under the cabinets. That’s where the dogs sleeps 🙂 If I could do it again, Outside Van is installing these new soft cabinets made by Adventure Wagon that look pretty cool. Headroom is a little tight. If we didn’t have bikes, I would have made the bed a few inches shorter. I don’t have a schematic.
Thanks Kristin. Reviewing your build again as we are starting ours. I am building the galley and storage cabinets myself and curious of the thickness of the Marine grade plywood used. 1/2” or 3/4” I suspect? Also, do you have a bottom and back to all cabinets? We are going to utilize the hanging Mule bags in bed area and also looking at it or other options in galley area. Perhaps my wife and I just need a tour next time you guys are in Boise:)
Nice write up. How was your experience moving from a 144 to a 170 in terms of drivability? Does the increased turning radius bother you or is it a negligible inconvenience? We’re looking to build a camper van for a family of 4 (2 little kids). Thanks, and keep up the great work. You’ve inspired many of us.
Hi Dan, this post will help you out with all those answers–https://bearfoottheory.com/144-vs-170-sprinter-vanlife/
It looks like you left a comment there that you found it! Glad to hear it was helpful.
ive been living out the back of a ranger for a few years and am looking into buying a short school bus and having something about 80% as nice as this for a 5k budget 😀
What is the name of the synthetic leather product you used on the walls and ceiling? I love the lay out of your van. You did a great job.
Hi Becky, the material is called Sil-Leather. Hope that helps!
Hi! I love the white walls and ceilings but have been told by builders that the sil-leather does not hold up to abuse. I have a really messy kid who doesn’t not like to take care of nice things and is a magnet to making white things not white. Would you still recommend doing the walls as you have done? I’ve been told that light scratches show up and dirt can build up in those scratches and ruin the easy cleaning properties of the walls. Is this a material that can handle serious abuse or is more fit for people who take great care of their things? In which case I will likely just use it on the ceiling and skip the walls.
THANKS IN ADVANCE :)))
@roverlife
Hi Jonathan!
Thanks for your comment. Kristen loves the Sil-leather and reports that it’s super easy to keep clean, but as you mentioned, she and her partner do take care of the van. I can’t speak on whether it would hold up to serious abuse, so it might be better for the ceiling instead of the walls. That way, you won’t have to worry much about it. When it’s done, come on out to Open Roads Fest with your family! https://openroadsfest.com
Hey there, I’m designing my Outside Van conversion and have to make some final decisions. I was wondering whether you like the exoskeleton for clothes, or whether you think cabinets would keep things looking a little more organized? Basically, I know I’m a messy person. In my current van, I try to be neat, but eventually I am shoving everything into the closet and glad I have doors to close. Just wondering if you have any realistic advice. I love your van !! Thank you… Heather
That’s a tough one. The exoskeleton is easy to grab stuff down from, but like you I’m messy, and that cabinet always seems to overflow. Next time I’m on the fence about which cabinets I’d go with.
Your and Ryan’s choice of interiors and cabinets are amazing…. marine grade plywood selection is very clever choice ,
https://www.ogavans.com
Link to view the top rack?
I can’t believe you can also fit bikes in there. That is nuts and also amazing. This was fascinating to read. Thanks.
Hello! Great review 🙂 wondering where you got that awesome insulated cabin divider curtain? We are looking for one just like that!
Hi Mary!
Glad to hear you liked it. This is Mary Kathryn responding on Kristen’s behalf. All the curtains in Kristen’s van were made by Outside Van. They are made of ripstop nylon with a layer of closed-cell foam on the interior to insulate. They’re pretty great! In my van, I have a storebought thermal blackout curtain that works quite well. It’s simple and white with thermal properties. I imagine it’s not nearly as warm as Kristen’s custom insulated curtains but it works well for us and only cost about $30.
This is so inspiring. Do you have any information or links to how to DYI a van conversion as I have plenty of time on my hands
Hi there, Joanne!
Thanks for your comment. We’re so glad to hear you feel inspired and are interested in DIYing a van conversion! I built out my van three years ago and had so much fun in the process, so I definitely recommend it. Our Bearfoot Theory team recently created a comprehensive FREE van life course that includes extensive information on everything that goes into a camper van conversion. It will be really helpful in your process. We’ll be releasing it soon, so jump on the email list and you’ll be notified when we launch it. https://bearfoottheory.com/van-life-roadmap-waitlist/
Hi there! Love all your information, I am digging through it slowly, does it say anywhere what something like this costs? Thank you so much, I’m trying to go from the idea of a four-wheel-drive truck with a camper that I’ve always thought I wanted To realizing I may be more into this style..
Hey there Jeanine,
Thanks for your comment. Kristen’s conversion was around 50 or 55K, not including the vehicle. There are so many awesome options out there depending on your lifestyle, priorities, needs, and budgets. Soon, we’ll be launching our comprehensive FREE van life course where we discuss everything from choosing a vehicle, converting one, and living on the road. Add your email to the list to be notified when we release it! https://bearfoottheory.com/van-life-roadmap-waitlist/
Not having a toilet for a woman is just downright nasty. I am a truck driver and I know personally that you have to always stay at a truck stop or a gas station because you can have a bm any time. However, those bathrooms can be extremely gross. Many Truck stops have a shower room and decent bathroom facilities but there are those depending on the part of the country you are that is just disgusting. Many of these women who camp ride bikes and hike and you think after those activities you shouldn’t take a shower? Not to mention when you’ve been with a man or your monthly cycle.
Hi Marie! Thanks for sharing your experience here. Many van lifers prefer not to have a toilet or shower and they make it work, while others do need one. Everyone is different, so it all depends on personal needs and priorities. 🙂
What is the name of the leather-like materials used on your walls. It appears that it was also used on the fronts of the open cabinets in the back over the bed. Please let me know what that is.
Thanks, JJ
Hi JJ! It’s called Sil-Leather. It’s eco-friendly, non-toxic, waterproof, and highly durable.
Hi – great van! Do you know what material they use for the walls and ceiling? Thanks in advance
Hi, Jon!
Thanks for your comment. In Kristen’s van, Outside Van used 3M Thinsulate for insulation and Mahogany luan panels for the walls. Then they covered it with a material called Sil-Leather, made of silicon. Sil-Leather is eco-friendly, non-toxic, waterproof, and highly durable.
Hi, love your van. I love the folks at Outside Vans and have toured their shop. I am curious if you could share more pictures on your dinette to bed set up. The bottom slides out, but how is the “back” supported? Can you access the space under the cushion? Thanks!
Hi Jeannette, this is Linda responding on Kristen’s behalf. Thank you for the love! There are some good photos of Kristen’s dinette to bed setup in this lesson which is part of our free online course, the Van Life Roadmap: https://bearfoottheory.com/camper-van-conversion-layout/
Thanks, but the photos do not show how the back cushion is attached and supported. Do you have any more information or pictures on this? Thanks! Hopefully she is healthy and happy.
Hello. I’ve been having a hard time deciding between LiPo and AGM batteries but love the idea of having such a big bank. That being said:
1) How many NorthStar batteries do you have and what is the name?
2) How heavy are they?
3) Is that useable 660AH (meaning you actually have about 1320AH, seeing that AGMs can only be drained 50%) ?
Sorry if that was a bit of a question-overload . Thank you in advance for your time and answer.
Hello Kristen,
Could you tell me what the brand of single burner induction cooktop you used? It is hard to tell in the photo. Maybe Thermador or Frigidaire?
Thanks so much
Hi Kelly – Kristen has a Mr. Induction stove, but the model she has is discontinued.
Hi Kristen, love your van layout! What do you do for internet access when you are in remote areas?
Hi Ruth – we have a whole post on that! You can find it at https://bearfoottheory.com/van-life-internet-access/
Regarding the dinette, how large is the table top? Is it big enough for three or four people to dine? If not, could you envision a way to have two lagoon tables in the dinette so that you could have three or four people dine at the table? I know it would be a tight squeeze. We’re in the process of building a dinette in our van with the intention of mirroring Kristen’s dinette, but it seems the weight limitation for the lagoon table top prevents us from having a size large enough to really have a restaurant bench-seat style experience.
I have been enjoying your newsletter and blog. I am learning so many new things about life in a van and it is so inspiring. My sister has a small van that she is converting herself and taking some small trips. I have been designing and scrap-booking all her Van Adventures so far. I hope I can join her on one but would love to some day have something bigger and more comfortable like yours. Thank you for sharing all this wonderful info. Artgal Style
Your clear, concise explanations of everything you liked/disliked in your first van, and the changes you made in your new one are wonderful! I’ve been looking for good information about converting a van, and I’ll probably use a lot of your suggestions. THANK YOU. I do wonder, however, about the AC. We will probably be traveling a lot in the southwest, and it gets pretty warm. I’ll ask our outfitters about the difference between the fans and the AC. Appreciate it
Glad you found it helpful!
Hi Kristen, I am curious about your opinion of the flush mount induction cooktop in your galley. I am working on a build with OSV and I like the idea of the flush mount cooktop, but am concerned that the interface between the countertop and the cooktop will collect grime, especially with the white countertop (is it avonite?) Have you found this to be an issue, or over time has it remained as nice as in the pic in this blog post? I assume it is caulked with silicone or something similar, but is it holding up over time? do you have any other options on the flush mount cooktop to share? Thanks!
So far it’s held up great!
I’m in love with your van and thank you for your post! I have a question about the photo of the outside folding table and there’s a stove on top. May I ask the brand name or where it was purchased? I’m looking for a heavy duty folding table I can use outside for outdoor cooking, and it looks like that one is pretty compact for space/storage, which is always limited in a van. Thank you!!
You can find them in our Camp Cooking Essentials post. The stove is a Eureka Ignite Camp Stove and the table is a GCI Slim-Fold Cook Station.
So cool and you dont need a toilet
Would love to know. Now that you have been in a Sprinter Extended for a few years vs your previous 144, hitting the trailheads hard, do you still prefer the longer van and why?
Hello Kristen, You mention the bed is almost king size. How long is it? I am 6’5″ and like the length of a California king.
Really like your van, it is just what I would like.
Hi Brad, the bed is 6.5 feet long x 5.5 feet wide. Hope this helps – good luck with the van search!
Hello – your website has a lot of great information – thank you!
could you provide more detail and/or resources for the hanging insulated current at the front of the van – how are they hung, did you make the curtains yourself or are they available somewhere? We have insulated coverings for the windows themselves but having something to block off the space at the front would be helpful in the winter. Thanks!
Hi Martha, it’s custom-made by Outside Van (my van builder), but it’s made of ripstop nylon with a layer of closed cell foam insulation on the inside. I talk more about it in my van tour video: https://www.youtube.com/watch?v=GLtN33KfELw. It definitely helps with temperature control to have something blocking the cab (where so much heat gets in).
Awesome article. I’ve been kicking tires for a few months and really getting into watching longer videos and reading longer format articles like yours. Yours has been one of the best. Thanks for taking the time. You’ve got me looking at Outside Vans too.
Hi Ryan, thanks for the kind words! I actually just had a new van built out by Outside Van (delivered to me a few weeks ago!). I’ll have a full van tour coming out soon if you want to see more of their work.
Hi, I just saw your video on your 3rd van conversion. Incredibly well done with the van design and the video. There is so much that I think I would want now whenever I finally get to buying a van and getting it built (by a professional). I am wondering if you can recommend or suggest any professional van builders who work on the RAM ProMaster. Thanks!
Hi Carlos, thanks for watching – I’m really happy with how the van turned out! I’ve only ever worked with Outside Van (for my 2nd and 3rd) & don’t have any personal recommendations for professional Promaster builders. However, I do recommend checking out this blog post on how to screen a reputable van conversion company: https://bearfoottheory.com/screening-campervan-conversion-company/. I had many issues with my first van builder back in 2015 & learned a lot in the process.
Thankz, I unexpectedly enjoyed reading and watching the whole thing! Interesting. Love the new details, like the increased organizational stuff as well as the innovative screens and curtains, etc. But still need that indoor show for quick 2 minute showers before bed!
Hi Terry, thanks for reading/watching! Totally understand on showers – everyone’s preference is different!
Are you going to try out the Cuddy again in this van?
Hi Kristin – I tested out a prototype at my house and had a few issues with it, but they are working out the kinks and I think it’s a promising product. I believe they are finally shipping them out to customers who pre-ordered one… but in that whole process, I decided that the system we used in my second van (Go Anywhere foldable toilet) works just fine for now.
Thanks for putting together this tour of your new van, its cool to see how all of the small design details function in daily use! I was curious if you intentionally chose the diesel air heater instead of Rixens hydronic air heater? I’m also looking at Rixens for heating in our van, but didn’t know they offered a hydronic water-only kit, without the air heater.
Hi Nick, thanks so much! After 2 other vans, I had a good idea of what I wanted, and the team at Outside Van really takes to the next level with their detail. As far as the diesel heater, I just went with Outside Vans’ recommendation – I figured they knew what was best.
I love your last van can you tell me a ball park if cost for a similar Van
Hi Sherrie, since every Outside Van is totally custom and my old van was built 4+ years ago before the prices of lumber, etc. increased, it’s impossible to give a ballpark of current numbers. I’d recommend contacting Outside Van directly to get a quote.
I am preparing to join the van life and get my first van. I really am grateful for your suggestions and ideas. I will hope to get my build right.
Hi Meryl, glad to hear you’ve found the blog helpful! And congrats on starting the preparations for van life… if you have any questions, please feel free to reach out 🙂
Hi Kristen-
Thanks for this tour! Literally, this was the first link I clicked on from a Google search, and I clearly landed in the right place. The give-away was the Phish Mexico bag at the front part of your video (my wife and I were there as well). We are at the start of reshaping our lives, at 52 years-young, and van life is calling us.
We’ll be diving in more with your blogs and articles, but my question is, How long did it take OutsideVan to complete the work? We’re Denver, Colorado based, and I will certainly be looking at local options, as well. A goal would be to have our van ready to get to Delaware by next August for Phish festival that was just announced. We look forward to diving into your posts and get ourselves educated.
-Whatever you do, take care of your shoes.
Hi Paul – Yay! Love seeing Phans stumble on the blog. Phish Mexico was amazing. We really want to go next year, but I think we’re going to do the festival instead too. Hopefully we will see you there 🙂 As for the van, the time really depends on their current supply of vans and how many people are in the queue ahead of you. I’d say it can take anywhere from 3-9 months, but you’ll get a better estimate by contacting them directly. Feel free to email me if you have any more questions! -Kristen
Kristen\\\;
Watched the video of your new van. You showed where you pee. Did I miss #2?
River
I pee in a pee jar and we have a portable toilet for #2.
Hi. The only thing that I think you are missing is a way to reach your rear door latch from your platform bed. As you know, from your high perch it is virtually impossible to reach the factory door release. EZ-Exit has solved that problem with its electric push-button rear door release. It is reasonably easy to install and even comes with a kit to give you 3-way lighting in your garage or even your back door and slider door.
I would love to talk to you about reviewing it and/or repping it.
http://www.ez-exit.com
Curt Simon
4q15.785.3757
In her latest van, she added a third passenger seat and made other modifications to improve storage and functionality for her family of three and two dogs. She chose Outside Van to build her third van because of their reputation and her positive experience with their previous work.
hi! yes that’s exactly right. I’m actually about to publish a blog post about van life with a baby where I talk about the layout a bit more.
How do you afford these expensive van builds. It certainly can’t be from these blogs.
Hi – I’ve been running this blog for 10 years and it does in fact bring in enough money for me to afford my lifestyle (and to support my family).
My husband and I are retiring next year and are planning to do some van renting this summer in the Pacific NW to try out different layouts and van options before buying. Your blog posts and all of the resources are SUPER valuable for us in this planning process!
Mahalo, Merrill and Anthony
Your newest sprinter van setup is exactly what I want. Can you tell me how or who I’d deal with to replicate yours? I’m also in Canada so it’s a bit more difficult. I’ve lived in a 37 ft fifth wheel RV and a trailer before that for a total of 25 years. But in one location. I’m ready for Gypsy lifestyle. I love your website. Really helps with informed researching. Thank you for making my life easier.
Hi Melissa – I’m actually getting ready to sell my van. Feel free to email me and I can share some details if you’re interested.