Camper Van Solar Panels, Batteries & Electrical Systems
Learn about the different van electrical system options and how to power your life on the road with solar panels, inverters, and batteries.
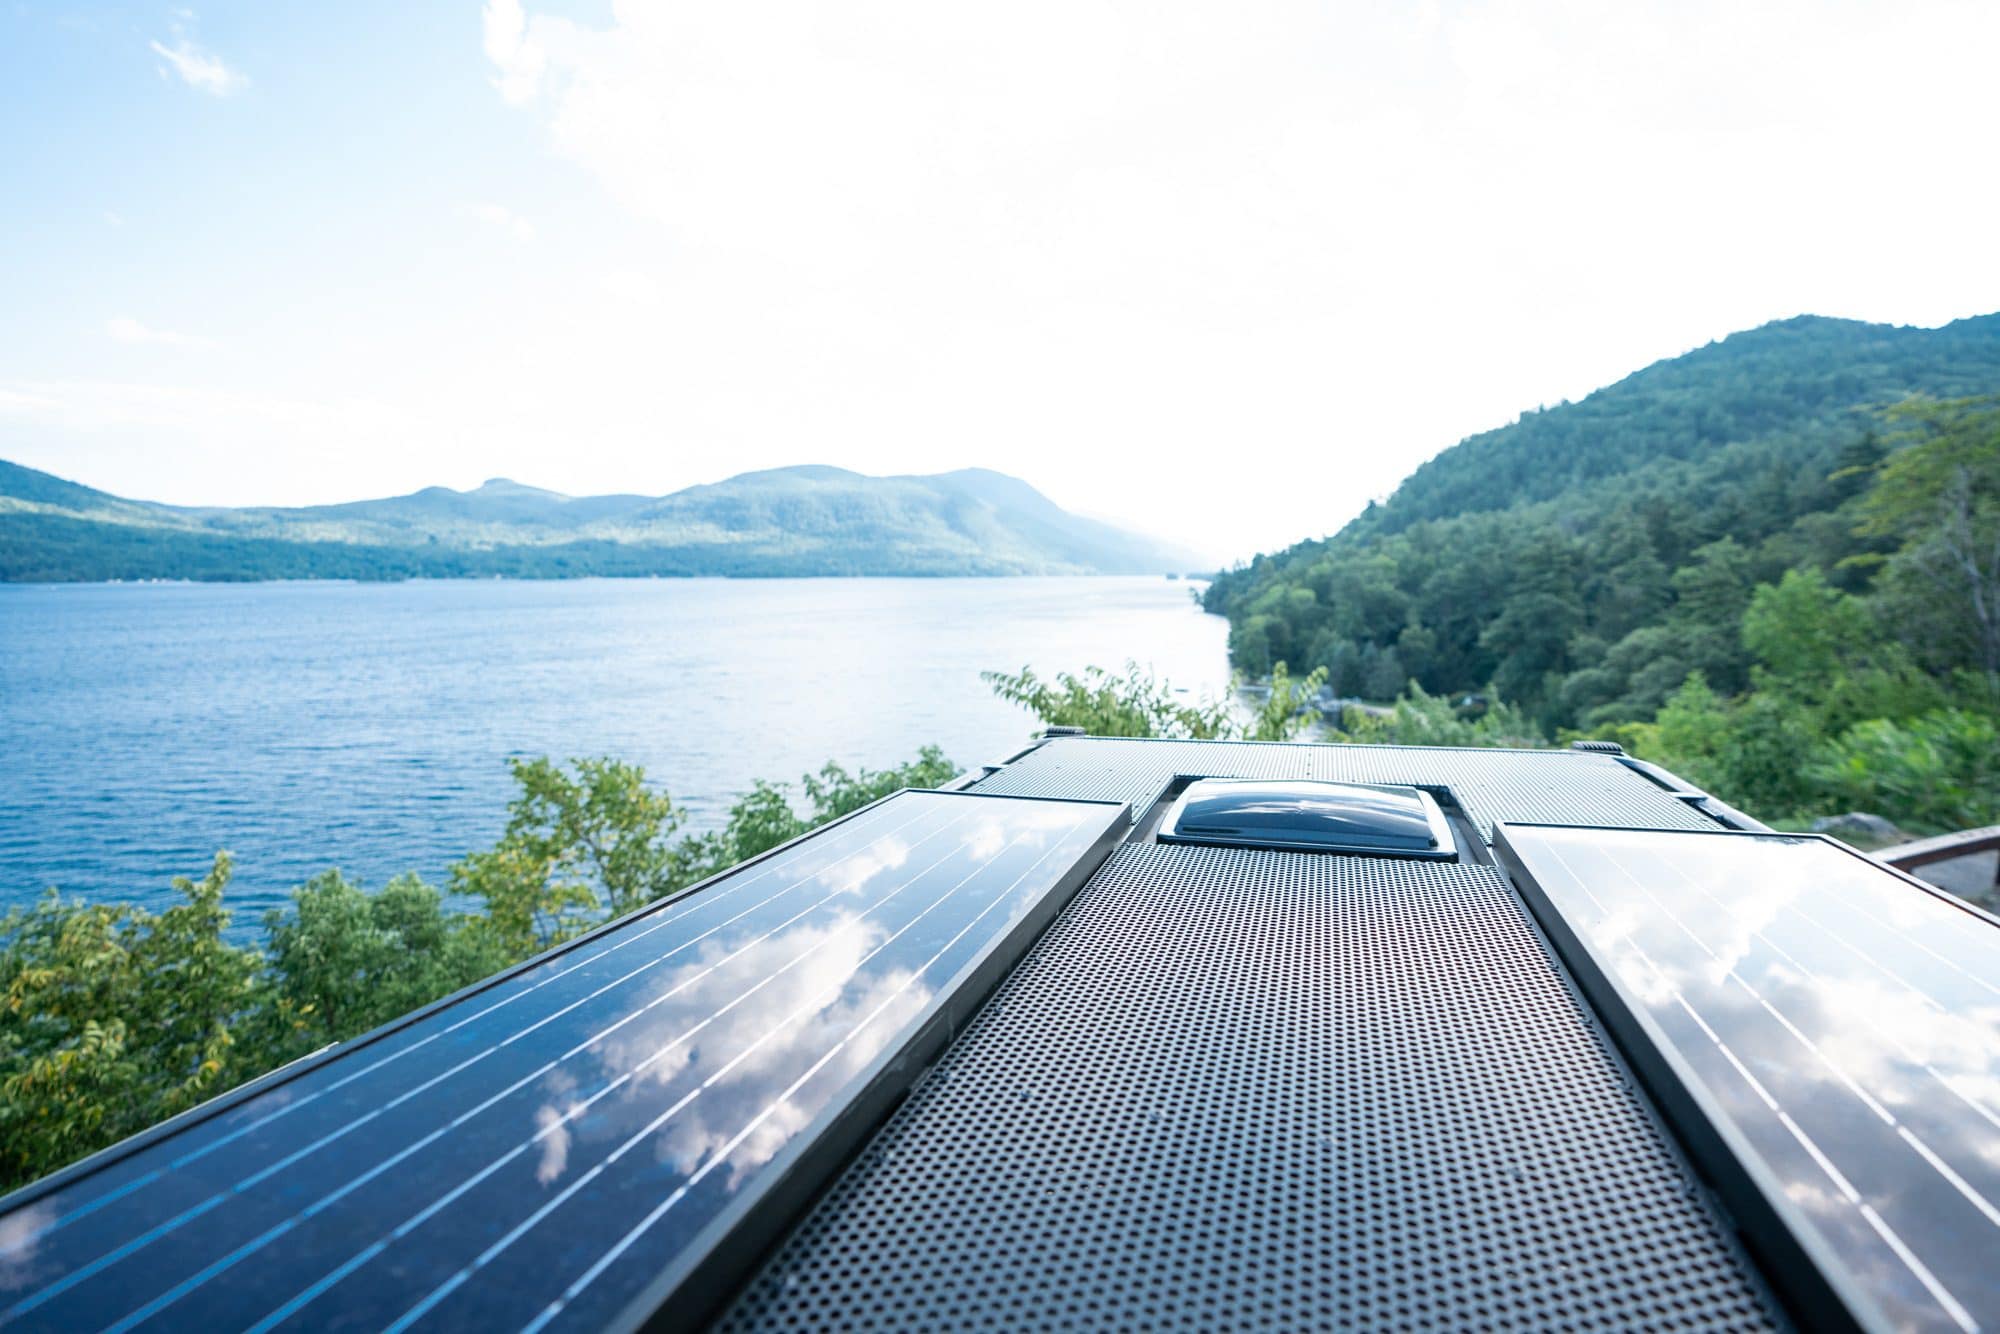
A solar power system in your van is one of the many things that differentiates van life from normal car camping. It’s such a luxury to be able to charge all of your electronics and run a fridge in your van. But where do you start? Unless you’re an electrician, all this talk of van electrical systems like batteries, inverters, solar panels, wire, and more may have your head spinning. I know mine sure was.
In this blog post, we’re going to cover van electrical systems including solar power. We’ll go over different options for powering your life on the road, then we’ll take a deep dive into solar since that offers the most flexibility for van life. You won’t be ready to go install it all yourself, but you’ll have a much better understanding of how it all works so you can make decisions about your van’s electrical system with confidence.

This post may contain affiliate links.
Camper Van Power Options
Your van electrical system is one of the main ingredients to ensuring a quality living experience on the road.
These are just some of the questions to ask yourself when determining how much power you want, and ultimately, how big of a battery bank you’ll need:
- Do you want to be off-grid without ever having to plug in? If so, for how long?
- Will you be a weekender or full-time traveler?
- What sort of appliances will you run and how often?
- Do you want to power a fridge, a fan, lights, a water pump, a heater, a laptop, or a blender, or all of the above?
There isn’t a one size fits all approach to van life, but together, we’re going to explore the foundational pieces necessary to determine your priorities to help you plan for your ideal electrical system.
The three primary ways of getting power in a van are solar power, a generator, and plugging into shore power.
Solar Power
Solar is a great van power option if you plan to be off-the-grid often and want to be able to sustain your day-to-day without needing to fuel up a generator or plug in.
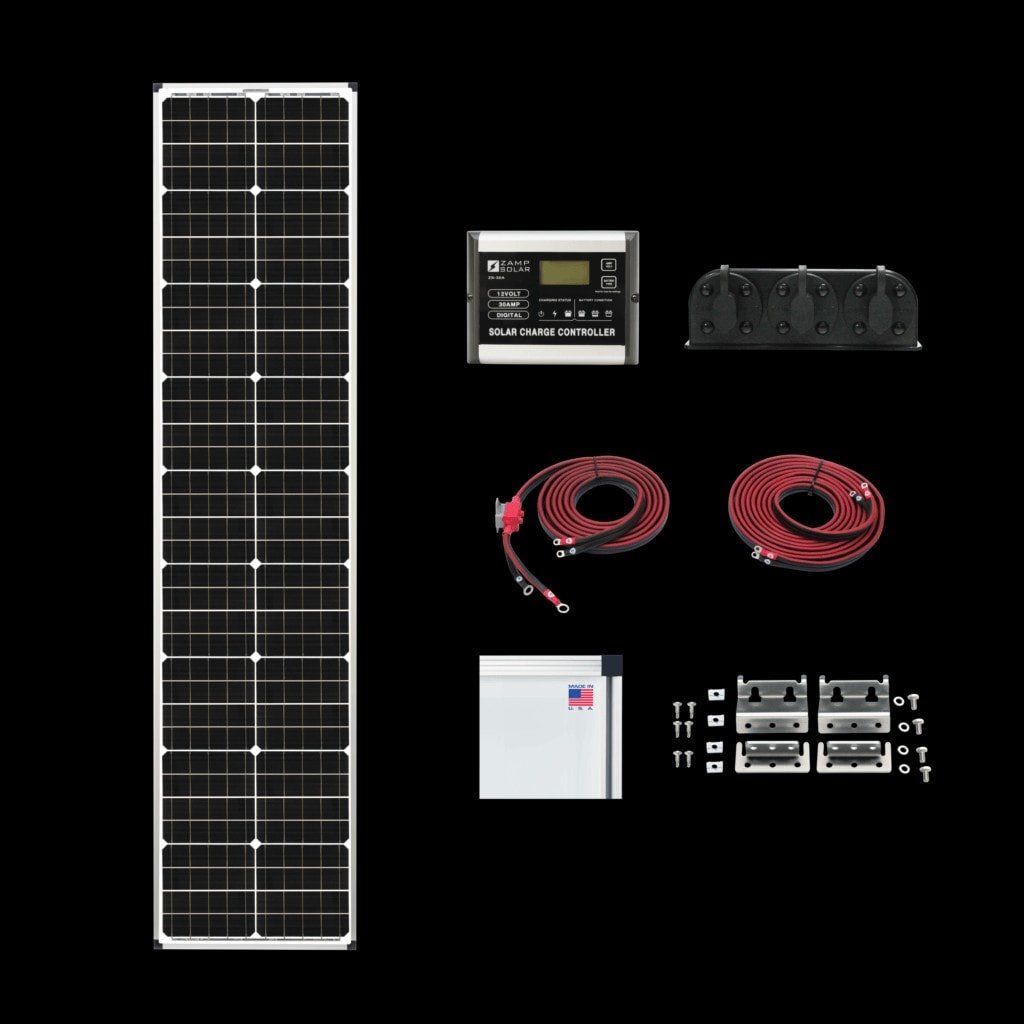
Opting for a solar power system is a more eco-friendly option, but it does have a heftier initial investment. To have a complete solar setup you need solar panels for your van, batteries, a charge controller, and an optional (but recommended) automatic charging relay (ACR).
Solar is the most popular van electrical system option, and what we would recommend for those planning a van build.

Generator
Powering with a generator is a tried and true method for road travelers and was the go-to prior to the rise of solar power.
Generators have their pros and cons. They’re favored because of their reliability no matter the weather or time of day. Plus, you can move them around wherever you go, creating power even when you don’t have access to the grid. Generators are also ideal if you plan to run an AC unit, electrical heater, or a microwave – these things aren’t easily powered with a solar set up due to their high wattage requirements.
One caveat is you’ve got to keep gas stored for the generator, so that’s something to consider when planning your build. The generator and fuel tanks are heavy and take up a fair amount of room, so you’ll need to have a dedicated space for these. A storage box on the outside of your van – like those made by Aluminess – is one option.
Another major downside of a generator is the noise factor. Generators can be loud, impacting your ability to enjoy the sounds of nature. Plus, many paid campgrounds have a sound ordinance or noise pollution policy, restricting their use during certain hours of the day.
Shore Power
Shore power is a viable option if you plan to stay in full-service campgrounds with plug-ins. If that’s the case, this is a perfect option that will allow you to use power as normally as you do in your brick and mortar house.
Even if you don’t plan on staying in campgrounds all the time, being able to plug in to top off your batteries is a smart option, especially for the winter months. When the days are short and the sun isn’t out very long, being able to plug in if your batteries are running low will help prevent them from getting damaged while allowing you to still function in the van. My shore power plug is located under my hood, and while we haven’t had to use it out of necessity, it gives me peace of mind being there in case I ever were to have an issue with my solar setup.
Automatic Charge Relay
A final option I recommend is to connect your house batteries to your vehicle’s alternator which allows you to charge your batteries while you’re driving. I don’t recommend relying on this as the only way you charge your batteries, but it is a great backup especially during the winter months. We’ll talk more about this option later on.
Save this post!
Enter your email & I'll send this post to your inbox! You'll also receive my weekly newsletter full of helpful advice for planning your adventures.
Solar Power for Vans & Other Vehicles
In case you’re not already familiar, the way a solar power system works is that solar panels capture the sun’s energy and convert it into electricity which is then used to either directly power something, or more commonly, that energy is collected in a battery that can then be used to run power from. If you’re using a battery (which you will if you’re planning on having a solar setup in your van), you’ll also need an inverter to convert the DC power in the battery to usable AC power for your appliances.
In the rest of this blog post, we’ll be covering all these elements that make up a solar power system including van solar panels, inverters, batteries, wiring, charge controllers, and more, starting with solar panels.
When shopping for solar panels for your van, you’ll encounter two main types: monocrystalline solar panels (mono) and polycrystalline solar panels (poly). Both serve the same function in capturing energy from the sun and turning it into electricity, but there are some differences between the two that are important to be aware of while you’re shopping for van solar panels.
Mono panels are generally more efficient and have a slimmer design, but they also tend to be more expensive.
Poly panels are typically less expensive but also a little less efficient. With limited roof space, it’s important to consider the most efficient panel setup that will support your power needs.
A well-built solar panel from a reputable company is rated to last over 25 years, so it’s a good idea to explore both of these options before making the investment. Ultimately, the differences between the two types are only slight. Once you narrow down your needs and preferences, the most important thing is to buy solar panels from a good company with quality products.
If you’ve been following my blog for a while, you’ll know that I’ve had Zamp Solar panels on both of my vans. You can check out this video for an overview of my previous solar set up and some additional tips.
Zamp’s panels are made of high-efficiency monocrystalline solar cells and are manufactured right here in the US. They have a comprehensive quality control process ensuring that each panel is built to the highest standards. I’ve been extremely happy with their van solar panels and other electrical system products and wouldn’t hesitate to recommend them.
Read next: Learn our best tips for conserving battery power so you don’t run out of juice!

Inverter
Now let’s move on to inverters. As mentioned earlier, an inverter takes the DC power from the battery bank and converts it into usable AC power that comes out of your 110v outlets, just like in a regular house. If you have anything that needs to be plugged in, or a microwave or an induction stove, you need an inverter.
The two primary types of inverters are pure sine wave and modified sine wave – each one transfers the flow of energy differently. Efficiency and cost are the biggest differences between the two.
Pure sine inverters are more efficient and will operate all appliances within their wattage range. They’re more expensive but will provide a steady flow of energy.
Modified sine inverters are an economical choice, but will use significantly more energy and might not support certain appliances, like a refrigerator, microwave, or induction stove. Some newer devices won’t operate well on modified sine inverters either, so it’s important to research the exact appliances you plan to use and what the manufacturer recommends.
If price isn’t an issue, pure sine is the way to go, because all equipment sold on the market today is designed for pure sine waves. But, this isn’t necessary for everyone – it all depends on what you’ll be powering.
Next, you’ll need to determine how powerful of an inverter to get by looking at the wattage requirements for each device you’ll want to power. The wattage represents the total amount the inverter can handle at any given time. Things like an induction stove, power tools, a microwave, or a blender have a high draw, so they’ll require an inverter that has a high wattage rating. If you’ll only be charging one computer at a time and an occasional appliance, you can look for something in the 600-1200 watt range. If you plan to run an induction stove or microwave while charging multiple appliances at the same time, you’ll need a high-watt inverter around 2000 watts or more. This is what I have in my van. We use our induction stove at least once a day, and a 2000 watt inverter has been able to handle whatever load we put on it.
It’s important to be aware of the demands of your appliances and devices so that your own needs are met and your equipment can be used properly. Otherwise, by overloading your system, you risk damaging your batteries.
Batteries for Your Van Electrical System
Once you’ve got a good idea of how much power you’ll be drawing, you can determine how big of a battery bank you’ll need. In my experience, it’s better to overestimate your needs than to underestimate, so make a liberal estimate when you’re planning your battery bank.
Battery capacity is measured in amp-hours (Ah), which is a measurement of how much electricity the battery can store. Choosing a properly sized battery bank is vital and depends on how much power your devices will draw and the wattage of your solar panels.
There are two types of batteries to consider: AGM and Lithium.
AGM Batteries
AGM batteries are heavy-duty and durable. They’re built to handle consistent vibrations and changing temperatures. They are significantly less expensive than lithium batteries, especially since lithium batteries are newer on the market.
The downside is that AGM batteries can only use 50% of their total capacity, so once they’re below 50% they need to recharge. That means if the total capacity of your battery bank is 400 amp hours, for example, you really only have 200 amp hours of usable power.
Frequent depletion below 50% significantly decreases the lifetime of AGM batteries, so it’s important to monitor them to ensure they’re getting the charge they need. You can do this with a voltage meter. When your AGM batteries are full, your voltage meter should read around 12.8 volts. As you consume battery power, this number will drop towards 12.0 volts. If it gets down to 12, you’ll need to charge your batteries as soon as possible as anything lower will start to degrade the battery.
Another thing to note is that, if necessary, AGM batteries can be mounted outside if you are looking to save space when planning your van layout. However, if you do have space or if you spend a lot of time in harsh climates, I recommend keeping them inside the van. AGM batteries are sealed and do not off-gas, so it’s safe to keep them inside and it will protect this big investment from the elements.
Lithium Batteries
Lithium batteries are considerably more expensive upfront but also more efficient. They’re long-lasting, but don’t handle cold temperatures very well and must be kept inside the van. So, depending on your plans and your budget, these are important factors to consider.
They can use 80% of their total capacity, so you have more amp hours to use before needing to recharge. Comparing this with the previous example we used, if you have lithium batteries with a capacity of 400 amp hours, you have 320 usable amp-hours compared to only 200 with AGM batteries. This means you can get away with a smaller capacity (and lighter-weight) battery bank because you get more from each battery.
The downside of lithium, apart from the upfront price, is they require greater temperature control. If their temperature gets below freezing and you try to charge them, the batteries can be damaged. Of course, if you are traveling in your van and have water in the lines, you’ll want to avoid freezing temperatures regardless, but if you spend a lot of time in wintery climates, this is something to consider when choosing batteries for your van. There are products out there that will maintain temperature, so make sure to look into this if you decide to go the lithium route.
If AGM batteries are properly used and well taken care of, they should last a long time. But, if they’re not and you need to replace them multiple times it can be costly and might add up to the initial cost of going with lithium. Even within the two types of batteries, each brand will quote a different lifespan and number of charge cycles.
Ultimately, it comes down to budget and climate demands. If you plan to travel or live in your van during the winter, you’ll need to size up your battery bank to ensure sufficient power through sunless days. Plus, running a heater 24/7 regularly to prevent freezing pipes consumes a decent amount of power. Whichever you choose, the key is to find a reliable company with a good warranty policy. Battery companies that come highly regarded are Battle Born for Lithium and North Star for AGM.
Van Wiring
Now, I’ll briefly touch on wiring. First, the most important thing when it comes to installing an electrical system is safety. I can’t stress this enough – whether you’re DIYing a solar electrical system yourself or hiring someone else to do it, safety and efficiency are essential. Improper wiring can be dangerous and put you at risk of electrocution or an electrical fire. Because of this, it’s important to understand the basic layout of a wiring diagram.
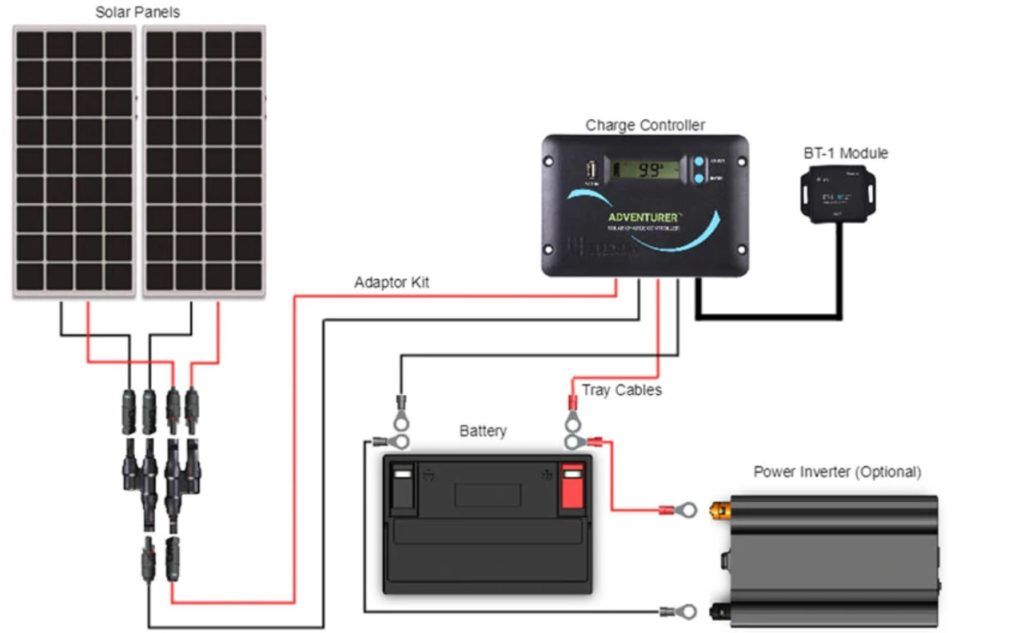
Essentially, there will be positive and negative wires running from the solar panel(s) to the charge controller, wires from the charge controller to the battery bank, wires from the fuse block to each battery, and wires from the battery bank to the inverter. This is only a very basic explanation to help you understand how everything is connected. Check the resources linked in this lesson (below) for more information.
It’s important to keep the wires neat and tidy and avoid excess wires running every which way in your van. Keeping a clean setup and choosing the right wire type and size will help to prevent the unnecessary loosening of wires due to frequent motion in the van.
If you’re hiring somebody to build your van, this is an area they should have a lot of knowledge and expertise in. Again, it’s all about safety and a poor electrical install has the potential to not only give you trouble, which will be super frustrating, but it can also be dangerous. For those of you who are DIYing, we’ve included links to some of our favorite resources below this video to help you better understand what sort of wiring you’ll need depending on your load.
Charge Controller
Now let’s move on to the charge controller. While the solar panels convert sunlight into electricity, that electricity voltage and current isn’t suitable for batteries, so that’s where the charge controller comes in. The charge controller converts the voltage and current from the solar panels and deposits it into a usable charge for the battery. A charge controller also protects your batteries from overcharging, improving their longevity.
There are two types of solar charge controllers. The first is called PWM or Pulse Width Modulation. These are cheaper, more compact, less efficient, and require your solar panels to be wired in parallel, which is more complex. Again, I’m going to refer you to some additional resources below this video if you want more details on wiring.
The other type of solar charge controller is called MPPT or Maximum Power Point Tracking. An MPPT charge controller harnesses the maximum energy coming into your panels, so your batteries get maximum input. These controllers are more expensive, larger, and also give you more flexibility with the way you wire your solar panels.
The controller Outside Van used in my second van is the Zamp 30 amp, 5-stage PWM charge controller. I’ve linked to some additional info on this controller in the resources section. It’s installed in the corner of one of my cabinets and provides a simple way to monitor the solar power coming into my batteries. It works like a charm and costs around $150.

Automatic Charging Relay (ACR)
An automatic charging relay is a small device that attaches to the vehicle’s alternator. It’s an intelligent, inexpensive piece of equipment that allows the alternator to charge your house batteries while you are driving. Having one of these means if you are on the road for a few hours, your batteries will be fully charged when you arrive at your campsite. Since your vehicle’s starter batteries are a priority, this device charges the starter battery first and then switches over to top off the house batteries. It’s fairly easy to install and is a great backup when it’s cloudy out.
My Van Solar Power Setup in Both Vans
I’ve had two different setups in my Sprinter vans. This video provides an overview of my second Sprinter van’s power system including the solar panels:

My first Sprinter van had 180 watts of solar and a 375 amp-hour AGM battery bank. What I found with this system was that on long summer days it was adequate, but as soon as the days got shorter or I had a long stretch of cloudy days, I really had to watch my consumption. I found myself plugging in more or using the van’s alternator to top off my batteries and for that reason, I decided to size everything up in my second van.
In my second van, I had 440 watts of Zamp solar panels and a 660 amp-hour AGM battery bank. My batteries were also hooked up to my van’s alternator so they charged while driving. To give you an idea of what we charge in the van, we have two electric bikes, my computer, a bunch of camera equipment, two cell phones, a dust buster, a blender, and a few other random electronics that we frequently charge. I’ve never had to plug in by necessity or had to be stressed that my batteries were dangerously low. The system has worked great, and I’m happy I overestimated because I never have to think about having enough power.
The downside of my setup is that the battery bank is very heavy due to its size and it was also expensive. I chose AGM because the lithium technology was and is still evolving, so I decided to go with the tried and tested system. In the future, I would consider lithium as a way to save space and weight, but I’d need to take extra precautions with temperature control since we use our van on ski trips.

For more information on my van electrical system, I’ve included links to two of my YouTube videos in the resources section.
Recommended Products
- Magnum 2000 watt inverter (Amazon link)
- Zamp Solar Roof Mounted Solar Panel Kits
- Battle Born Lithium Batteries
- Victron 30A MPPT Controller
- Zamp 30 A PWM Controller
- Wiring Diagram & Tutorial by Far Out Ride
Resources Section
- Video: My Second Sprinter Van Solar Setup & Electrical System Tips
- Video: Sprinter Van Solar & Electrical System Tour of my First Van
- Review of Zamp Solar Charge Controller by Truck Camper Adventure
- Best Batteries for Solar Power by Parked in Paradise
- Solar Calculator & DIY Wiring Diagrams by Parked in Paradise
- Explorist Life: Switching from AGM to Lithium
What will your van electrical system and solar panel setup look like? Share your questions, tips, and experiences in the comments below, and make sure to sign up for van life resource updates here!
Hey Kristen! This is all extremely helpful. A couple questions for you: did you do the solar install yourself? And if so, what did you find was the best way/placement for the hole in the roof for wiring? I’m looking to do the solar install myself but drilling a hole in the roof is… well.. terrifying (as I had a company install my exhaust fan so I didn’t have to cut the square in the roof myself haha).
Hi Paige, sorry for the delay in getting back to you! Kristen did not install her solar system herself but if you want to try doing it yourself I’m sure you can find some helpful DIY info out there through a google search 🙂 You can read all about Kristen’s solar setup here and learn more in the accompanying video as well: https://bearfoottheory.com/sprinter-van-solar-panels-batteries/
Hi Kristen,
I’m appreciating your thorough examination of the process. I’ve finally gotten to the point of planning my layout and your rollout of ‘Van Life Roadmap’ is very timely though Ive had my Sprinter for a couple of years, I’m at a place where I can do the project now.
My question is this….Im looking at some of the reviews of solar power stations, especially ones that can be charged through the 12v van battery while driving (would this be a ‘charging relay’?). It seems like an economical and adequate way to run my electrical system given what my needs will be. In fact Im having a difficult time coming up with reasons not to go this route.
With something like 1000 watt hours per charge, and a price point just at $1800….its really tempting
Tell me why this is a bad idea?
Thank you again for your time and dedication, I can only imagine what effort it took to put all of this together. Its very helpful
Khalden
That can be a simple and easy way to go if that meets your power needs!
Hi again, correction from previous comment….the model Im considering has 2400 watt hours ( not 1000 as previously stated )
thanks Khalden
Hi,
just watched your youtube video and read this posy, so much great info! 😀
I was wondering, how much does your electrical setup + solar panels weigh?
/ Ida
Hi Ida! We’re so glad to hear you’ve found these resources helpful. I don’t know the exact weight of Kristen’s solar setup but it’s made by Zamp solar so you could likely find that information on their website. Best of luck!
Great! Thanks 😀
What a great Article, very informative, well written. Thank you for taking the time to write it.
Erick Viking Heating & Air
Great! Thanks