Tour my First Sprinter Camper Van (a tiny home on wheels)
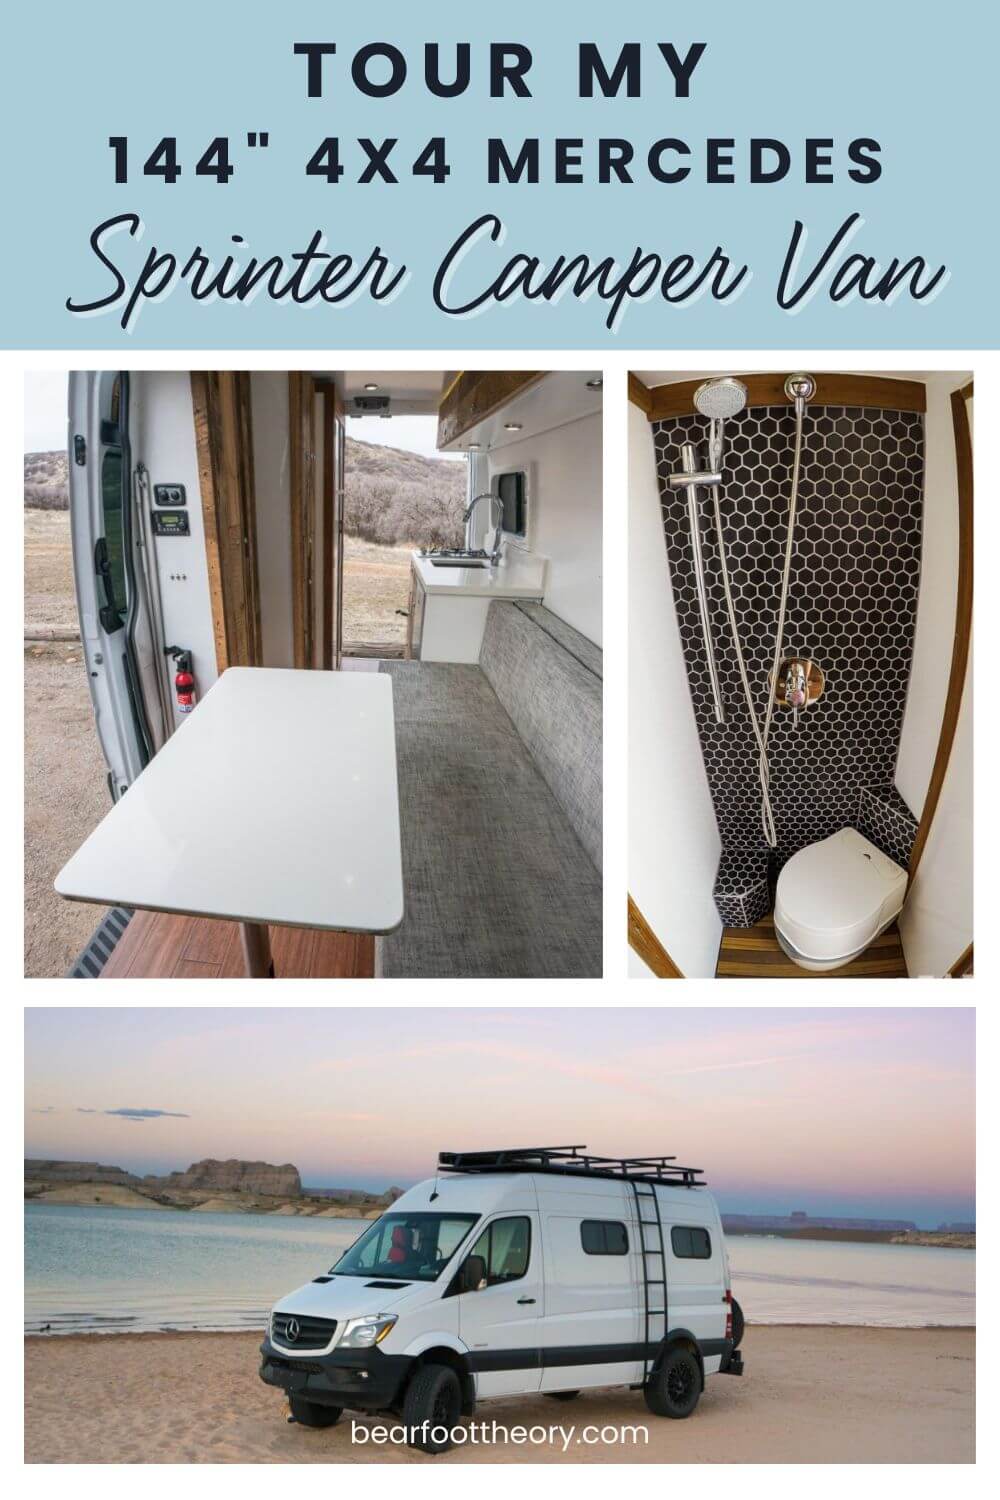
Get a full tour of my first 144″ 4×4 Mercedes Sprinter camper van with a video, details of the conversion, and what I’ve learned since.
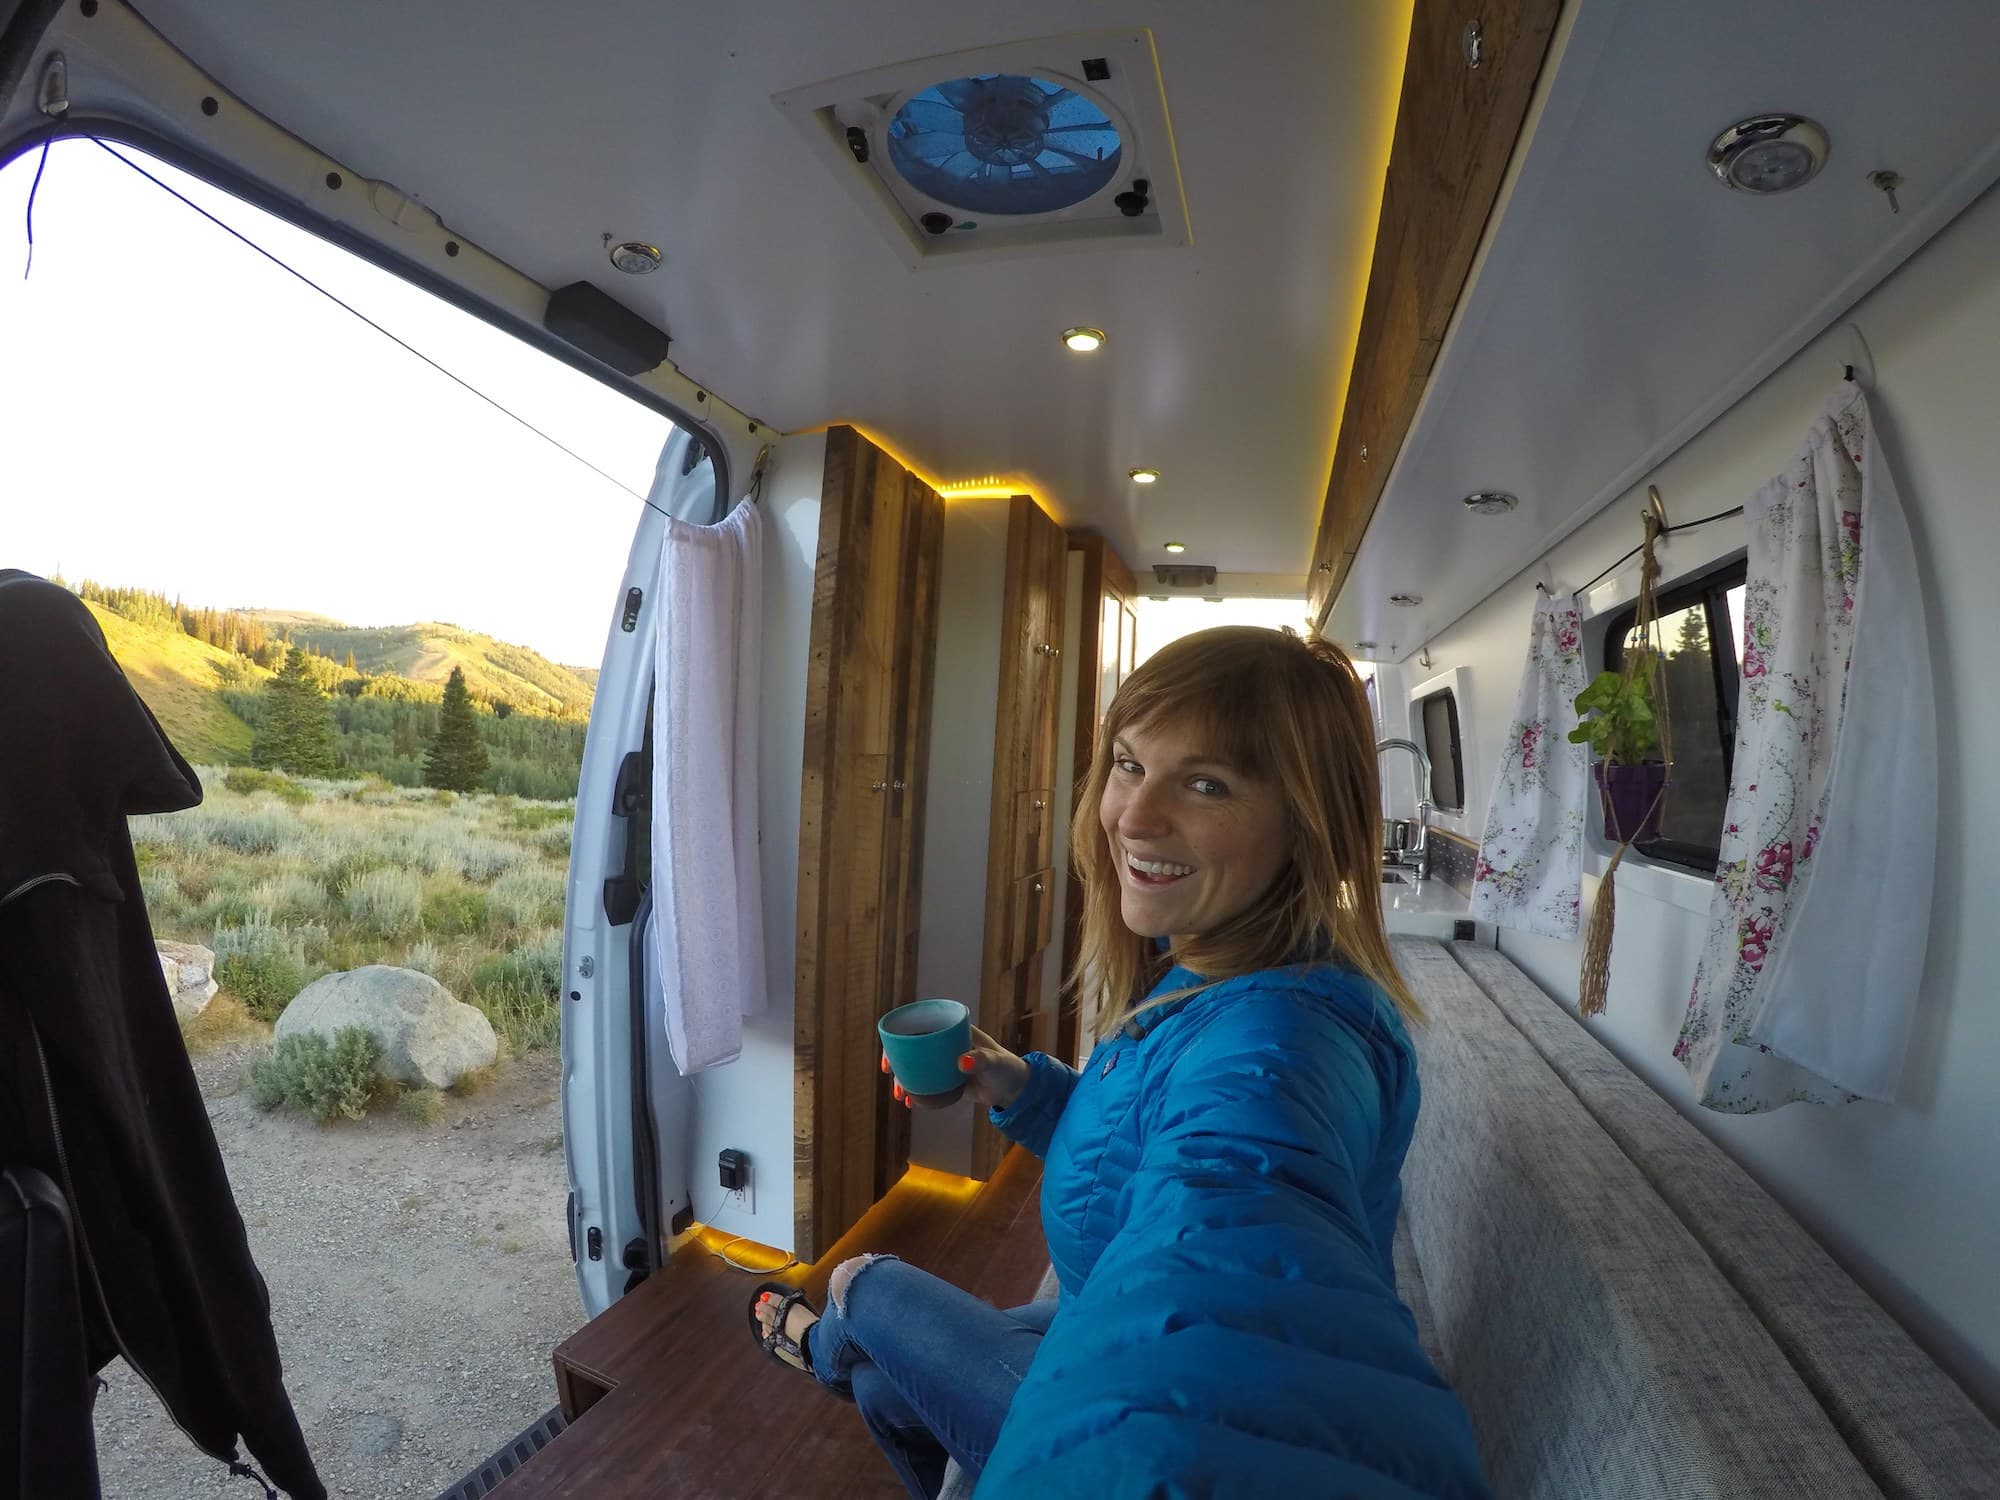
**Update – I sold this van in March 2017 and have had two Sprinter Vans built by Outside Van since. Check out the tour of my new Sprinter Van conversion here, plus how it compares to Sprinter #1 and Sprinter #2. Otherwise, continue on to check out Sprinter #1.
Back in 2015, I bought my very first 4×4 Mercedes cargo Sprinter Van with big plans to convert it into the ultimate tiny home on wheels.
When I was coming up with the concept for my Sprinter camper van, I knew I wanted not just an adventure mobile to haul my gear, but a comfortable place to live and work. With this in mind, I had a few priorities when I was designing the van interior:
- I wanted the van to feel open and airy maintaining the walkway to the back door.
- I wanted the bed to run vertically down the van rather than across, so I would have more legroom while sleeping
- I needed a table where I could sit and do my computer work
- I needed ample storage space for gear, clothes, food, and other necessities for living on the road
- I wanted a toilet and shower
- I wanted a permanent galley and a sink to do dishes in
The custom conversion of my Mercedes Sprinter Van took four months and turned it from an empty cargo van to a fully capable camper van.
Read on for a full tour of my first custom converted Mercedes Sprinter camper van including a video, what components I chose after lots of research, and how everything turned out.
This post may contain affiliate links.
4×4 Sprinter Camper Van Tour on YouTube
For a quick overview and to see everything in action, watch this full video tour to see the inside of my first 144″ 4×4 Mercedes Sprinter camper van.
UPDATE: Here is the video of my third and newest custom Sprinter camper van that was converted by Outside Van in Oregon:
Save this post!
Enter your email & I'll send this post to your inbox! You'll also receive my weekly newsletter full of helpful advice for planning your adventures.
Sprinter Van Model
I got the 144″ Sprinter, which is the shorter model of the two Mercedes Sprinter vans available at the time. The 144″ Sprinter fits in a normal parking spot and is slightly more maneuverable in cities and on back roads.
I opted for the high roof, cargo-style Sprinter van and added a sliding door and back door windows. I added the 4×4 option which has a 3.0 L, v6 diesel engine.
Read next: Deciding between the 144″ and 170″ wheelbase Sprinter Van? Check out my comparison here after owning both.
Sprinter Van Bed
Fitting all of my desired components into a 144” Sprinter van (the smallest version of new Sprinters) was going to be a challenge. When I was coming up with the concept for the layout, there were a few different options for the bed.
The first option was a dinette. This would maintain the walkway and give me a place to work, but it would be near impossible to have a bathroom. Plus sleeping vertically meant that the entire back half of the van would be devoted to the bed. Considering I’m often by myself, I didn’t think it made sense to waste two full walls on a bed and a 6 seater dining table.
The next option was a platform bed, where the bed is built on a large platform with a bunch of storage underneath. This option would provide the most storage space but would again eliminate the option for a bathroom. The walkway also wouldn’t be maintained, and my workspace would be an afterthought.
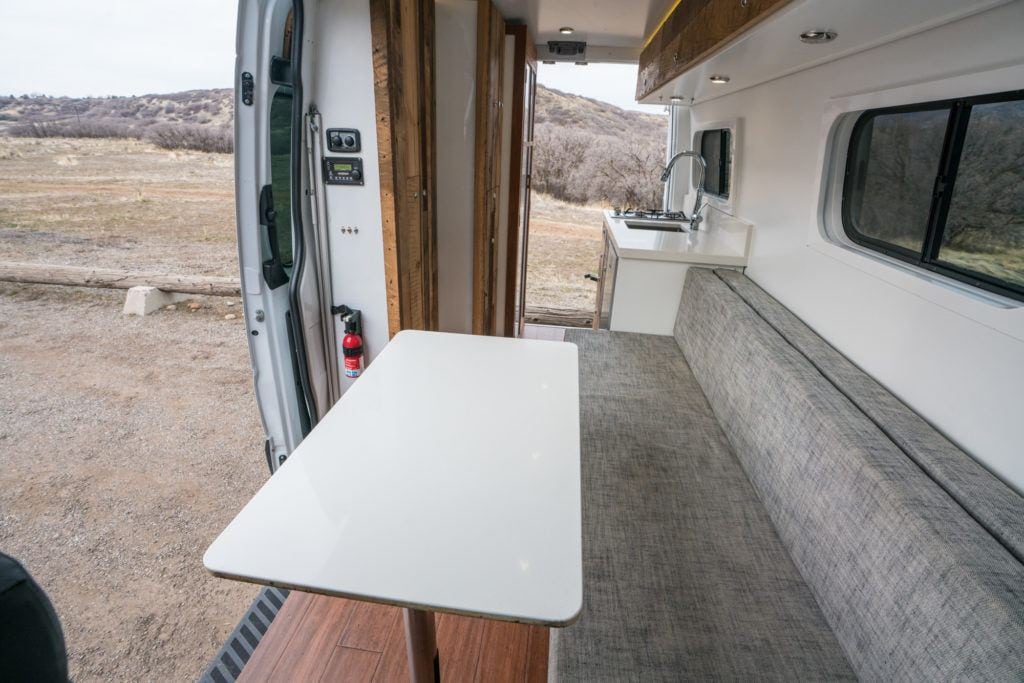
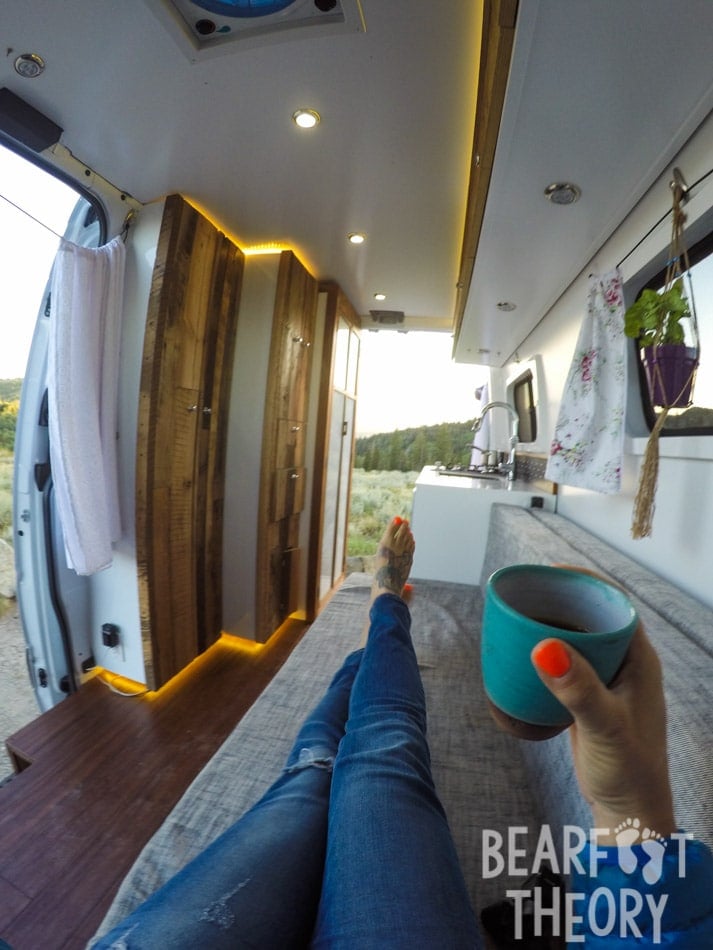
After doing a lot of research and looking at a ton of cool camper vans on Pinterest, I had the idea for a convertible couch/bed with a pop-out table that faced the large side door. This would maintain the walkway and the open feel of the van, giving me space for a bathroom and galley along the back wall, and I could enjoy the views as I sat and worked on my blog inside the van.
Read next: Get more camper van bed ideas here
With the couch and the passenger swivel seat, my van can comfortably seat 4-5 people when stationary. When it’s time to eat or do my work, I simply place the two table legs into pegs built into the floor and then set the table right on top.
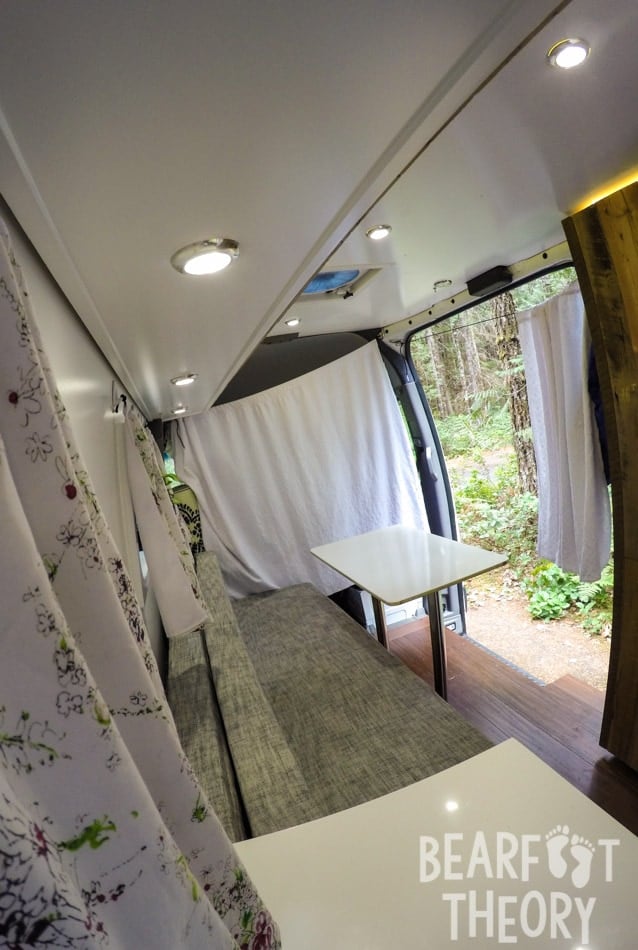
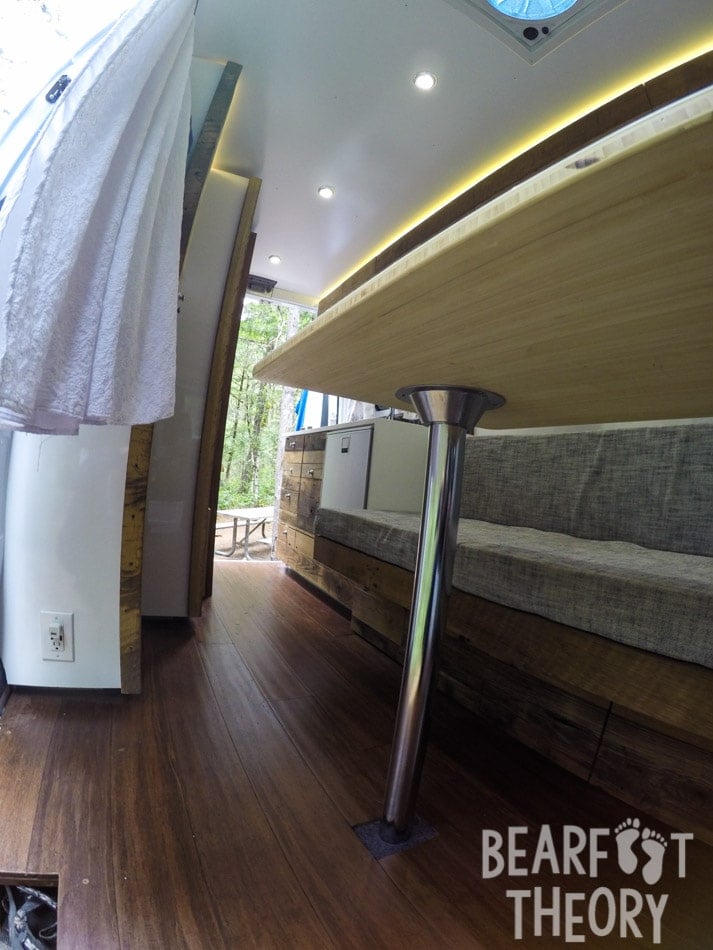
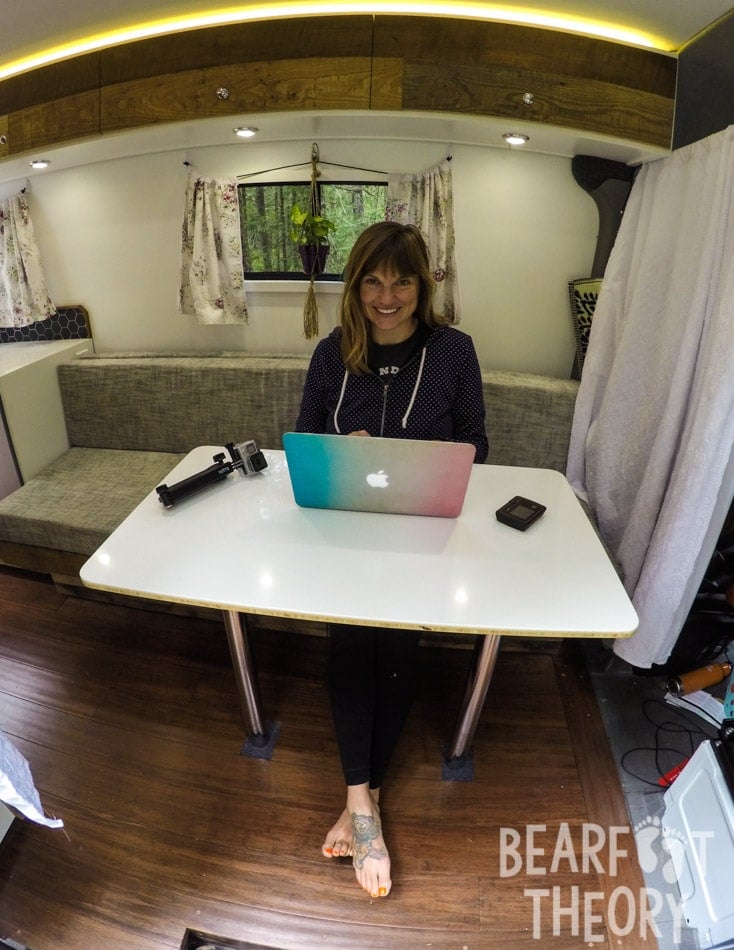
If I was going to have to make the bed every day, I wanted it to be super easy so I’d actually put it away every morning. So at bed time, all I have to do is remove and store the table, unhook the bed, and the bed slides right out in one swoop. Then the memory foam cushions from the back of the couch separate and lay flat resulting in a near queen-sized bed at 60” wide x 76” long – meaning it can sleep two tall people very comfortably.
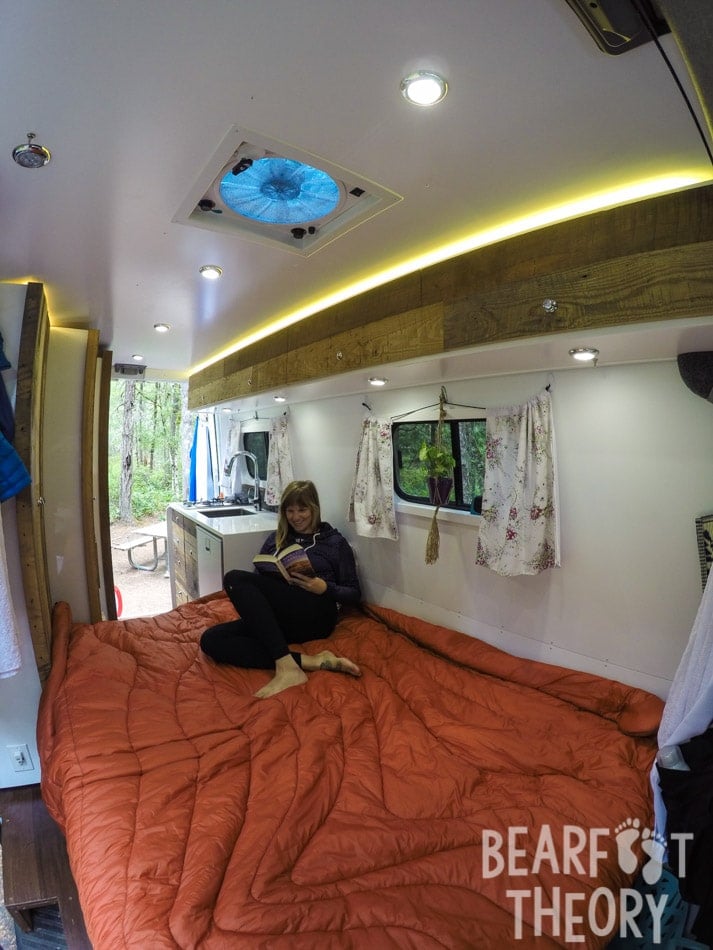
For more details on how my convertible bed works in my Sprinter Van, watch this video:

Sprinter Van Galley
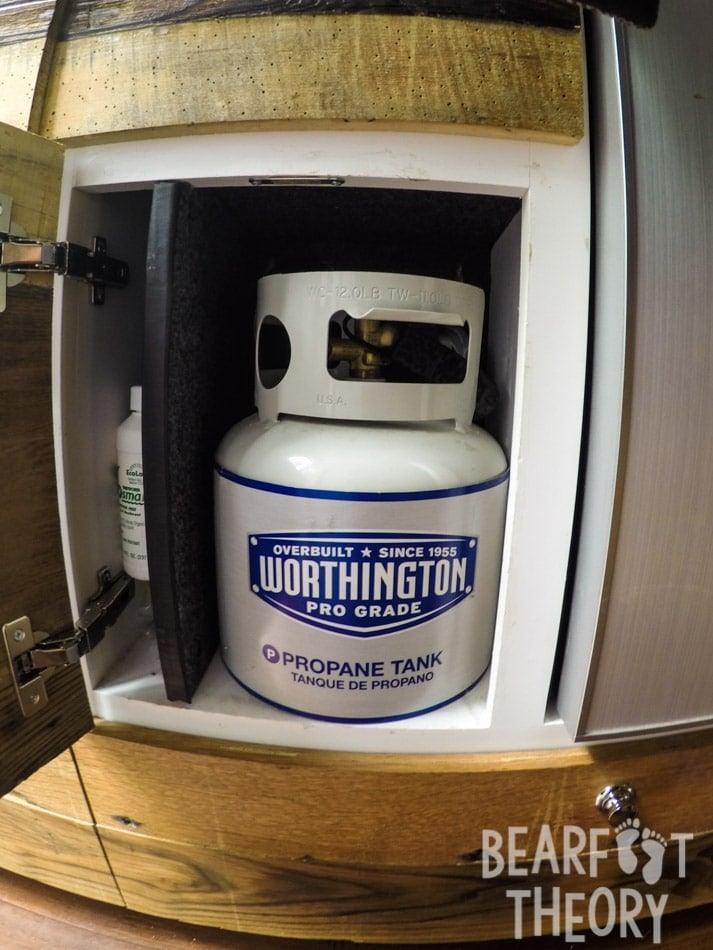
I didn’t want to have to set up a Coleman stove every time I cooked, so I opted for a permanent two burner galley. The stove is made by Ramblewood Green (Model GC2-43P). It’s a little large for the space, but it’s plenty powerful, cleans easily, and runs off of propane. The 1-gallon propane tank is stored in a cabinet under the sink and is enough for a week or longer depending on how much I use it.

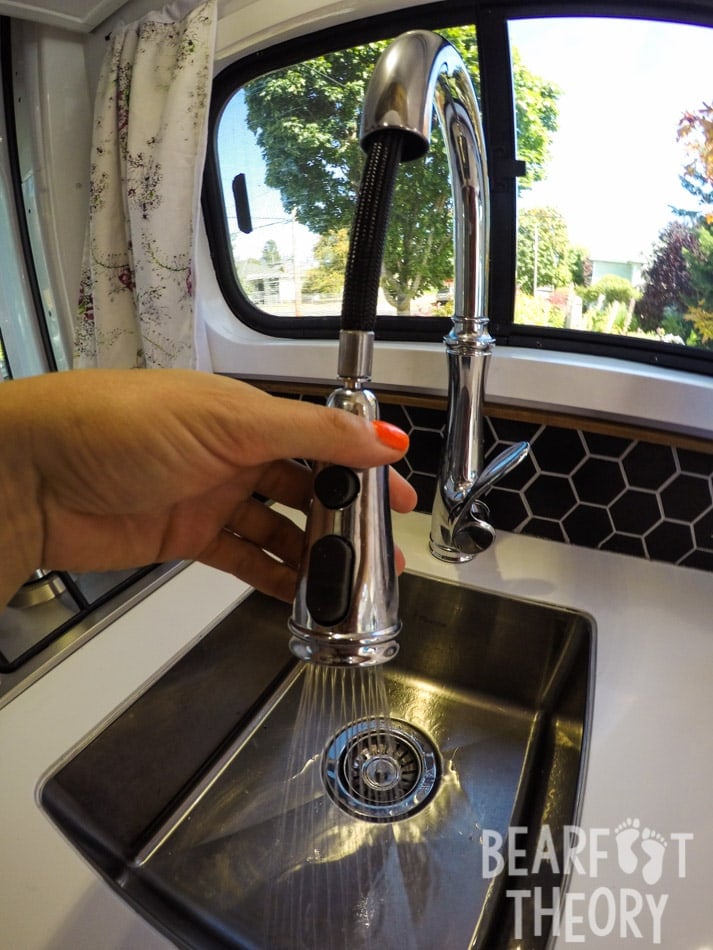
I also wanted a place to do dishes and wash up so a sink was a necessity for me.
The sink is stainless steel and made by Dawn USA (Model BS121307). It’s not too big, but big enough to throw some dirty dishes in. In order to do dishes without water getting everywhere, I chose the Kohler Simplice faucet (Model K-596-CP) with a pull-down spout, so I can direct the water as I’m scrubbing and rinsing.
Since the galley is on the back wall, it had to be built right over the wheel well. This reduced my options for a fridge, since the space wasn’t very big. The Isotherm CRUISE 65 Elegance is a medium-sized marine fridge that fits perfectly. At 2.3 cubic feet, it’s compact, but if you shop smart you can fit 4-5 days of food in there, plus a few beverages. It’s also really quiet, and you can’t hear the motor.
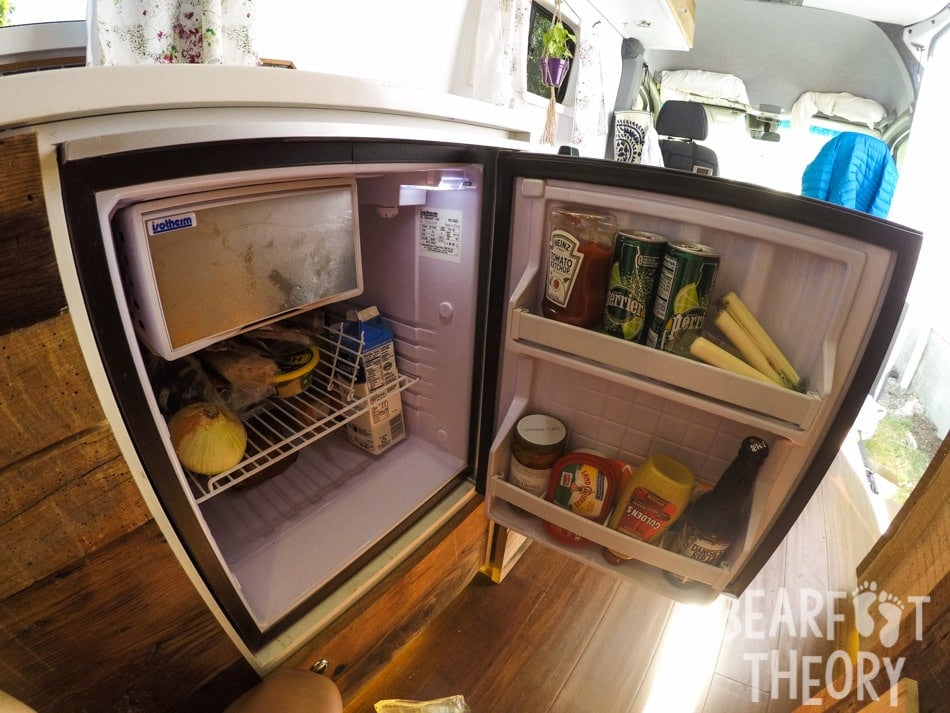
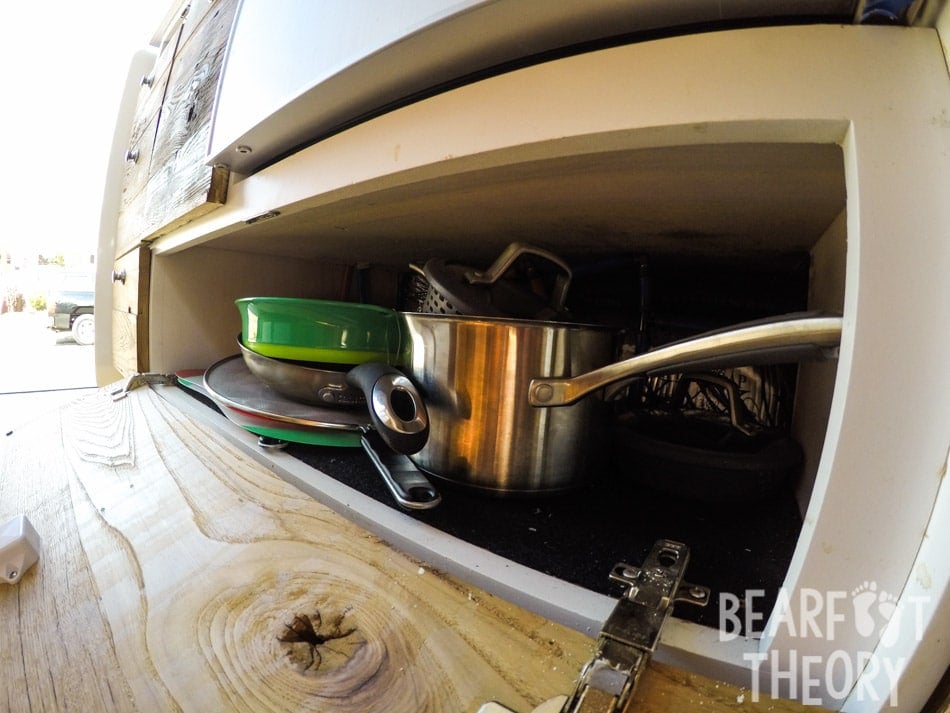
The galley has enough countertop space to cut and prep food and has a set of 4 drawers and a deep storage space for pots and pans underneath.
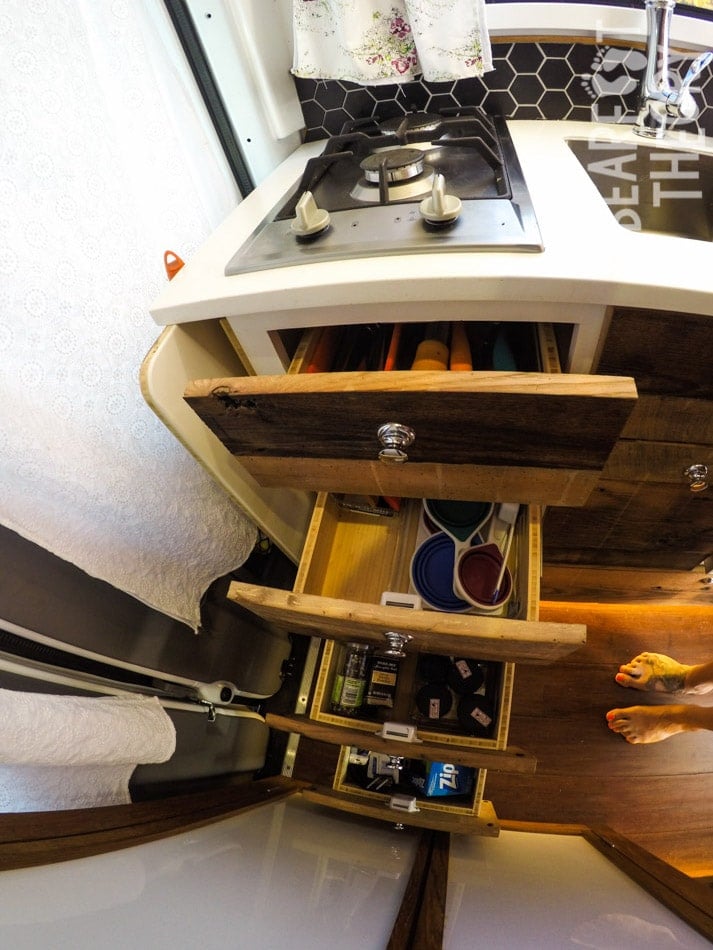
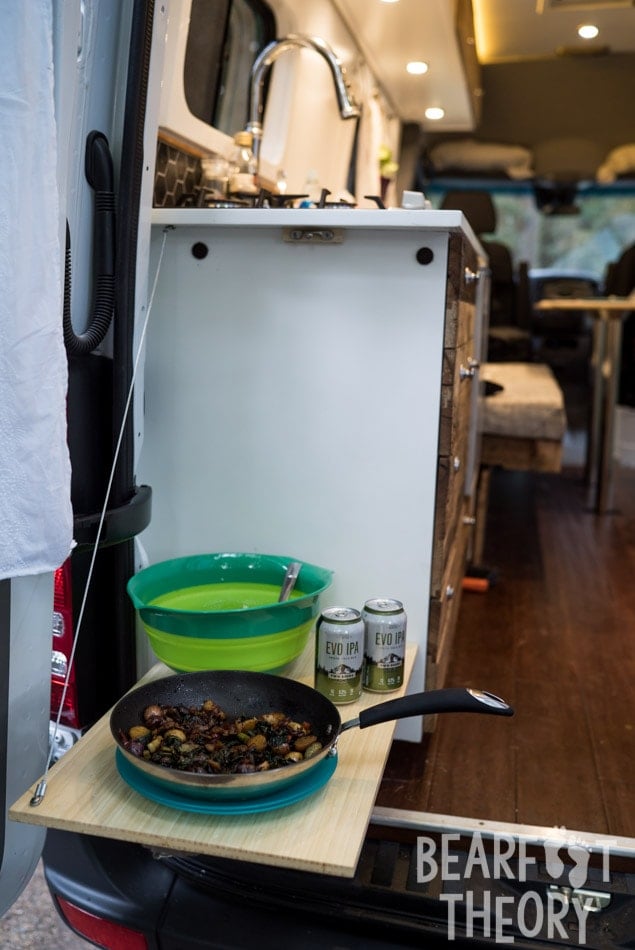
Finally, on the back end of the galley, there is a small fold-down bar/counter where I can put food and drinks if I’m grilling or eating outside.
Read next: Check out my must-have kitchen essentials for camper van cooking
Sprinter Van Bathroom
I wanted a bathroom for a couple of reasons. I didn’t want to have to go outside in the middle of the night – waking up in the dark, getting dressed, and putting shoes on just to go pee is the WORST.
Second, as a solo female traveler, I wanted to be completely self-contained for safety reasons. If I’m somewhere where I’m not super comfortable, I wanted to be able to close the curtains, lock myself in, and not have to go outside for anything. That way, no one has to even know that I’m in the van by myself. Alternatively, if I’m parked in a city or outside a friend’s house, I can be totally out of their hair. So that was my reasoning behind having a toilet.
Read next: Solo female van life safety tips
Finally, having a hot water shower inside the van would make living in the van year-round more sustainable and enjoyable. Showering outside in the summer is fine, but in the winter without a shower, I’d be spending too many nights at friend’s houses or RV parks. Note: my thoughts on needing an indoor shower have changed since the time I wrote this, read why I don’t think you need an indoor shower in your camper van here.
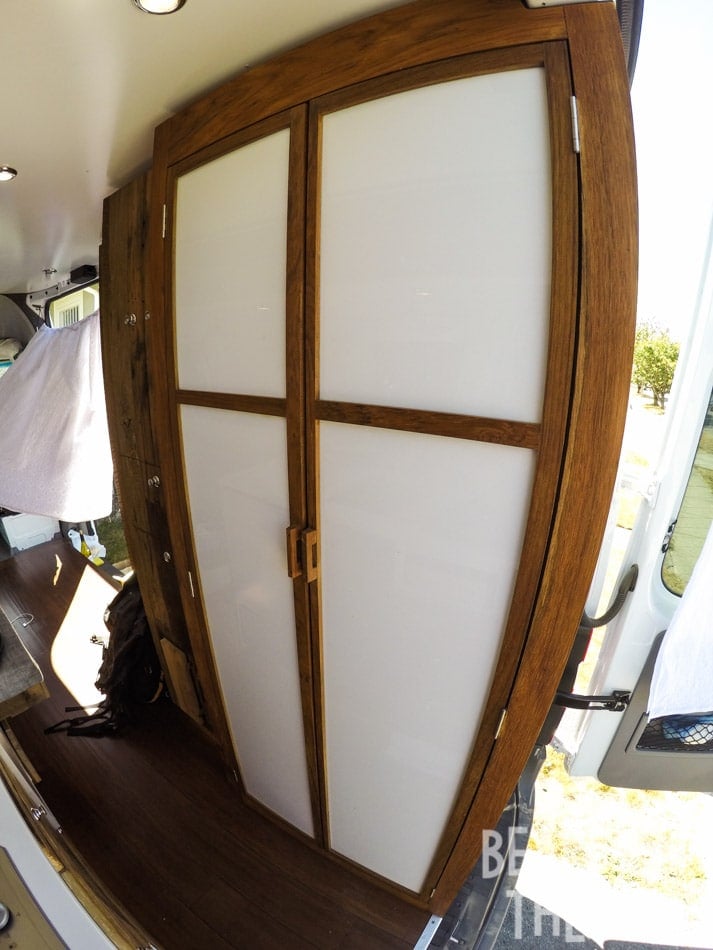
The bathroom is completely enclosed in the back corner of the van. It’s a little tight to sit on the toilet and have the doors shut, but even with my long legs, I fit in there ok.
The toilet is a Thetford Curve Portable Toilet (Model 92360 Porta Potti 550E). This means there is no plumbing associated with it. You sit on it just like a normal toilet, do your business, close the lid, open the flusher, press the water button, and close the flusher. I’ve only gone #1 in it so far, but the deodorizer seems to neutralize all smells really well.
When the holding tank is full, there is an indicator letting you know it’s time to dump it. To clean it out, you simply separate the bowl from the holding tank, unscrew the lid and pour it down into the RV dump station, just like you would for a black water tank. Then rinse, reassemble, and you are good to go.
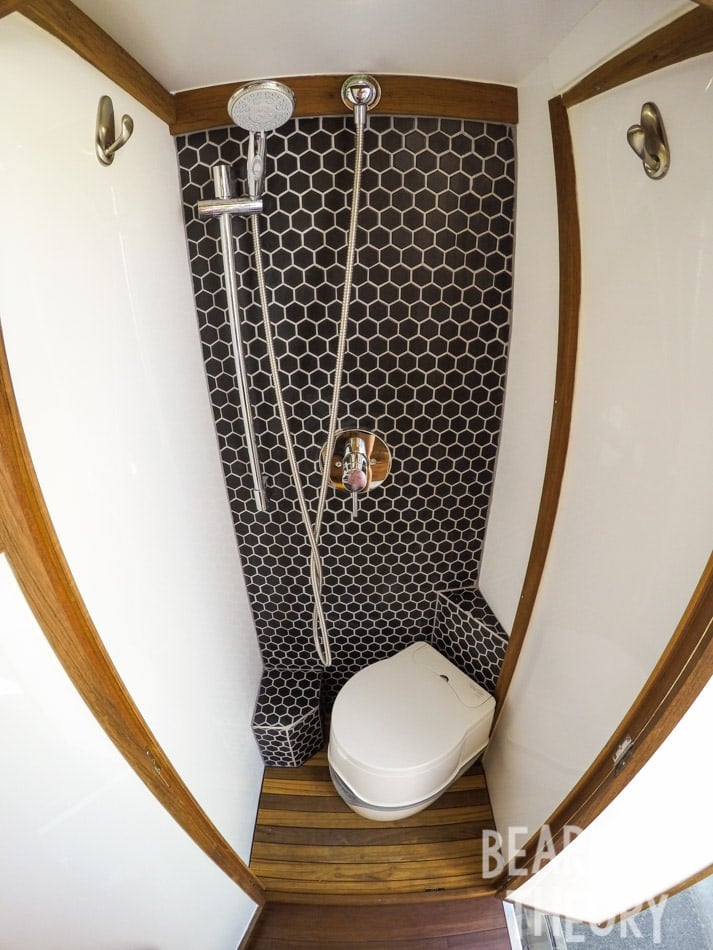
The advantage of the porta potty vs a permanent toilet is that when I want to take a shower, I can take the entire toilet out so I don’t have to maneuver around it. Also if I want to go on a trip and need the bathroom to store large pieces of gear, I can leave the toilet behind.
Read next: The best toilet options for van life
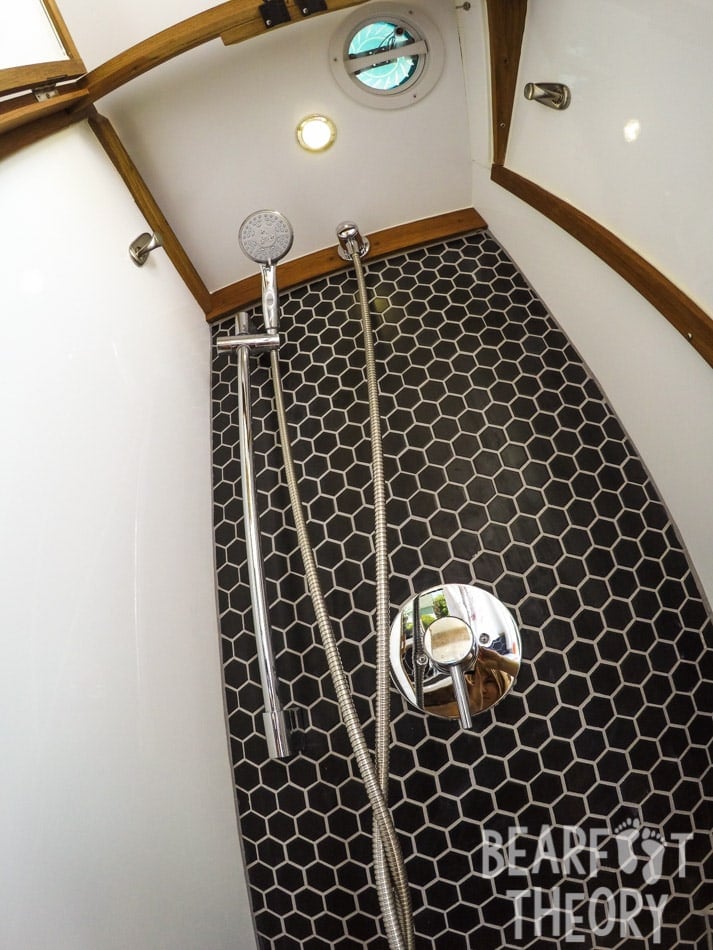
The shower head is made by Camco (Model 43712) in chrome. I chose this showerhead because it has an on-off switch on the handle. Paired with a 6-foot-long shower hose, I can also use the shower to hose down gear or my feet outside. The shower floor consists of teak slats which are removable in case the drain to the grey water tank needs to be accessed.
Finally, I had a small fan installed in the bathroom to help dry it out after showering.
Sprinter Van Water Tanks
I have a 10-gallon water tank inside the van and another 15-gallon tank underneath the van outside. This was one of the biggest mistakes in my first sprinter camper van conversion. I spend a lot of time in wintery climates and my exterior 15-gallon tank is unusable in winter, limiting me to the 10-gallon tank inside.
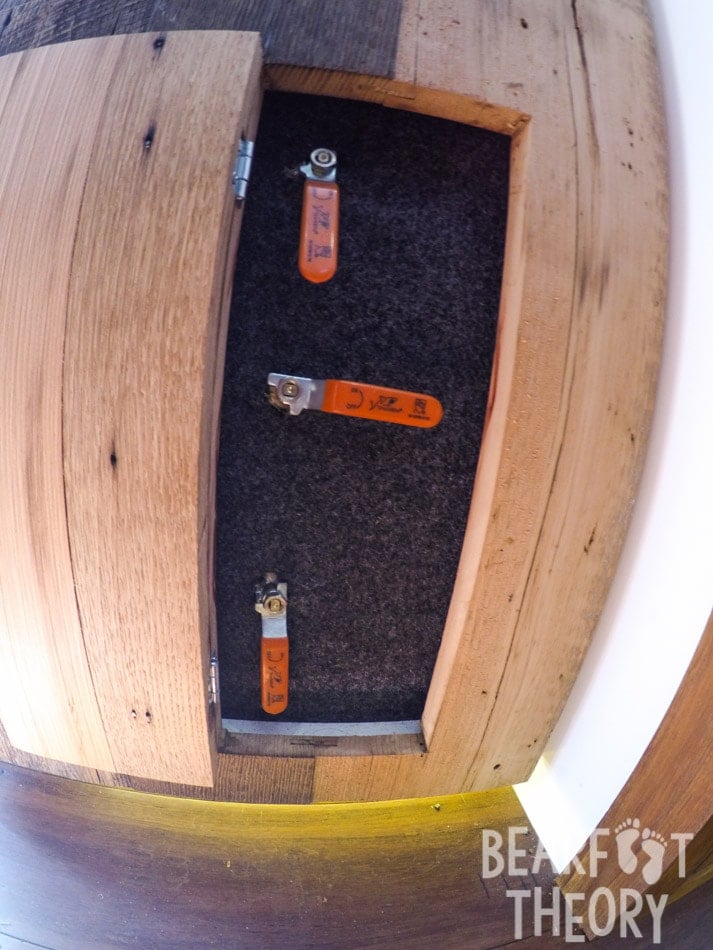
I also have a 15-gallon gray water tank underneath the van where the shower and sink drain into.
Read next: Learn all about camper van water systems and how to set this up properly
Sprinter Van Cabinets & Storage Space
The floorplan of my first Sprinter van afforded quite a bit of storage space.
I have a large floor to ceiling cabinet where I store all of my clothes, another big closet for gear, and a couple of drawers for my toiletries and electronic equipment.
The galley has drawer storage for kitchen items, and then overhead cabinets run along one entire side of the van. This is where I store food, books, and other random things. Underneath the bed, you’ll find another large drawer where I store outdoor gear like camp chairs, my tent and sleeping pad for backpacking, etc.
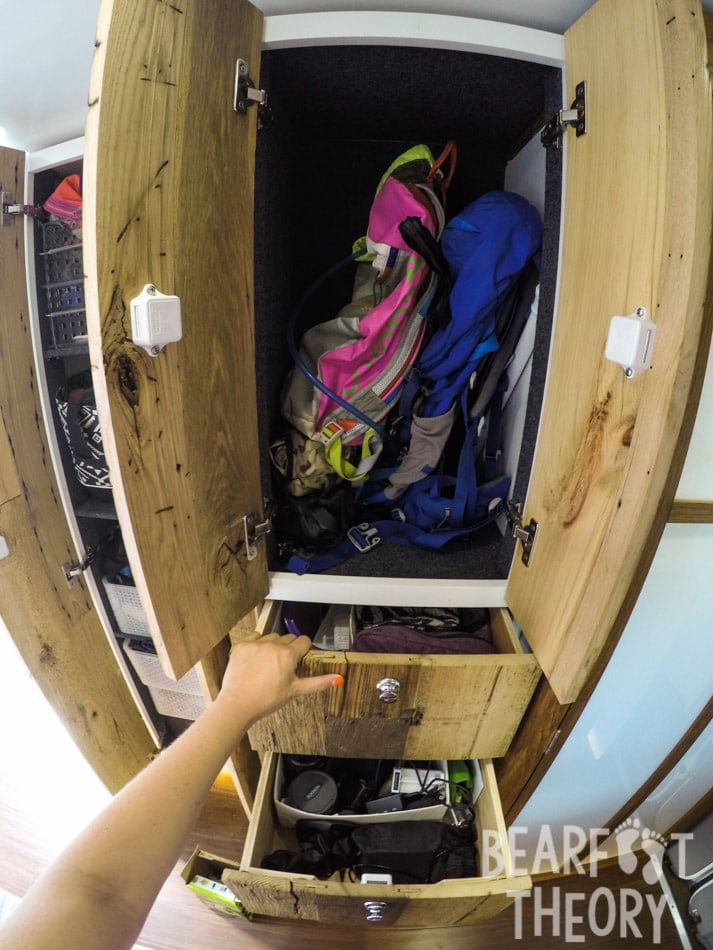
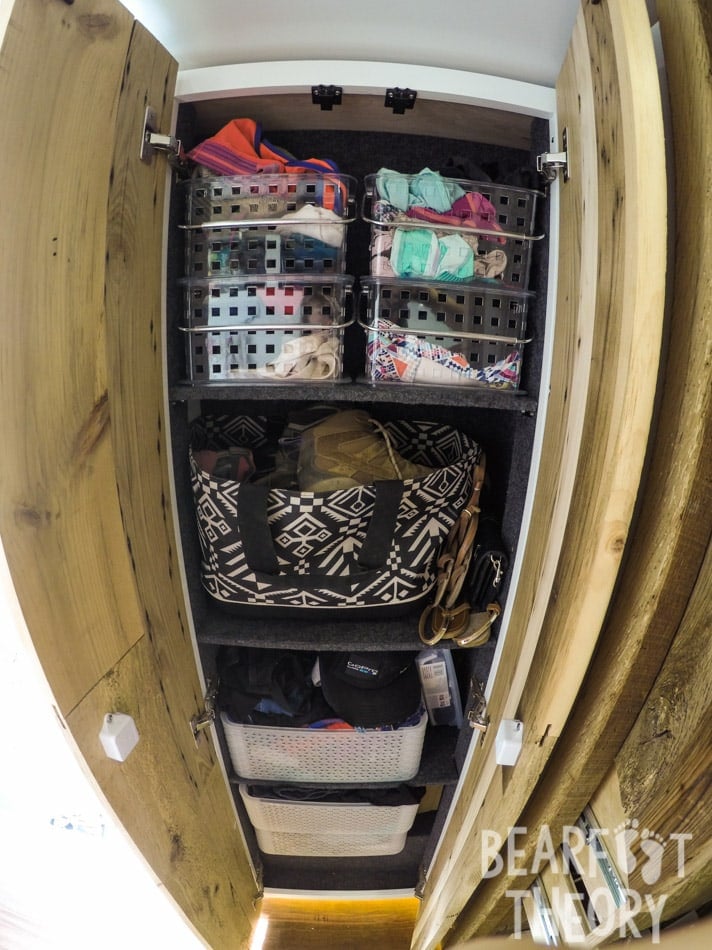
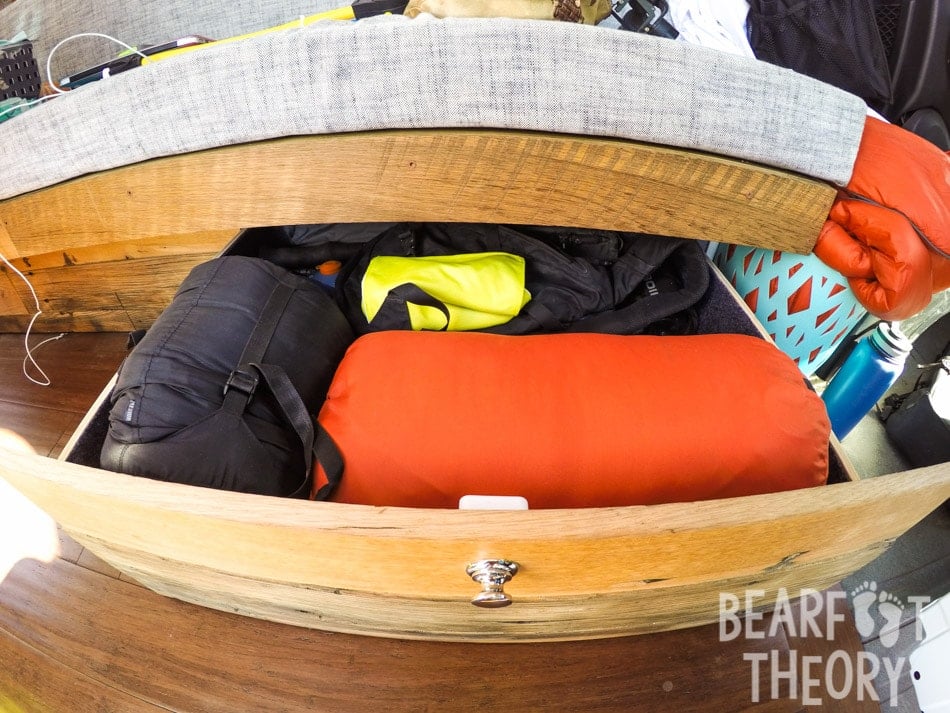
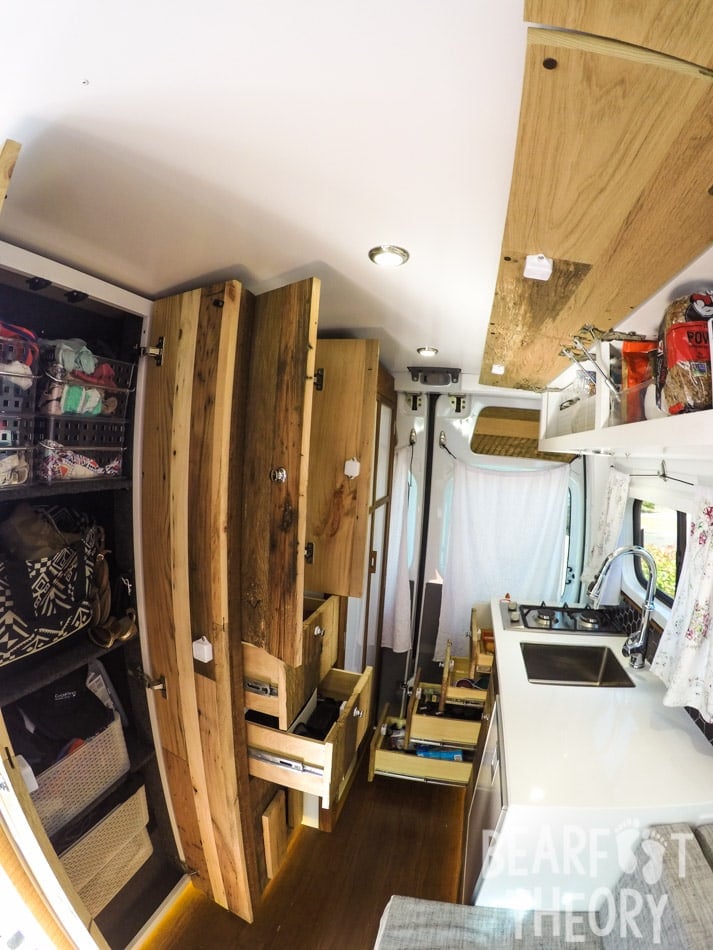
All of the drawers lock using these push buttons that prevent the drawers from sliding out while I’m driving.
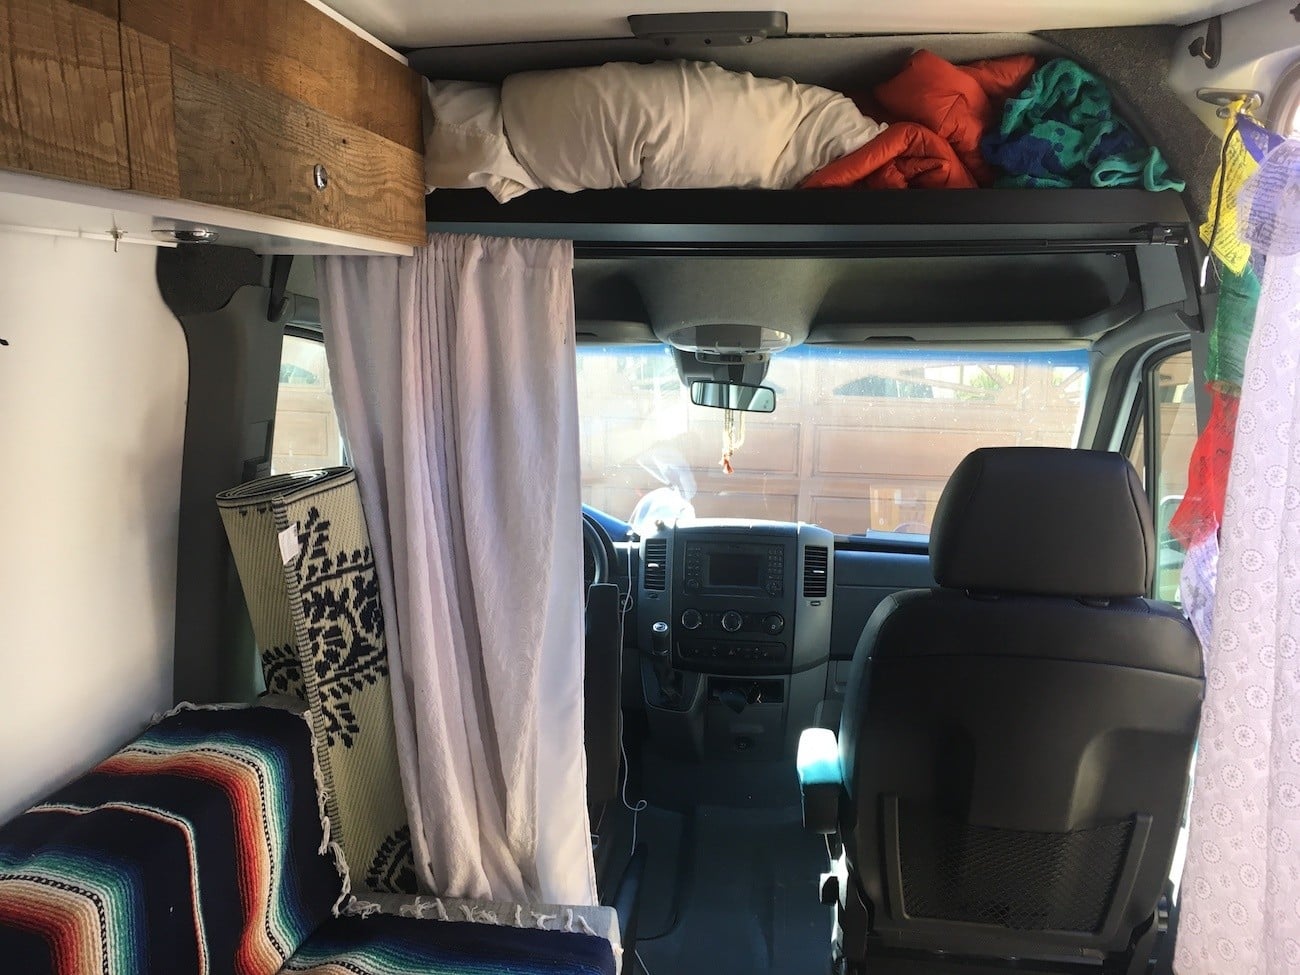
I recently installed the raised headliner shelf by RB Components which fits right in the headspace above the driver and passenger seats. I was a little hesitant to give up the ample headspace in the driver’s area, but this shelf has turned out to be a great compromise. It still gives access to the storage pockets above the visor and you only have to duck down a little bit when walking around up front – a worthy trade-off for the storage space I’ve gained. I’ve been storing bulky items like my pillows and blankets up there and it also makes it much easier when I’m making my bed every night.
Sprinter Camper Van Solar System
In my Sprinter camper van, I have a variety of electronics that need charging, and I wanted to be able to power all of my gear with solar. On the roof, I have 180 watts of solar panels made by Zamp Solar in Bend Oregon. I chose these because Zamp makes some unique-sized panels, and they had an 80-watt long and skinny panel that would fit on the side of my ceiling fan (more on that below).
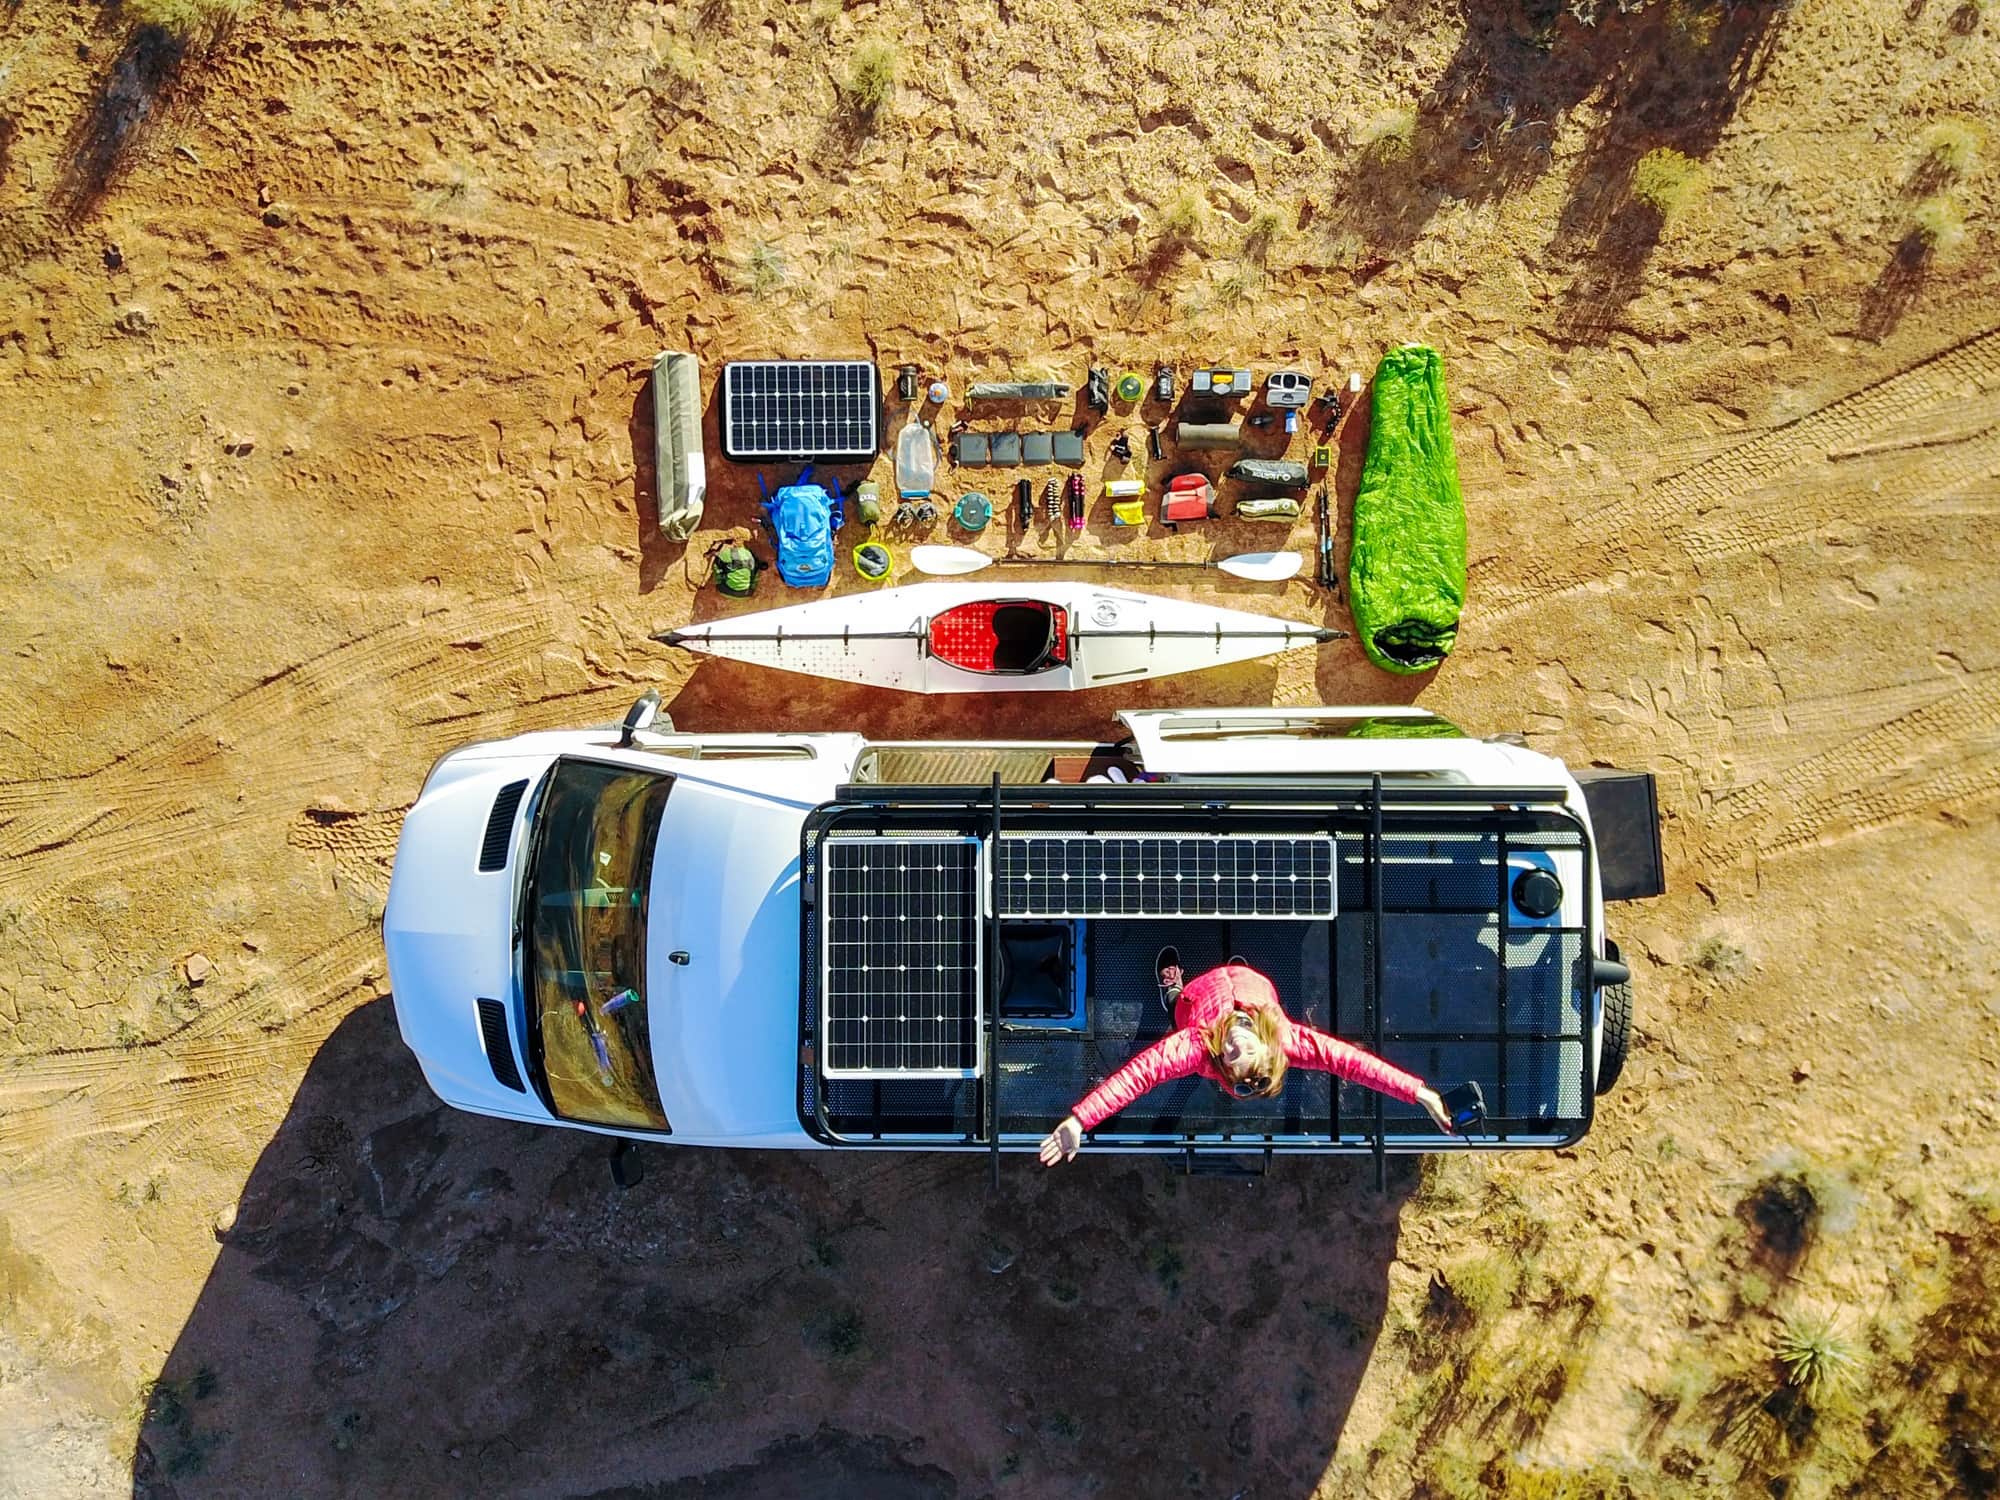
These power up three 125 Amp Hour batteries for a total of 375 Amp Hours. My batteries are also charged by my alternator when I’m driving.
The solar controller is the Midnite Solar Kid with a temperature sensor. This has a screen that tells me the status of the batteries and how many watts are being taken in by the panels.
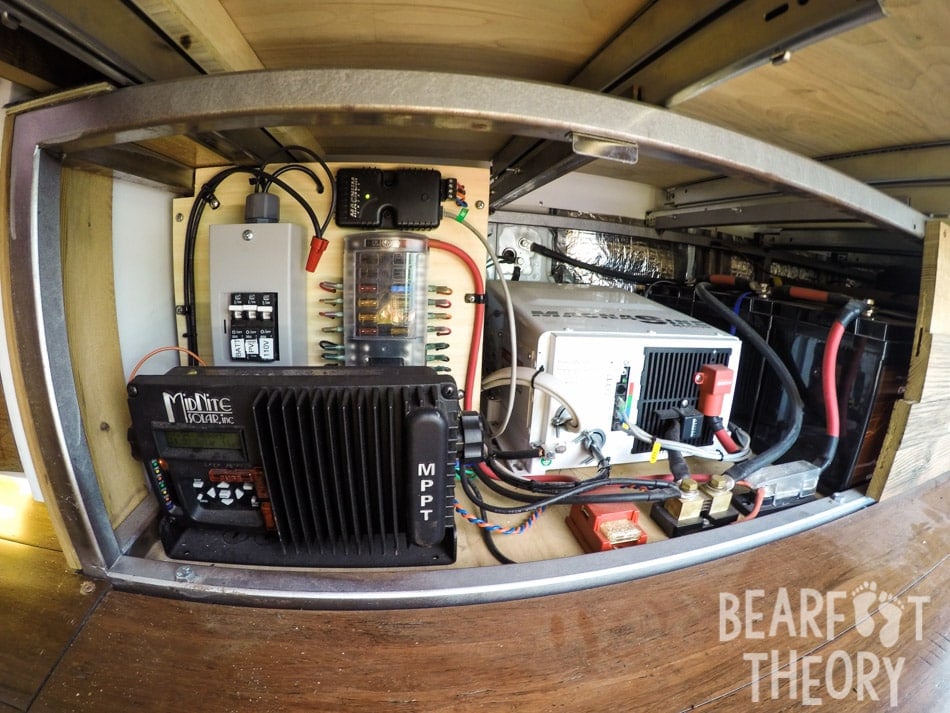
In order to use any of the stored power and be able to plug things into outlets, you also need an inverter. I use a Magnum continuous inverter/charger (MODEL MS2012).
The lights are all LED and powered by a few different switches. There is also track LED lighting that runs along the floor and ceiling which is really nice for evenings when I want some mellow mood lighting.
Read next: Learn all about camper van solar panels, batteries, and electrical systems and how to conserve battery power.
Ceiling Fan
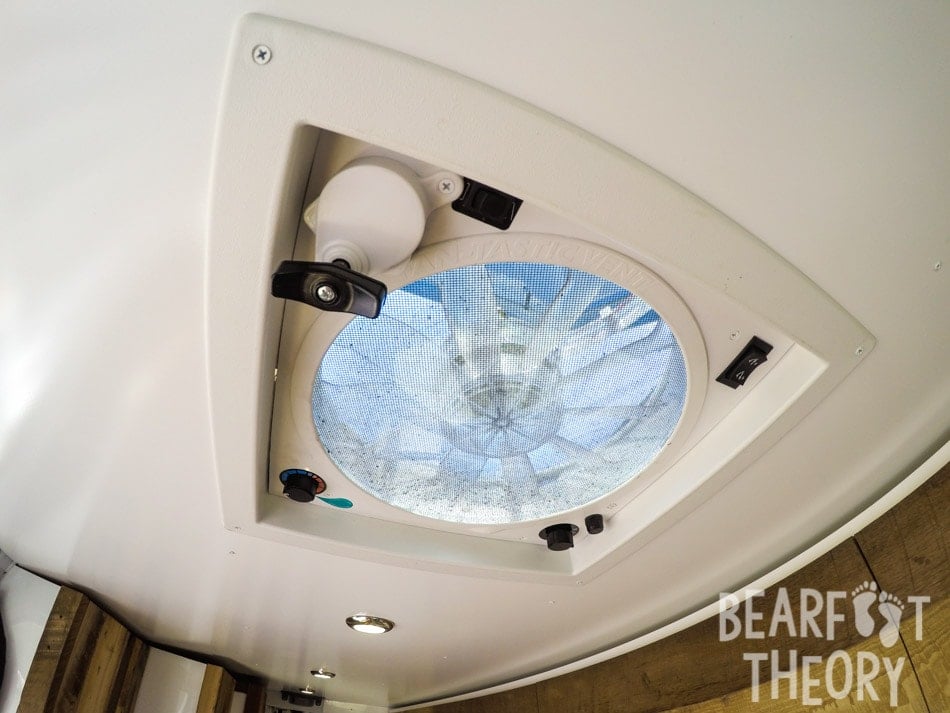
My ceiling fan is a Fantastic Fan (Model 2250). It is super powerful and can either pull air in on a hot day or blow air out when I’m cooking.
Wood in My Sprinter Van
The front of all of the cabinets is reclaimed barn wood, floors are dark bamboo, and the shower floor is made of teak. If you are looking for a source of reclaimed barn wood, there are lots of sites on the web that you can source it from.
Do you have any questions or comments about my first Sprinter camper van conversion? Leave a comment below!


This is amazing! I’m very impressed I’ve been in commercial construction for 34 years and have an incredible itch to “Caddilac Camp” my way around the country in retirement (and be a ski bum once again!) like I did back in the 70’s! I’m interested in knowing the “bottom line” if you don’t mind sharing. And did you do the design yourself or was it a team effort with the builder? I love following you, I have two daughters and encourage them often to thing outside the box. Best of luck to you…
Mike
Hey Mike you sound like me, wanting a mobile retirement with loads of recreational activities during retirement. I’ve been courting this camper/van idea now for a few years; just sold the house and downsized into an apartment in prep for much smaller and active retirement living in 5 years. So I also want to know how Kristen went about the design and how much it cost. I would want to be able to package all costs into a “mortgage” since I’m fairly cash poor and want to be able to deduct costs/loans for tax purposes. Any further info would be great and thanks Kristen, you’re my hero!!!
Susan in Oregon.
hey Susan – That’s great news that you are thinking about van life. The cost…I’ll be posting more info about what to budget soon on my new website http://sprintercampervans.com . Please keep an eye there once it launches! Thanks for your patience.
Hi Kristen, Love your design! However, this link isn’t displaying anything? Have you had a chance to post design and costs? Metta
Hey Karla, head here for answers to common questions about Kristen’s van: https://bearfoottheory.com/category/van-life/
Website has been down for months. That’s a shame. 🙁
Coming Soon
Get ready! Something really cool is coming! Sign up now & be the first to join this rad new community of Sprinter Van enthusiasts.
This is so awesome! I’m super jealous of your new living arrangements! Enjoy!
So, altogether how much did it cost for the van and everything inside? I love this idea.
I’ll be sharing some cost information soon. Please stay tuned!
Thank you. That would be great. Congrats on your Journey.
Wonderful stuff! Did you share the cost info? If so could you supply the link?
Charles Boisseau
Gainesville, FL
An amazing dream come true! Your van looks great looking forward to some cool trips and adventures 🙂
What company did you conversion? It’s amazing!
All the info and their website is listed at the bottom of the post.
I’ve looked several times for the info and website you say are listed at the bottom of the post, but for some reason I still can’t find it anywhere?
I do not see a link to the company at the bottom of the post
I don’t see the conversion company information either. Also, can you tell us more about cost, please.
The conversion company is located in Santa Barbara, and I do NOT recommend them, which is why I didn’t mention them. More info on cost coming soon!
for the roof solar power, did you set this up yourself? friend? or you use company to set it up for you?
I used the company listed at the end of the post.
????? where
This is above Park City, UT
There is no link. What’s the name of the company?
I used a small company in Santa Barbara and unfortunately I don’t recommend them
This is absolutely amazing, congratulations! #LifeGoals
What are the dimensions of your galley?
I find this amazing and found you through the matador network. But I was curious how much did all of this cost? I have been playing with the idea of a camper van, rv, or remodeling a mini school bus so I could take an epic road trip across all of the North American Continent to fulfill some Bucket List Items since I have a gap year or two but keep struggling with costs of build out.
A professional conversion will be pricey and whether or not it’s worth it depends on your budget, time, current skill set, and interest. I’m going to share this info in an upcoming post so please stay tuned.
Your Sprinter looks great! Love the nice and cozy living space with views out the back and side doors. Can’t wait to hear about new and exciting places you’ll explore with this baby.
Would it be possible for you to share your buildout specs? I’d love one just like yours; we’ve very similar wants & needs.
Love it.
Thanks
Jan
What kind of additional specs are you looking for?
I’m also very interested in a floor plan of the interior space, mainly considering
– complete floor space (I’m especially curious about the usable interior width as this is always the limiting factor in a van)
– size of the couch/bed
– size of the kitchen unit
– size of the bathroom
– actually: the more measurements the better 😉
This is one of my favorite camper van designs and by now I must have seen hundreds of them. Good job on the design 🙂
Agreed. One of the best designs I’ve seen thus far! All dimensions would be lovely. A few additional questions as well:
– Do you also have a water heater?
– How often do you use A/C or heat and what’s the power source if so?
> Thinking about taking my pooch on the road w/ me, and would need to ensure Benny Franklin is comfortable at all times. 🙂
I have the Webasto Dual Top EVO that heats my water and the air. This runs of diesel and a little electric. My batteries are charged by solar and my alternator.
I dont have AC.
I would also be interested in this as I am looking for land to live on right now and once I find it I plan to sell my car and buy a sprinter to convert and so far how yours looks I like the most. I’d like to know the measurements on everything if possible
I agree with the positive comments about the layout. I would love to get the dimensions of things as well. It’s possible to guess at most of it based on the pics, but more information would be nice. Thanks for sharing!
Amazing conversion! I have a new 4×4 on order that I plan on converting as well. For the exterior tanks you can get a 12v heating mat that sticks to the bottom of the tank and heats just enough to keep the liquid inside from freezing. With your solar setup you should have no problem running them.
Jacob – Thanks so much for that tip. I’m going to look into that for sure.
Hi Jacob – I am having trouble finding a good source for these 12v heating mats you mentioned – can you link to where you are finding them? Also, think they might work for radiant floor heat? I\’ve got 990W solar on my 170ext, mid-conversion & thinking that could be a nice addition for cold temps at Ouray ice fest, etc.
http://www.ultraheat.com/selecting-a-tank-heater
Great job, looks wonderful! Maybe I missed it, but I didn’t see anything in your article about heating. I’m assuming there’s no AC since you describe a fan.
Hey Jim, That’s correct. There is no AC. I am getting a heater installed, but I’m not sure which one yet. I’ll be sure to share some info about that soon!
Great site and great build. Any update on the heater?
I went with the Webasto Dual Top EVO. It’s still in the shop but I should have an update on how it works very soon!
Thanks, that looks like a great solution for heat and hot water. On my short list now!
Hi Kristen,
I just watched you youtube video of the 4×4 sprinter.
What a beautiful design you did. I love how bright and open the van looks.
I look forward to seeing more of your youtube videos.
Cheers from Melbourne, Australia
Glen 🙂
Hi there
Love the van” but for me the best part has to be the way you have the bed setup.
I built one camper van and now I would to do a Sprinter van and like to use your idea on the bet set up do you have any plans on the bed setup.
Thank you.
Brian
I don’t have plans to share, but I can definitely do another post on the bed. Please stay tuned!
Awaiting your post anxiously 😉
I think I see the basic design, but wondering what size of sliders they used & what the weight capacity is on them. Regardless, very cool!
Definitely looking forward to seeing how the bed is designed as well. Thanks
We would LOVE more information on how the mechanics of the bed work, too!
Thanks Alexandra! Bed video is coming! Please subscribe to my YouTube channel to get notified when it’s live:
https://www.youtube.com/channel/UCao1w-o4Z7NUMyUIAn2kjnw
Thanks Kristen, I have subscribed and am excited to see more about the van and journey! My husband and I have a 4×4 Sprinter going into production this December. We are leaning towards doing a conversion layout similar to yours! 🙂 we will blog once we get our Sprinter in March/April.
Can you please explain how your bed works? The video doesn’t really show exactly how it was made and how to open it. Thanks
Sure. I’ll make sure to add some details on the bed. Please stay tuned!
Yes!!! Would love to see how the bed works
Would you mind providing the cost of the van and conversion?
Hi Maureen, I’m working on a FAQ where I will talk about cost. Please stay tuned. -=Kristen
Can’t wait for the FAQ, thanks!
Kristen, I recently found your video on YouTube and wanted to know where you were kayaking in a narrow canyon at the beginning of the video. Love the van! Thank you, Michael
That’s in New Zealand. You can see the entire video here: https://www.youtube.com/watch?v=v94h9JGs21A
Can you give a ballpark estimate of what your conversion cost? It looks amazing!
I’m working on a FAQ where I will answer that question. Please stay tuned. Thanks!
Awesome! Looking forward to the FAQ, putting pennies in my piggy bank!
I really love your open concept with your Sprinter Van. The bed really has caught my attention. I’m 6′ 7″ tall and being comfortable when I sleep is very important to me. You have all the necessities and yet off the grid. I’m sorta a detail oriented person, I’d love to see your design plans. I’d even be willing to pay for a copy, if they were available. Looking at your pictures, I suppose I could back engineer them, if I had to.
A 4×4 Sprinter is way to go. Being warm and safe are keys to my happiness. Your decor is warm and inviting. Also, with the way you have this laid-out, I wouldn’t feel claustrophobic.
Thanks again for sharing this wonderful idea. You have inspired me to think in a different direction.
All the best in the future.
Sincerely,
Mike Sweney
Hi Mike! Yeah the bed would be perfect for someone of your height. Have you considered a van with a pop top? The sprinter is amazing, but at 6’7″ you won’t be able to stand up straight. I’m sure you’ve thought about all that, but just wanted to add that point. Thanks for the thoughtful comments!
I have seen probably every van tour on YouTube trying to get ideas for my build. They all have one big problem…they feel too confined. I think I would lose my mind in them. I LOVE your ideas and your checklist is the same as mine. I would love to use your design concepts in my van design. It\\\’s perfect for me! I probably won\\\’t be using a Sprinter van for mine bit it would definitely be a high top.
Enjoy your home, it\\\’s gorgeous!
Very cool! God speed!
super cool conversion design, well done! What outfit helped with the build out?
A van is cool. I did it back in the 80’s on a Harley with a tuff stoff storage bin on wheels…a pop up tent and self-inflating air mattress and thought that was good! Indy to Key West, to Sturgis. And don’t forget to work for a carnival for a week…that was great too, up in Flagstaff, AZ
Super cute!! Love the shower.
Wow this is really fantastic!
Wish you all the best.
Truly lovely! I am currently working on a bus conversion. Where did you find the knobs for your drawers and cupboards? They do not seem too small, and I like the securing of the drawers without having to add any additional latches. Any info on the manufacturer or store would be appreciated.
Thank you for sharing and Enjoy!!
I just updated the post. These are the push buttons: http://amzn.to/2cGv3M3
I have an idea for your roof rack that might work. They make roof basket racks for small cars that might be able to be mounted on the driver’s rear behind your solar panels next to the shower vent. You could access it from the back easily and put up various sizes things and secure with a bungee net. I have friends who have the hard shell storage and even if they can be locked they aren’t all that secure (they have had it broken into) plus they permanently added the height for the entire trip whereas with the basket you’re only adding a few inches and could unload it if you’re going through a tight space.
Totally awesome!!
What a life!!
Guess what??…I’m not going to ask you the cost for the tenth time, why?? Well because I read what you’d already informed us of. That you were going to put it up soon & to stay tuned…haha ✌️
I had not thought of keeping the isleway! Love your open floor plan. Certainly worth making the bed each morning 🙂
Such a great space. I love that you can sit inside but can enjoy the views and feeling of outdoor space with the doors open. I find so many campers feel enclosed, but you seem to have solved that problem. Enjoy!
I appreciate your giving me more info of how you set up your bed and where to buy the material.
Thanks Kristen,
Absolutely beautiful Kristen. Do you know what material was used for the galley countertop?
That looks awesome! Curious about the dimensions of the washroom? Thanks!
Ty
So, how much did the conversion cost? haha…only joking. 😉 Look forward to that post. More generally, you are awesome. If the world only had more outdoor-recreation advocates like you, I think our collectively-shared home would face many fewer threats. Thanks for the smile. 🙂
saw your vid on youtube.from all the different arrangements yours is by far the best i\’ve seen so far. great use of space. just wondering is your sprinter a super high roof model? you seem to have to much room even as your stand. i\’m wondering if mercedes has different roof heights. can\’t wait to see and update video or faq on the build. lots of great questions posted here. please advise! i\’m sure alot of people are wanting to know more details.! awesome rig!
This is the standard high roof Sprinter.
How do you take a shower without getting all wet ?
Your van is fantastic! We currently have a Sportsmobile but we love your openness in the van. Who did the woodwork and cabinets? Thanks!
Just curious, can you hookup to 30amp or 50amp?
I can hook up to 30amp shore power
Kristen, Great Job!! congrats!
Regarding who did your van conversion, you mentioned that “All the info and their website is listed at the bottom of the post.”
I am not sure if it is there…i could not find it…
Thank you so Much
Serge
Love the shower/ toilet concept, perfect. Do you need to hook up for hot water or heat or do you have a solar option?
I am getting a hot water heater/air heater installed called the Webasto Dual Top EVO
Very well thought out with great design features. All so practical and in sich a small space.
Have you considered heated tanks for the winter with black electrical heating pads attached under and on 2 sides of the each tank exterior tank? Hope this helps. Let us know what you decide.
Also you have convinced me my next RV will be a Class B of my own design.
Once again beautiful RV. Amazing design. And you have several great blog posts. Well done all around! Looking forward to exploring and reading more of your posts.
Hey Kristen, I looked through the article twice, but for the life of me can’t find the company that did the conversion! would you be able to link me? thanks!
Amazing setup!
Looking forward to the cost breakdown post
Hey Kristen! Amazing. Is the best sprinter van design I ever saw. I’m looking forward to flour plans and calculation of costs. Thank you for this nice vision of your cosy camping bus.
Regards from Germany!
This is so amazing! What company did you use to design the inside?
Constantly checking back for your grand total on the build out and interior (bed, closet, galley, walkway, bathroom) dimensions!!!
I have seen many van conversion videos but yours is the best.
Hello, I’ve been searching conversions for 6 months trying to find my favorite that would be a perfect fit for me and this one by far fits the bill! I’m embarrassed to say i’ve read and searched all over this site (including the bottom of post and still do not see the company name who did it) if possible to post it again or send to me directly that would be awesome!
My conversion was done by a small company in Santa Barbara and sadly I don’t recommend them.
Hi Kristen!
Congrats, think you hit the nail with the design, no doubt it is already a reference for many of us in the van living brainstorming with more open space feeling. I’m working on my 2013 VW T5 high roof conversion and I’ve changed designs towards your layout, hope not author’s rights claims. Yosemite & Torres del Paine awesome places visited for me too, love your website & photos, keep going.
Cheers and big hug from Chile, Jaime
Cool! Looking forward to checking out your van!
Thank you for sharing this wonderful project. It certainly awakened the possibilities of what is possible. You’ve done a great job. Any details of the design and floor plan would be greatly appreciated.
I shall start my search for a similar van & help from a cabinet maker.
May you always be blessed with abundance
Nashir
So much thought going into your van conversion! Great job. My husband thinks you could use heater tape on your exterior tanks and attach them to your solar supply for insulating. Also, not to pry, but how do you support this lifestyle? Always seems like a dream, but when it comes down to $$, suddenly reality hits.
Hey Patti – Thanks for the tip on the heater tape! And you’re definitely not prying. I’ve worked really hard to turn my blog into a business. I make my full-time income through my blog, freelance writing/photography, and consulting.
Hey there, you are an amazing person, really fresh clutter free design….Love it.
Question…Is the white surface on the walls and ceiling white PVC sheeting?
The walls are made of aluminum that were painted white
I would really like to see plans for the bed. Did you buy the bed cushions direct, or were they custom made?
They were custom made
Hi, I’m not seeing the info on you builder anywhere. Did you ever get around to the FAQ page to answer a bunch of these questions on your original post?
You asked a question about your exterior water tanks freezing..if you put in some RV anti-freeze, the pink stuff, your water will not freeze and then you do not have to worry about trying to insulate that tank.
Thanks Bob! Antifreeze is a great solution if the van is going to be sitting parked for a while during the winter. But I’ll actually be using it
https://www.amazon.com/JR-Products-HTH-Holder-Heater/dp/B000BGK1XE/ref=sr_1_5?ie=UTF8&qid=1477847953&sr=8-5&keywords=water+holding+tank+10
Dig the openness. Spring/summer in Ontario is soooo buggy …. and they take chunks out of you … I would need screens … was leaving the out a conscious design choice out are they not available?
You can get an aftermarket screen that installs with velcro. Bugs haven’t been a problem for me, but it’s something I’m considering for next summer.
Can you share the outfitter that did the dinnette/bed conversion? It says it is posted in the post but I can’t seem to find it?
Would love to hear about the overall cost. Or even a rough estimate.
Also, would love to get the dimensions. ALL the dimensions! Bed, closets, bathroom, galley, walk way, table, etc.!!
Kristen,
I watched your youtube video and am still absolutely amazed by your layout.
I had a question regarding your electrical:
Do you charge your batteries from BOTH solar & alternator?
If so do they charge the batteries at the same time?
Thanks so much for sharing a tour of the van already!!
I’m in the process of getting a starter relay installed that hooks up my batteries to the alternator. I think this is a necessity if you don’t want to be plugged in that frequently. I think it depends on your set up on whether the solar also charges at the same time. I think the verdict with my system is no. it’s only the alternator or the solar, not both at the same time.
Love your blog and Lifestyle— How do you handle laundry?
Ah laundry. Well, I try to only have clothes that I can re-wear several times and don’t get wrinkled. Then there’s always friend’s houses and laundromats. I’ve also heard about that Scrubba bag which looks pretty cool.
OMG! This is an Awesome build out. You’ve really done a great job and those solar panels on the roof are perfect. Maybe the EV makers can learn a little bit from harnessing the sun from a panel on a car/van that is always facing the sun 🙂
Great Job!
Hello Kristen, I absolutely love your van, it is exactly what I want. I had no idea it was possible to fit so much into such a small space and it is so open too. Looking forward to any future information you might post on galley and shower dimensions, bed details etc. I would also be more than happy to purchase plans if available. Best wishes!
Awesome to hear. Thanks Todd. Please keep an eye on my YouTube channel where I’ll be posting more videos soon:
https://www.youtube.com/channel/UCao1w-o4Z7NUMyUIAn2kjnw
Love the layout and design of space! It’s hard to tell from your video how the bed pulls out. Have you been able to post any additional info on that yet? Thanks!
Thanks Diana! Bed video is coming! Please subscribe to my YouTube channel to get notified when it’s live:
https://www.youtube.com/channel/UCao1w-o4Z7NUMyUIAn2kjnw
I also did not find the company that did the build-out.
Another question for you, where is the table top when not on it’s legs? Please, when you answer the bed questions, also show where you put the table for “storage”.
Bed video is coming! Please subscribe to my YouTube channel to get notified when it’s live:
https://www.youtube.com/channel/UCao1w-o4Z7NUMyUIAn2kjnw
Unfortunately I can’t recommend the builder due to a number of issues with my conversion. If you still want their name, feel free to email me.
You CRUSHED it, sister-sledge!
Love your smile, enthusiasm, and committment to living the dream that’s yours!
Cheers,
Jack
Thank you!
Amazing!! OMG-drive carefully! -Kristen
Hi Kirsten….as someone who has lived in tiny places (toyota prius, now a sailboat),….I’m wondering,….where you park this van? Parking was a hard thing for me. I LOVE your van and totally want one. I think it’s great people are thinking about the box, living smaller, and bucking consumerism and big houses. Great job for spreading the word!
This is why I am looking for land, I could not find many things for where I could park and the second part of owning a van, what to use for a DMV registration address
I used my parent’s address for registration.
I’m also wondering what you do about internet. One tough thing about living on the sailboat is accessing Internet.
Hi Kristen- Congrats on creating such as beautiful home! You can tell there was a lot of love put into it.
My partner and I are in the process of planning on converting a Sprinter to be ready in the spring and your post has been so inspirational.
We look forward to your upcoming videos/posts on all the details (bed, specs, costs, etc).
Sending you all good vibes!
I find your van build to be one of the most unique and well planned designs on the net. I have yet to unbox my maxxair deluxe because I feel like it is too big. Can you please share a link or information about the bathroom vent? It seems perfect!
Hi, I am a Sprinter dealer in Southern California and I have a client that saw your van and likes it. Is that a 144 inch wheel base or 170 inch wheel base ? Also who did your conversion ?
Thanks for your help,
Jon Montgomery
Mercedes Benz / Sprinter of Arcadia
Office 626-462-3150
Cell 626-298-0985
Hey Jon – I have the 144″ wheelbase. My conversion was done by a small company in Santa Barbara and unfortunately I don’t recommend them
Hi
I saw your video and read your post and thought this was a super great idea I’ve been considering doing this myself. I had just one question how do you do your laundry in the video it showed how you store your cloths but nothin about cleaning
Well, I definitely don’t do laundy as much as I used to. I wear clothes that I can wear many times in between washing. Then for washing you can use friend’s house and laundromats.
A very cool conversion. I love a lot of things about it. How does the bed pullout. It seems like it comes out of no where. Can you tell or show us how it works?
Hey Mark – Here is the video of my bed: https://www.youtube.com/watch?v=uoUlcVBoOX4&t=125s
Where do you store the table top and table legs?
I store them in the back of the van next to the counter. It’s not an ideal place to be honest, but it was something the company who did my van didn’t really think out.
What company did your van? Or can you say?
A small company in Santa Barbara did my conversion, and unfortunately I don’t recommend them.
Very very nice!! 😉
Hi Kirsten. Thanks for all the great sprinter information and I love reading about your travels. We are taking delivery Saturday 144″ high top cargo 4×4. I am curious what system you have to heat water and if you have a cabin heater. Thanks Mike
I have the Webasto Dual Top EVO. So far so good!
Hey there. Love your camper. I wondered about what sort of insulation was done to the bare shell before being outfitted? And what lines the walls now?
Thanks for your informative blog. Looking forward to hearing more.
Regards
Marc Burlace – Bondi Beach Oz.
Hey there – this is what the insulation looked like: https://www.instagram.com/p/BEpNoGmonM5/?taken-by=sprintercampervans
Now the wall panels are made of aluminum.
Your Webasto Dual Top: Where did you find the space to install it? Under the van? Great interior layout, btw.
Thanks, –Jim
I put it in the spare tire spot under the van and I will be mounting the spare tire to my rear door.
Hi Kristin!
Thank you for posting your video and info on your Sprinter van. Great job! It’s gorgeous! My husband (Fred) and I are in the process of ordering a 4×4 Sprinter and are having the conversion done through a professional company called Sportsmobile. We were struggling with the layout until we saw yours. We really like the idea of the couch/bed across the open slider door, like the way you have it. Sportsmobile doesn’t offer a couch/ conversion bed that is big enough to fit both of us.
Are you still happy with your couch/ bed and the way it converts? If so, Could you share the name of your company and website that made the bed? Would really appreciate it.
Thanks so much! Joanna
Hey Joanna – I am happy with the bed, although it is a compromise with storage space and you also have to decide if you want to make the bed everyday. Have you seen my YouTube video on my bed? That shows a lot more detail. My conversion was done by a small company in Santa Barbara. Unfortunately I can’t recommend them 🙁 https://www.youtube.com/watch?v=uoUlcVBoOX4&t=125s
Hi Joanna,
I am also planning on using Spartsmobile. Did you ask them if they could make something up to get a bed 5 feet wide?
THanks! Sue
After looking at a LOT of postings, my wife and I are getting ready to build up our Sprinter. We will copy much of your layout. I wonder whether you would measure and report:
The length of the bed
The depth of the counter
The distance between the counter front and the front of the closets
The width of the shower closet door
Thanks very much for making the posts of your van.
— Jim
Thanks for sharing, I like it a lot!
Absolutely love what you have done! Could you point me to where you got your wheels?
Love the look and sprinter wheels are hard to find!
Thanks
I bought them from a tire shop in So Cal. They aren’t made specifically for sprinters though.
Hi Kirsten
Absolutely love your design. Suggestions for insulating your external tank would be wrap it with a good few layers of insulation and some canvas for protection. Keep sharing
Thanks
Thanks! I need to figure something out because that external tank has been unusable all winter.
You may want to talk to the Installer of your Webasto Dual Top about re-routing the Water Lines and using the “Waste Heat” to keep your External Tank from Freezing. Keeping the Temp comfortable inside will also keep the External Tank from Freezing…or should. Advanced RV has a video and they do some awesome things for Sprinters! https://www.youtube.com/watch?v=0OiDufshu_Y
Thanks for a really informative Blog Kristen. Just starting the plans for a 4x Sprinter now & many of your ideas will me incorporated into my plans.
Curious about the inside shower, under the teak is there a shallow catch basin with the drain?
If you could change items/configurations what would you change? are you happy with the 144 vs 170
I’d maybe rethink having a bathroom. Makes the plumbing super complicated. there is a drain under the teak. I’m going to do a full post on the 144 vs 170 and the bathroom so stay tuned.
I don’t see the name of the company that did the conversion at the end of the post. Am I missing something? Thanks!
A small company in Santa Barbara did my conversion and unfortunately I don’t recommend them.
What are your dimensions of your shower? I am would love to put an RV (24x36in) tub in my van…. Did this ever come across as a possibility? Thank You !
I need to measure the bathroom. I’ll do that and post about it when I do my video on my bathroom, which is coming soon!
Hi Kristen,
Is there any way possible I could find out who helped you with your conversion? I really liked all that you did and this is exactly what I want to do, I could just never get it to go down on paper correctly. THIS is it!!! I would love to do exactly what you did, with very few changes. Is there any way I can get all the particulars?
I so love your van. As soon as my house sells I plan to move into a van full time as well. I have been wondering about powering computers, charging cameras etc. You say you have enough from your solar to keep you going but is there any issues with power supply possibly damaging electronic gear? Do you have USB connections in the van? Thx.
Nicky (NZ)
Hey Nicky,
I’m going to do a full post on my electrical system. I do have USB connections and I’m not worried about damaging my computer, etc.
Beautiful sprinter! My husband and I recently decided to take the plunge and buy a Sprinter. We are considering adding a bathroom to our design. What are the dimensions of your bath?
I need to measure. Stay tuned for a video on the pros and cons of a bathroom…things I wish I would’ve known beforehand.
Hello Kristen,
My wife and I have been looking high and low for a water heating system like the Webasto system you have.
How has it performed so far this winter?
Who installed the Webasto unit?
Your van conversion is very inspiring, so much so that after watching your videos, my wife’s floor plans have shifted a bit to look similar to yours.
We are getting very excited as our June ’17, ‘start the build date’ is coming up fast.
I’ll be doing the conversion with the help of two friends, an electrical engineer and a finish carpenter, but the Webasto will be over our heads.
Thank you for your time and inspiration.
You rock!
It’s been performing pretty well. The only issues I’ve had is if the diesel in my tank gets too low, then I get air bubbles in the line and was getting an error. Now that I’ve figured that out though, it’s been good.
I had it installed by Sync Vans in Sun Valley.
I’d search for Webasto dealers in your area. A lot of the dealers service semi-trucks, so that might help you in your search.
Good luck!
Kristen
Great conversion.
I\’m used to seeing the fridge get the best views out of the van so it\’s good to see the couch there, but also an inspired idea to put the table so you can work and look up and out. The slide-out bed works well too, best dual/triple use of a small space, I\’m taking notes for my Hiace.
As for insulating the external tank and pipework – I think you\’d have to have another tank/bowl made to go over the top as a \’container tank\’ and 2\” of polystyrene between the two, which insulated it+pipes right up to the floor. To keep it liquid when even colder you can try something like Retro-Line from Heatline, uses 3W per foot so 6\’ of that coiled around would only use 18W or (120Vac) power. With your solar it should look after itself.
Thanks for the suggestions about insulating those exterior pipes! I’ll look into that for sure.
HI!
I’m going to do something similar!
Getting ready to get on the road this summer.. 🙂
Would you happen to have any “plans” or blueprints/ materials list that I could use for mine?
See ya “on the road”
I don’t have any blueprints yet…But a lot of people have been asking, so I’m thinking about it.
HI just curious what water pump system you were using to get the water pressure needed fro your full size faucet and shower?
This is the water pump I have in my van: http://amzn.to/2nubNqY
Hi Kristen,
Just wondering, what is the length from the back of the driver’s seat to the back doors? I know the high roof, cargo 170″ wheelbase is about 13.5 feet/164 inches in length.
Also, if you had to do this all over again would you choose the 170″ wheelbase for more space? Or do you find the 144″ is better overall due to better maneuverability, more compact, stealthier, etc?
The 170 you get more room but they are harder to park and manuever. I think it depends how many people you are traveling and whether you are full-time. When I first got the van, I was single, and it was plenty of room. now I have a boyfriend and a dog and it is a little tight…but still not sure I’d upgrade to the longer.
. . . Can you remind me of the heater you installed. I believe I heard you mention it somewhere but I cannot find it now. Also, you are a bad ass and thank you for sharing this amazing floor plan: )
My heater is the Webasto Dual Top EVO. And thanks 😉
Hey Kristen,
I love your van! I was wondering what the shiny white material the walls and ceilings are made of is? Is that painted wood or is it some sort of plastic or fiberglass?
The walls are made of aluminum.
Thank you Kristen! My family and I just bought a 2016 170 and I have been loving all of your helpful posts! We have three kids and 100lb dog so I think we will do pull down bunk beds where your closet and shower are! Thank you for all the details! Come on by if you are every in San Clemente, Ca!
What are your wall panels made out of? Bathroom and living space?
My walls are made of aluminum.
Have you considered adding salt, like some pools have for the bath water to keep from freezing?
I haven’t, but I’ll look into that. Thanks!
Or pour some cheap vodka in your tank to keep the water from freezing. The vodka will lower the freeze point of the water
Thanks, Dave! Oh, the many uses of vodka! What an interesting idea, thanks for sharing.
hi Kristen!
Thank you for your post, it’s the best design I’ve seen so far and had inspired me to have my own sprinter build that way.
I think you mentioned your webasto dual is under the van. did you have any problems with this on cold temperatures? I’ve heard that webasto boiler purges itself automatically when too cold to avoid damages.?
thank you!
I haven’t had any problems with that actually. I’m sure it happens in extreme temps, but I just kept it on anytime I had water in my system and it worked great.
Great looking van and looks like you have spent a lot of time keeping the community informed. I noticed that you mentioned that you have switched your solar panel set up. My first question is why you chose to get rid or the 160W panels and how the new system is performing? I am trying to select the components for my solar system right now and I am currently looking at these two 160W panels (https://www.solarwholesaler.ca/product/rvboat-pwm-320-watt-solar-kit-enerwatt/) and want to gain any insights you have into the success of your system. Thanks for you time!
I got rid of the first panels because the dimensions didn’t fit my roof well and they covered up the rails. They also weren’t powering my batteries well. I don’t know if it was a loose wire or what…but now I have 180 watts and it’s more than adequate with my batteries hooked up to my alternator.
Hi Kristen, first off all thanks for the videos and ideas. My boyfriend and I are converting a Sprinter as well and your van is our biggest inspiration. 🙂
We are from Brazil and here is not so easy to buy specific things fo the van convertion. I am going to USA next week and I will try to buy few things for the van.
Could you help us with the bed? I read all the comments and watched the videos but didn’t find it. I read that you dont recommend the company that made your covertion, do you have any problem with the bed system or is it a good ideia?
The other question is about the internet, do you have any internet satellite plan ? I ask about that because in Brazil we can not depend on mobile networks.
I like my bed, and it was custom made. No problems in that regard. I use my Verizon data plan for internet when I’m on the road.
Hi Kristen – First off thanks for all of the time, energy and great ideas you have given to those of us in the Sprinter Up-fitter crew. I love oyur build. Quick question – what are the dimensions of your upper cabinets on the drivers side and are you happy with them?
Hey there. Just doing my research and I too am interested in how people are insulating an ext. H20 system. I’m trying to conserve space inside! Have you heard of any ideas?
Best,
Andre
Hi there could you please tell me what your van is insulated with?
They used denim insulation and reflectix
Hi Kristen, you’ve done a fantastic job with your van conversion. Best I’ve seen…I’ve looked at a lot. Really like the layout & openness. A couple of questions:
1.) I recognize your emphasis is for “off the grid”, is your vehicle set up to also “plug in” to say campgrounds that provide power, water, sewage, etc? For myself, I can see the need to plug in from time to time.
2.) I didn’t notice an oven or microwave in your build. Your thoughts? I know microwaves are a tremendous drain on electricity or is propane an option?
3.) A non van conversion question – how do you connect to internet during your travels? I’ve been looking into a Verizon Jet Pack, but haven’t seen a lot of other choices. Not seeing much currently about satellite.
Regards, Bill
I’ve been reading through your blog, and overall I’m pretty impressed with your conversion. I don’t think I have the patience to have something built, so I’m considering a commercially built van conversion. After some 47 years of owning a self-contained chassis-mount camper (a predecessor to today’s Class C), I got rid of it recently, and I’m already missing the old beast. A smaller beast would be just right, I think, because my lady isn’t interested in camping, but very well might be interested in using a Class B for traveling instead of by car. So while I’m looking and considering what I want and how much I’m willing to spend, I’ve been spending time on the Internet, which is how I stumbled upon your blog. The first entry I read was about your roof rack.
I do have one big, BIG concern. Your propane tank is stored indoors, and even if you’ve vented its compartment to the outside, that is extremely unsafe. Propane flows invisibly downhill–it’s heavier than air. It can collect in the floor area, and a spark would be disastrous. The best place for propane storage is either underneath, in a frame mounted tank designed for that purpose, or in a sealed metal or fiberglass compartment that opens to the outside only. The piping is then routed through rubber grommets to the inside of the van. That’s why you see travel trailer propane tanks mounted on the tongue of the trailer; most of today’s motorhomes use frame mounted tanks, and all of the commercial Class B converters that fit their products with propane appliances use frame mounted tanks. I hope you’ll do something about your propane set-up very soon.
Best wishes for continued success with your van and your blog–it’s a very enjoyable read.
Hey Kristen,
Thank you so much for all your videos – they are really well made and very inspiring. I have researched many van conversions and yours is by far the most thought out. I see other comments relate to the bed. It is an ingenious design and if you ever share some other details on its weight capacity and mechanism etc. that would be great. If you ever make it over to the UK, let me know and we can point you in the right adventure direction. Happy trails! Peter C
Hello again Kristen,
I’ve just caught up with your bed explanation video. #Clever! Thank you again for showing the world in all its glory.
Peter C
Hi Kristen, great job on your conversion! Here’s an offbeat question for you. Who’s the artist/group for the background music you used in the overview video of your conversion? I really liked their music and would like to learn more about them.
Thanks,
Chris
I’m obsessed with this van and have gotten so many ideas from it. Great job! On a separate note, where did you get that ceramic cup? It’s super cute!
Nice fitout. Question re the bed/mattress…
Many campervans have couch/bed conversions with the mattress essentially split to make the cushions when a couch (as yours does. Is the mattress comfortable with these splits in it? Do you notice them?
Hi Johnson, Kristen’s mattress is comfy! You can also get a mattress cover to help with concealing the splits a bit.
I really love the honeycomb black walls and would love to have them in my rv bath. Did they come like that? They don’t seem like tile…any info would be great
Hello Debra, Kristen isn’t actually sure what the walls of the shower are made of as her van outfitter put them in. They do have a waterproof membrane though on top of them. So sorry we couldn’t be more helpful. You can read more about her bathroom here, https://bearfoottheory.com/sprinter-van-bathroom-pros-and-cons/.
Hi, Excellent write-up. I hope you have time to reply.
I’m in the beginning planning stages of my round-the-world trip and I am trying to decide on the vehicle, and am leaning toward the 4×4 Sprinter.I
All of your RV requirements are exactly the same as mine and I so appreciate it how you thought everything out, configured your RV, and shared it
I am planning on starting my tour in Spring ’18 from Anywhere, USA. Should be enough time?
Any advice on buying new vs. used?
How come you went for propane for cooking instead of drawing off your diesel fuel?
Also, since I will be traveling to many, undeveloped parts of the world, and the overall water supply and emptying the toilet are major concerns, as there will not be rv camps.
What about heating of the cabin and cooling (a/c) of the cabin?
I am a professional photographer and writer and I have a lot of very expensive camera equipment. Have you given any thought about a safe for such valuables?
And what about staying connected to the internet? I envision becoming a digital nomad so
Are there beefier solar power systems available?
If anything happens and you have to see your rig, I would be open to purchase it.
And if you don’t mind sharing it, what would you estimate the cost for duplicating your rig.
Safe travels, and perhaps we will cross paths one day. Best regards, Reed (PS-please put me on your mailing list and/or blog).
Hey Kristen,
Here is a link to possibly solve your water tank freezing problem;- http://www.tankblanket.co.uk/
BTW, love the van (best i`ve seen anywhere on the internet) and your lifestyle – hoping to do this myself when I retire to the Costa Blanca in Spain in a few years time.
Regards
Keith
Your Sprinter is amazing and thank for sharing. I have one huge question… your design is one of the only ones I can find that does not place the bed in the back of the Sprinter. Often times this puts the kitchen forward and in my opinion wastes space. Worse when people go to sit in their Sprinter… they’re usually staring at a wall. Your design allows you to sit with the van door open looking out at the wilderness, and I love it! My question is… do you know of any other conversions that use your layout? I’m going to be doing it on a dime and I’d like to see what people have come up with.
My layout is actually becoming pretty popular now. You should check out my instagram feed @sprintercampervans where I share other people’s builds. You’ll get some ideas there. https://www.instagram.com/sprintercampervans/
I have browsed countless van conversions and yours is by far the BEST! Seriously, you should be hired by Winnebago to help them design. I have been thinking about doing this for a while and wanna do it EXACTLY like yours. I bet you get tons of offers to buy your van if you ever decide to sell…and here’s another:) If you ever pass through Southern California, please let me buy you lunch, a drink, whatever….just to hear your adventures in person. I can give you advice on the area, I’m born and raised here. You can always contact me through my jewelry website lunaCielo.etsy.com. Erin
Hi,I read your new stuff named “Full Tour of my 4×4 Mercedes Sprinter Van Conversion – Bearfoot Theory” like every week.Your writing style is witty, keep it up! And you can look our website about love spell.
This is amazing. I never considered a sprinter van conversion until I came across this website. But I do have one concern, with all of your travels to remote places, do you ever have any problems finding gas stations that carry diesel fuel? I use to own a VW diesel camper van many years ago and found out that diesel fuel is not everywhere and had some close calls.
Kristin this vaedn has excellent planning for features. Especially like your large work table and fold out bed.
How did your conversions and how much did he whole right cost. We’re very interested.Be happy to buy from your suppliers
Bob email : rjdowling56@gmail.com
Thank you, thank you, thank you, so much Kristen! I am very close to retiring from a 40 year plus career in the utilities world and my lifelong goal has been to do exactly what you have shared with us right down to the same vehicle footprint!!!
Kristen
Your layout in the Sprinter is the first design that I really see making sense. I never like the split bed/couch area that most go with in the rear.
I live in Ecuador, retired and hoped that I could find a Sprinter locally to see this Continent. If you are going to Patagonia, is this from the US? If so, when are you taking your trip>?
There are many things I’d like to learn about your fit out. If you have the time please feel free to get back with me via email: jabadead@gmail.com.
Best,
Joe Durr
Are there any photos of your Sprinter Van on the web taken with a DSLR? I really appreciate all your photos, but I find it is difficult to determine depth and perspective because they have fisheye distortion (looks like GoPro wide shots).
From the comments I see on the web, there is a vast army of Borites that want to build your exact Van, so photos with straight edges and some measurements would be AWESOME.
You know that no good deed goes unpunished! Your blog is inspiring many dreams so while us fans keep asking more of you, know we really, really appreciate the information.
Hi Linda – the reason I use the GoPro is because you need a wide angle to get the inside of the van in one shot – especially areas like the bathroom. Here are a few others that give you some perspective:
https://www.instagram.com/p/BbSYhM_Fgs3/?taken-by=bearfoottheory
https://www.instagram.com/p/BbCZIdPFnh6/?taken-by=bearfoottheory
https://www.instagram.com/p/BY3zHStgwCM/?taken-by=bearfoottheory
https://www.instagram.com/p/BX3tJ3VlRkH/?taken-by=bearfoottheory
https://www.instagram.com/p/BWP6-3zAW1P/?taken-by=bearfoottheory
https://www.instagram.com/p/BVnH8c-g6Jh/?taken-by=bearfoottheory
Hope that helps! -Kristen
this is incredible. I’ve been talking to my wife for a while now about a sprinter camper. this has many more conveniences than i even thought about. i just wanted a shower, bed and fridge, but you squeezed in a whole damn kitchen and queen bed! kudos.
Greetings Kristen, my name is Dennis Holcomb and live in Doyle, CA and I received a notice that you are going to sell your van and I was wondering what are you asking for it.
Please let me know if you still have it and is still available.
Thank you,
Very Respectfully,
Dennis Holcomb
Hi Dennis, here are the postings for Kristen’s van on Ebay & Craigslist:
https://www.ebay.com/itm/2016-4×4-Mercedes-Sprinter-Van-Fully-Converted-Camper-Van-with-Shower/323070881826
https://saltlakecity.craigslist.org/rvs/d/2016-4×4-sprinter-van-fully/6486632019.html
I see your selling your van. How much are you asking for
It?
Sweet Sprinter. I’m getting ready to build one for my son who lives in NorCal. Bought a 2012 144 hightop. I really like ur design and space conservation. Anything you would do differently now?
Thanks, Larry from Ohio.
Excellent Van, Can you put some pictures of the BED frame and how it is connected to the sliders, with out the mattress, to see how they connected the sliders to the metal frame. That will be very helpful
Thanks You
How much for your van?
Hi John, Kristen already sold her van! Thanks for reaching out.
Love it!!! The lighting is gorgeous and the wood as well. This is such a cute little van. I have a sprinter van as well. I like the use of space and versatility. So elegant and useful at the same time. I was wondering if that is a composting toilet or not? I have a full bathroom but thought the toilet may help with water consumption.
I see that you have a small little fan in your bathroom, where did you get that from? Is it good in the rain? Does it make much of a difference?
Hi there Ari, it’s just a fantastic fan, similar to the own in Kristen’s main compartment–you can find them on Amazon.
Very impressive
I do custom lithium battery systems for vans and I think your setup could be a lot better if you considered switching to lighter weight and more powerful batteries, also your alternator is good to charge your batteries but make sure it isn’t the original one an alternator can be exhausted trying to recharge 3 batteries at once.. my email is mrlmrsl99@gmail.com let me know if you’d like more info on these battery systems it can allow you to run all you electronics and appliances for days instead of a few hours as with deep cycles batteries.
It’s the best configuration of van RV
what’s the mileage?
Hi love, do you have any recommendations for taking a loan out to buy one?
We found one and are trying to get it financed but aren’t sure what’s next.
Are there any certain regulations it falls under: RV, business loan, etc?
Any tips help!
Hi Ashlee, we don’t, unfortunately, have any advice or information on that. We wish you the best of luck!
Hi, Kristen! Could you tell me what tile you used in the shower?
Hello Tiffany, Kristen isn’t actually sure what the walls of the shower are made of as her van outfitter put them in. They do have a waterproof membrane though on top of them. So sorry we couldn’t be more helpful. You can read more about her bathroom here, https://bearfoottheory.com/sprinter-van-bathroom-pros-and-cons/.
Where did you get your couch/bed cushions made? I am going to make a similar design so we have a bed for our 5 year old son. Thank you!
Hello Kristen!
I had a question regarding your propane set up for the stove. I’ve read a lot of articles online about the danger of having the tank in the van like you have. What was your reasoning for going with that design? Did outside van do anything special for the cabinet?
Thank you!
It’s a very small tank, and propane is very stinky. So in that small space, if I had a leak, I’d know it immediately. Of course, it’s a personal decision, but it’s not something I’m losing sleep over.
Hello Kristen, Your Design is Amazing.
Love your design! Your van looks great looking forward to some cool trips and adventures.
Thanks for sharing this design.
Thank you! This was my first van. You should check out my new one 🙂 Or come hang out at Open Roads Fest this summer.
nice tat
Kristen,
Was wondering where you got the slide out baskets that are in your larger cabinet. I think that would be great to have the large storage which I do and then add these to hold extras!
Hi Deb, those are from The Container Store. Highly recommend!