8 Amazing Washington Snowshoeing Routes
Explore the best Washington snowshoeing routes this winter with our detailed trail guides and important winter safety information.
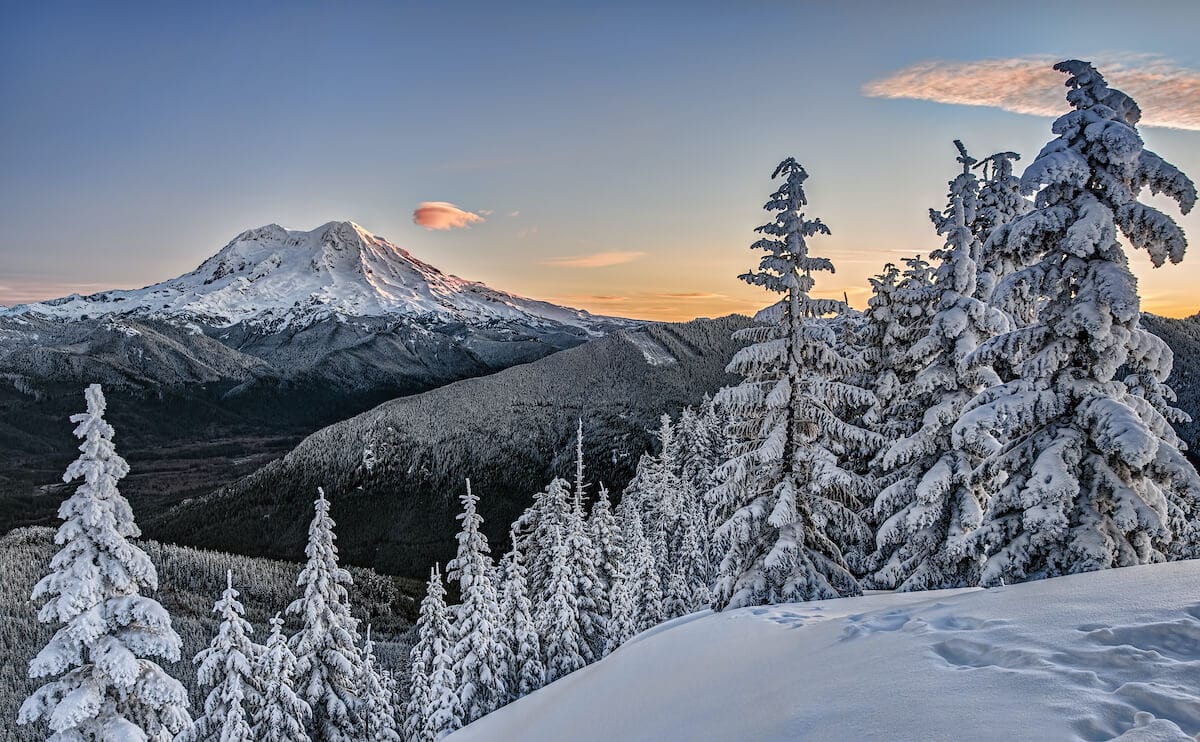
Though the Puget Sound Lowlands have a reputation for mild, relatively snow-free winters, the mountains of Western Washington log some of the deepest annual snowpacks on the planet making Washington snowshoeing routes some of the best in the country.
Mount Rainier in the Central Cascades and Mount Baker to the north average more than 650 inches of annual snowfall and frequently top 1,000 inches – that’s 83 feet of snow! The two peaks routinely alternate as world record holders for most annual snowfall. Currently, Mount Baker holds the world record at 1,140 inches (95 feet!), beating Mt. Rainier’s previous record of 1,122 inches (93.5 feet!).
All that snow creates unmatched adventure opportunities for snowshoers and skiers. Forest roads become narrow snowshoe trails, clearcuts become pristine meadows, and forests become quiet Zen gardens open for expansive exploration.
This post may contain affiliate links.
Explore the best Washington snowshoeing routes this winter with our guide!
Winter Road Conditions in Washington
Though there tends to be a lot of snow in the Cascades and Olympics, it’s not the light, fluffy powder commonly found in other Western states. The snow in Western Washington is locally known as Cascade Concrete. It tends to be wetter and heavier than Rocky Mountain powder.
The only limit to a Washington snowshoeing adventure is road access. Only the most heavily traveled mountain roads and passes are plowed, so visitors are funneled in a few corridors of travel. Most of the cross-Cascade highways remain open, though the high, narrow route over Chinook Pass closes each November at the entrance to Mount Rainier National Park. However, the Road to Paradise within that park is kept open all winter, as is the winding route to Hurricane Ridge in Olympic National Park. Always check road conditions before heading out on your Washington snowshoeing adventure.
Because of the variability of snowpacks from year to year (and even day to day), these recommended routes may vary in accessibility, difficulty, and even length. The key to making the most of your winter adventures is checking for updates before you head out and staying open to the idea of quickly altering plans and expectations!
Save this post!
Enter your email & I'll send this post to your inbox! You'll also receive my weekly newsletter full of helpful advice for planning your adventures.
Washington Snowshoeing Trailheads — Mapped
Best Washington Snowshoeing Routes
Hurricane Ridge, Olympic National Park
- Round-trip distance: up to 5 miles
- Elevation Gain: 800 feet
- Difficulty: Easy to Difficult
Olympic National Park encompasses the wild Pacific Ocean coastline, deep rainforest valleys, and high, glaciated mountains. Hurricane Ridge stands as the premier destination for exploring the mountain portion of the park. Come winter, this high, open ridge offers miles of snowy meadows for snowshoers to explore while enjoying panoramic views stretching from Mount Olympus to the south to Vancouver Island, Canada, to the north.
To make the most of your time on the ridge, from the parking area near the Hurricane Ridge Visitor Center, start trekking west along the unplowed road as it rolls through the Hurricane Ridge meadows and forest stands. Because the deep snow protects the fragile meadows, snowshoers can amble out into the fields as they move west, effectively customizing the adventure.
At about 1.4 miles from the parking area, the route crests a small knoll where, during summer months, visitors can park and enjoy picnic tables with expansive views of the park. This is a good turnaround spot for a moderate outing. But for the best views, snowshoers will push on up the exposed ridgeline toward the top of Hurricane Hill. The summer-use trail hugs the western slope of the ridge, but that route crosses some potential avalanche terrain. If following this path, be absolutely sure of current snow and avalanche conditions. The better option will be to stick to the narrow ridge crest to climb near the top.
If the snow is heavily crusted or icy, even snowshoes with heavy cleats will not be enough to ensure safe footing to the summit so don’t set the top as your ultimate destination. The entire ridge up Hurricane Hill sports grand vistas, so enjoy the lower slopes. To the north, the Strait of Juan de Fuca creates a blue-gray border separating the Olympic foothills from the green shores of Vancouver Island. Looking to the east/northeast, the San Juan Islands dot the north end of Puget Sound and beyond those islands stands the massive white cone of Mount Baker. Closer in the peaks of Olympic National Park line the sky: to the arcing from Mount Angeles and McCarthy Peak to the east down to Mount Olympus and the impressive Bailey Range to the south.
Winter camping is allowed on Hurricane Ridge with a permit – be sure to read our guide to cold weather camping if you plan to stay overnight.
To get there, from Port Angeles drive 17 miles up Hurricane Ridge Road to the Hurricane Ridge Visitor Center. Park near the lodge and sign in with the rangers at the center.

Artist Point, Mount Baker Area
- Round-trip distance: up to 6 miles
- Elevation Gain: 1200 feet
- Difficulty: Hard
As the world record holder for largest annual snowfall amount, Mount Baker is a given as a prime snowshoeing destination. And one of the most beautiful places for snowshoeing in Washington is Artist Point. The area earned its name because of the incredibly photogenic meadows filled with summer wildflowers, backed by the towering rock summit of Mount Shuksan and glacier-crowned Mount Baker. But many feel the area is even more beautiful and worthy of reproduction on film or canvas when shrouded with snow.
The route starts in the parking lot above the ski area lots. Head up the slope to the south and just past the ski runs, turn right and start a steady climb to the pass. The route climbs just 500 feet from the parking area to 4700-foot Austin Pass, but after the pass, the route heads more steeply upward. Climb the open meadows to the lower end of Kulshan Ridge, at about the 2-mile mark from the parking lot. Less than a quarter-mile further on, you’ll top out at Artist Point and its sweeping panoramic views. Look east to Mount Shuksan and tip your head upwards to the west to pure at the soaring summit of Mount Baker. To the southwest are the Coleman Pinnacle towers.
To extend your trekking, push on past Artist Point to the left to follow Kulshan Ridge as it rolls eastward to Huntoon Point. From this promontory, look east into the expanse of North Cascades National Park.
To get there, from Bellingham drive east on State Route 542 (Mount Baker Highway) to the road end, about 55 miles, at the upper parking lot of the Mount Baker Ski Area.

Bagley Lake, Mount Baker area
- Round-trip distance: up to 2.5 miles
- Elevation Gain: 300 feet
- Difficulty: Easy
The Bagley Lake route begins high on Mount Baker and maintains a fairly consistent elevation along its length, making this one of the easiest high alpine Washington snowshoe routes you’ll find.
Mount Baker offers some of the most beautiful alpine scenery in the world, and for snowshoers, it offers the added enticement of alpine adventures with little elevation gain. Also, because of the high elevation, the snow here tends to be lighter and drier than the normal Cascade snowpack, so snowshoers can explore rolling meadows of pillowy snow above timberline with exquisite views of the North Cascades range.
The route starts at the highest parking lot at the Mount Baker Ski Area and traverses across open slopes into the Bagley Lake Basin. You’ll encounter the broad flat plain of frozen Lower Bagley Lake in just a quarter mile. Skirting the east edge of the lake (please avoid crossing the lakes—like all Cascade Mountain lakes, the ice cover should never be trusted with your weight) leads route upslope to the upper lake basin. Gray jays (a.k.a. camprobber jays) typically provide company here, watching for any handouts or lunch scraps from visiting humans. Please resist the urge to feed the birds.
After entering the upper lake basin, the preferred snowshoe route skirts along a low ridge behind which lays Terminal Lake. Turn east and then north to complete a loop down the spine of this open ridge to return to your waiting car.
To get there, from Bellingham drive east on State Route 542 (Mount Baker Highway) to the about 55 miles to the upper parking lot of the Mount Baker Ski Area, signed Bagley Lakes Trailhead.

Skyline Lake, Stevens Pass area
- Round-trip distance: up to 3.5 miles
- Elevation Gain: 1100 feet
- Difficulty: Moderate
Stevens Pass is the northern-most cross-Cascade highway kept open year-round. That, coupled with some impressive trails and routes, makes it a great access corridor for Washington snowshoers. The route to Skyline Lake climbs north away from Stevens Pass to a ridgetop lake with awesome views south to Mount Rainier and north to Glacier Peak.
The route climbs from the ski area parking lot on the north side of the highway. The trail starts on an infrequently groomed road leading past a number of small skier cabins on the edge of the forest above the highway. About a quarter mile into the trek, the groomed track tapers off to the east, but your route leads straight uphill to the north. Hug the trees on the west side of the open slope about the groomed road – sticking close to the trees reduces your avalanche risk and minimizes meetings between uphill snowshoer and downhill telemark skiers.
As the route crests the ridge near the 5000-foot level, the slope levels off into a broad meadow among the trees. Continue north along this clearing while enjoying the views. Look south and, on clear cold days, the Stevens Pass Ski Area appears to be just out of arm’s reach. The network or open runs appear as a spiderweb cast over the slopes on the opposite side of the highway. Beyond the ski area, look for the jagged crest of Mount Stuart – a massive granite wall looking over the Alpine Lakes Wilderness to the south.
As you cross the meadow, stay left and head for a tall steel cellular phone tower. Pass the tower and continue to climb. In another half mile, the ridge top route leads through a forest grove to the shores of Skyline Lake. This is your destination, and for safety, it’s always a good idea to skirt the lake’s shore rather than risk crossing the ice. The combination of generally mild winters and the volcanic nature of the Cascade Range makes all lake ice suspect. Even if temperatures are cold enough long enough to freeze a lake solid, the geothermal activity below the mountains creates a lot of warm and hot springs, some of which can spout out of the ground in the middle of a lake, keeping it warmer than you might expect. In effect, these unseen warm springs sometimes melt the surface ice from underneath.
To get there, from Everett drive east on U.S. Highway 2 to the summit of Stevens Pass. Park in the ski area parking lots on the north side of the highway.

Kendall Peak, Snoqualmie Pass area
- Round-trip distance: up to 9 miles
- Elevation Gain: 1600 feet
- Difficulty: Moderate/Hard
Though the route to Kendall Peak climbs relentlessly, the pitch is gradual, making this a good option for first-time snowshoers looking for a good winter workout. The trail leads up old logging roads to high on the flank of Kendall Peak, which looms over the north side of Snoqualmie Pass. The route eventually leads to the mountainside basin of Kendall Lakes (5,675 feet), but trekkers can trim the trip to any length they’re comfortable with by simply turning back at any of the many scenic overlooks along the way.
The route starts from the western edge of lower Gold Creek Valley on an old logging road that is heavily used by both snowshoers and backcountry skiers. The track climbs steeply for a brief pitch, then moderates as the path slices through an old clearcut about a half-mile in. The clearcut (winter meadow) offers adventurous snowshoers the chance to explore on their own, heading north, straight up the slope. More cautious and energy-conserving trekkers may stick to the road as it meanders up the slope through some wide switchbacks. The road route had the added benefit of providing convenient stopping places – each corner – to pause and appreciate the wintry views to the south. Gold Creek basin, the eastern end of the Summit Ski Area can be seen, with the bulk of Mount Catherine marking the horizon.
At nearly 2 miles out, the road splits with our route heading off to the right – the left fork makes a nice outing, too, as it leads to another broad meadow with grander views of the Snoqualmie Pass panoramic vista. But to head toward the lakes basin, stay right as the road leads east up and over a low ridge spine before bending back to the north. From here, the road switches back and forth through dense forest for a couple of miles before breaking out to views once more.
Enjoy the views here before turning back or pressing on. The final pitch to the lakes basin leads away from the roadway and up an open, somewhat exposed, ridge crest. If you make it to the basin, stop at the edge – the lakes, especially the upper lake, are nestled in a deep cirque with avalanche-prone walls.
To get there, from Seattle drive east on Interstate 90 over Snoqualmie Pass to exit 54, 2 miles east of the pass’s summit. Exit I-90, turn left, and cross under the freeway to reach the Gold Creek SnoPark just a few hundred feet north of the highway interchange.

Gold Creek Ponds, Snoqualmie Pass area
- Round-trip distance: up to 2.5 miles
- Elevation Gain: 100 feet
- Difficulty: Easy
For novices and/or families with small kids, Gold Creek Ponds makes an ideal Washington snowshoeing destination. The terrain is flat yet scenic, the route is easily accessible from the Seattle metropolitan area, and there’s a ski area with numerous lodges across the highway that provides plenty of options for after-adventure snacks and beverages.
The trail starts from the Gold Creek SnoPark and leads up Forest Road 144 as it runs north into the broad Gold Creek Valley. The road runs through a dense stand of forest for a few hundred yards before the trees thin and then give way to a broad meadow. Angle to the left (west) and hike into the Gold Creek Ponds basin. During the summer months, this is the site of a nice picnic area and paved interpretive trail. When snow blankets the area, though, it’s all meadows, small lakes, and views. As you cross the summer parking area, stay to the right as you approach the lakes to follow the general path of the interpretive trail. By taking a counterclockwise approach to circling the lakes, you give yourself the best views along the way. Kendall Peak towers over Gold Creek Valley to the west-northwest and the ragged crest of Rampart Ridge marks the eastern wall of the valley.
The route around the ponds ambles along a willow-lined creek to the north end of the pond basin. Your best views up the valley can be found here, as well as grand views south across the cut of Snoqualmie Pass to the Mount Catherine and the white ribbons of the ski area run. You can enjoy those views as you complete a loop of the ponds, venturing out into the meadows as you go to explore the immediate scenery and snowy landscape. As you explore though, beware. The broad expanse of the flat pond surface looks inviting, but dangers await any who venture out onto the ice. Generally speaking, ice doesn’t form thick enough in many Cascade lakes to be safe for human weight, and this route sits at just over 3,000 feet elevation, meaning the temperatures never drop low enough to get create a thick ice cover on the water.
To get there, from Seattle drive east on Interstate 90 over Snoqualmie Pass to exit 54, 2 miles east of the pass’s summit. Exit I-90, turn left, and cross under the freeway to reach the Gold Creek SnoPark just a few hundred feet north of the highway interchange.

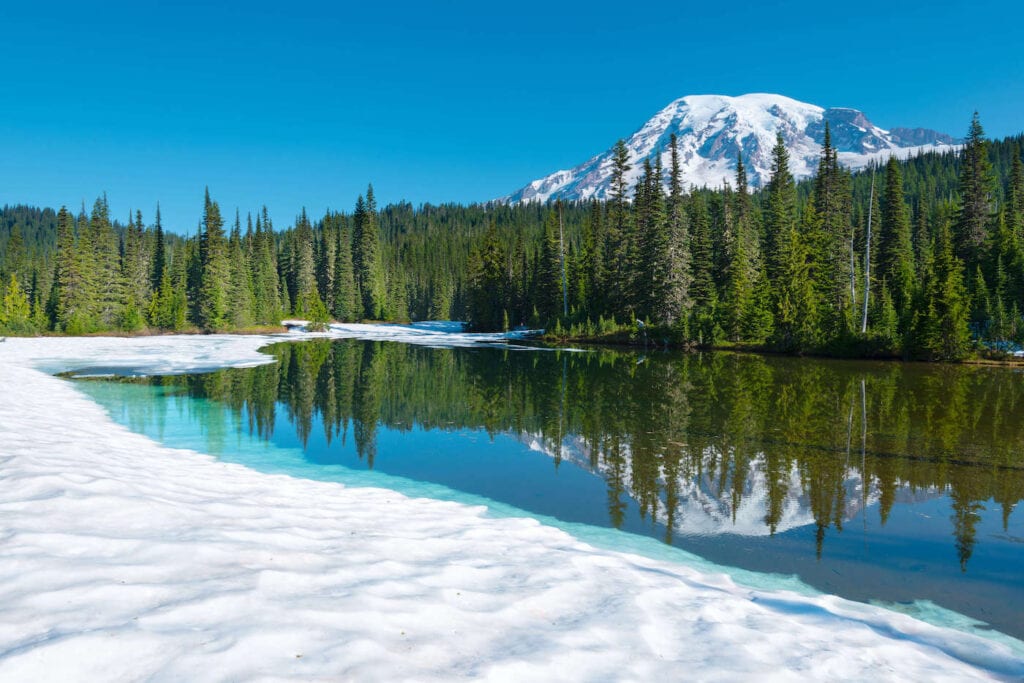
Reflection Lake, Mount Rainier National Park
- Round-trip distance: 3.5 miles
- Elevation Gain: 560 feet
- Difficulty: Moderate-Difficult
The route to Reflection Lake provides good local scenery, but no grand vistas – until the end. The lake basin is the payoff. During the summer months, this little lake is one of the most popular places for visitors to photograph the mountain. The lake sits alongside the primary road within the park and sports glorious views of the upper mountain, framed by broad meadows.
Much of the snowshoe route follows that popular roadway, but it starts in the trees near the Narada Falls viewing platform. From the parking area, angle right past the area’s restrooms and maintenance shed. Visitors who have done their homework on current avalanche conditions and found the snow to be stable (and not too deep) may climb the steep, open slope directly ahead to reach the main trail. That route, though, is very steep and strenuous, and if there is a whisper of snow instability it should be bypassed.
Instead, veer left past the buildings and follow a set of blazes as the path traverses the forested slope. A few hundred yards into the trek, a short climb leads to a break in the trees and a wide, open ribbon of snow. This is your path. In the summer, this is the traffic-heavy Stevens Canyon Road but in winter, the domain of skiers and snowshoers. Follow the road east as winds around the flank of Inspiration Point. The going is easy as there is little to no elevation gain at this point as the route cuts through lush forest.
At just over 1.5 miles, the road enters the broad meadow that cradles Reflection Lake. The road sticks to the south side of the lake, below the jagged crest of Pinnacle Peak. Looking across the frozen lake, the hulking mass of Mount Rainier dominates the view. You can enjoy the view of Rainier as you explore the lake basin. While you might see tracks across the lake itself, we urge caution. This is an active volcano, and all that geothermal power keeps warm springs bubbling around and in most of the lakes in the area. In short, warm water bubbling up from the lake bottom can create dangerous thin spots in the lake ice.
To get there, drive east from Tacoma on State Route 7 and bear left onto SR 706 at the town of Elbe. Continue east through the Nisqually Entrance of the park and proceed to the Narada Falls View Area parking lot.
Panorama Point, Mount Rainier National Park
- Round-trip distance: 5 miles
- Elevation Gain: 1300 feet
- Difficulty: Moderate-Difficult
Paradise – an incredibly popular destination for summer visitors to Washington – includes a sprawling network of wildflower meadows and rugged alpine terrain. The hordes of summer visitors are restricted to narrow, hardened trails to minimize damage to the fragile meadows. But come winter, those wildflowers are safely asleep under a deep blanket of snow. Most years, that snow layer may be 20 or more feet deep! So, snowshoers can safely roam anywhere in the expansive meadowlands of Paradise.
To make the most of an outing here, set a course to one of the best viewpoints in the region – Panorama Point. From the Paradise parking lots, enter the meadows near the guide service building and head north straight toward the mountain itself. You’ll need to skirt around the left side of the groomed-snow play area (a popular sledding/inner tubing site for families) before cutting right to follow the west side of the tree-covered crown of Alta Vista peak. The route climbs somewhat steeply here through meadows and thin tree cover. Stop often to look ahead at the mighty mountain, as well as behind at the jagged line of Pinnacle Peak, The Castle, Unicorn Peak, and Boundary Peak marking the north end of the Tatoosh Range.
After cresting the saddle at the upper end of Alta Vista ridge, veer right and climb along the ridge crest leading straight toward Mount Rainier. The route parallels Nisqually Glacier, seen in the deep valley to your left. At about 1.5 miles, the route crosses a small plateau known as Glacier Vista. If you are tired at this point, turn back here knowing you have experienced some of the best views of the route. But sturdy snowshoers can press on, climbing another mile or so – sometimes very steeply – to the rocky promontory known as Panorama Point. This rocky perch is high enough on the mountain that, on clear days, you can see the craggy summits of the Goat Rocks Wilderness Area as well as the broad cone of Mount Adams to the southeast.
For your return to Paradise, complete your loop by traversing east to the upper flank of Mazama Ridge, then drop down that ridge wall into the upper Edith Creek basin. The basin is wide, and you can pick your own path once you enter it, but use caution when making the first drop into the basin. For the safest route, traverse out at least a half mile from Panorama Point to skirt the steepest slopes, which are always heavily corniced. Once past the obvious cornices and steep drops, head down the slope toward Edith Creek and follow it all the way down to Paradise, passing under the eastern face of Alta Vista.
To get there, follow the Road to Paradise and park in the Paradise Parking Lots near the Skyline Trailhead.

Permit Information
All of the routes here start on federal lands – either US Forest Service lands or National Park Service lands. For those trailheads, a Federal Lands Pass is required. A Northwest Forest Pass can be purchased annually or for one day and is valid at all National Forests in Washington and Oregon. The Forest Pass is NOT valid at National Parks. For access there, passes – when needed – are available at the specific park entrance gate. A better option, though, is to purchase an annual America the Beautiful Pass, which is good for 1 year and can be used nationwide at federal recreational lands, including USFS lands, National Parks, U.S. Bureau of Land Management (BLM) lands, and U.S. Fish and Wildlife lands.
For maintained winter parking areas on Forest Service lands, visitors will also need a SnoPark Permit sold by Washington State Parks. The fees from these permits are used to pay for the plowing needed to keep those trailheads open and accessible as well as to perform grooming on some routes. SnoPark permits for non-motorized users cost $25 for a day permit, or $50 for an annual permit (valid Nov. 1 through April 30 each season).
We hope this helps you plan an amazing Washington snowshoeing adventure this winter. Do you have any questions about snowshoeing or have any popular routes we missed? Leave us a comment below!
