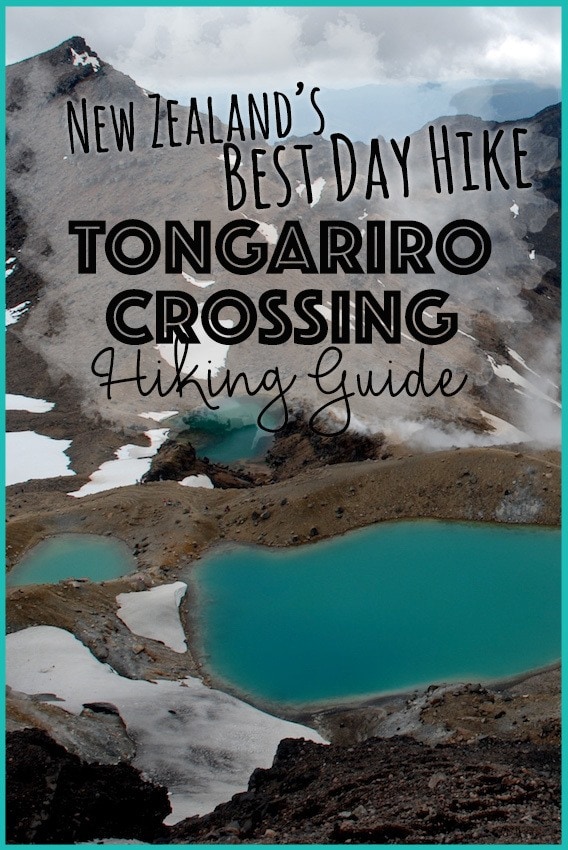
New Zealand’s Best Day Hike: Tongariro Crossing Hiking Guide
Don’t miss New Zealand’s best day hike. Get this detailed hiking for the Tongariro Crossing hike, one of New Zealand’s Great Walks on the North Island.
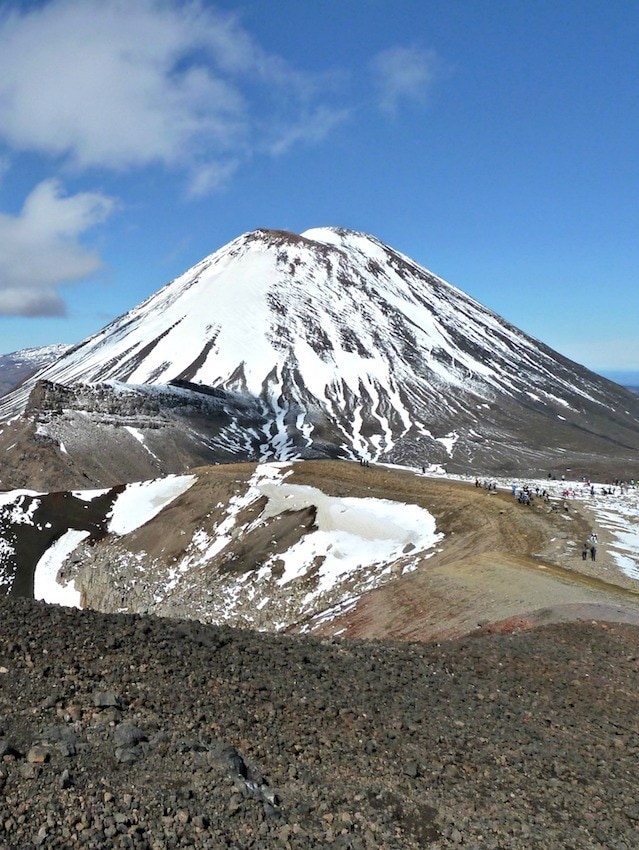
Arguably New Zealand’s best day hike, the Tongariro Crossing hike, is situated in the center of New Zealand’s North Island. The trail runs through an active volcanic region in the midst of Tongariro National Park, which is home to the iconic mountains of Ruapehu, Tongariro and the famous Mt Doom from Lord of the Rings (Mt Ngauruhoe).
The Tongariro Alpine Crossing is a 7-8 hour hike through dramatic volcanic scenery, offering epic vistas all the way to Mt Taranaki on a clear day.
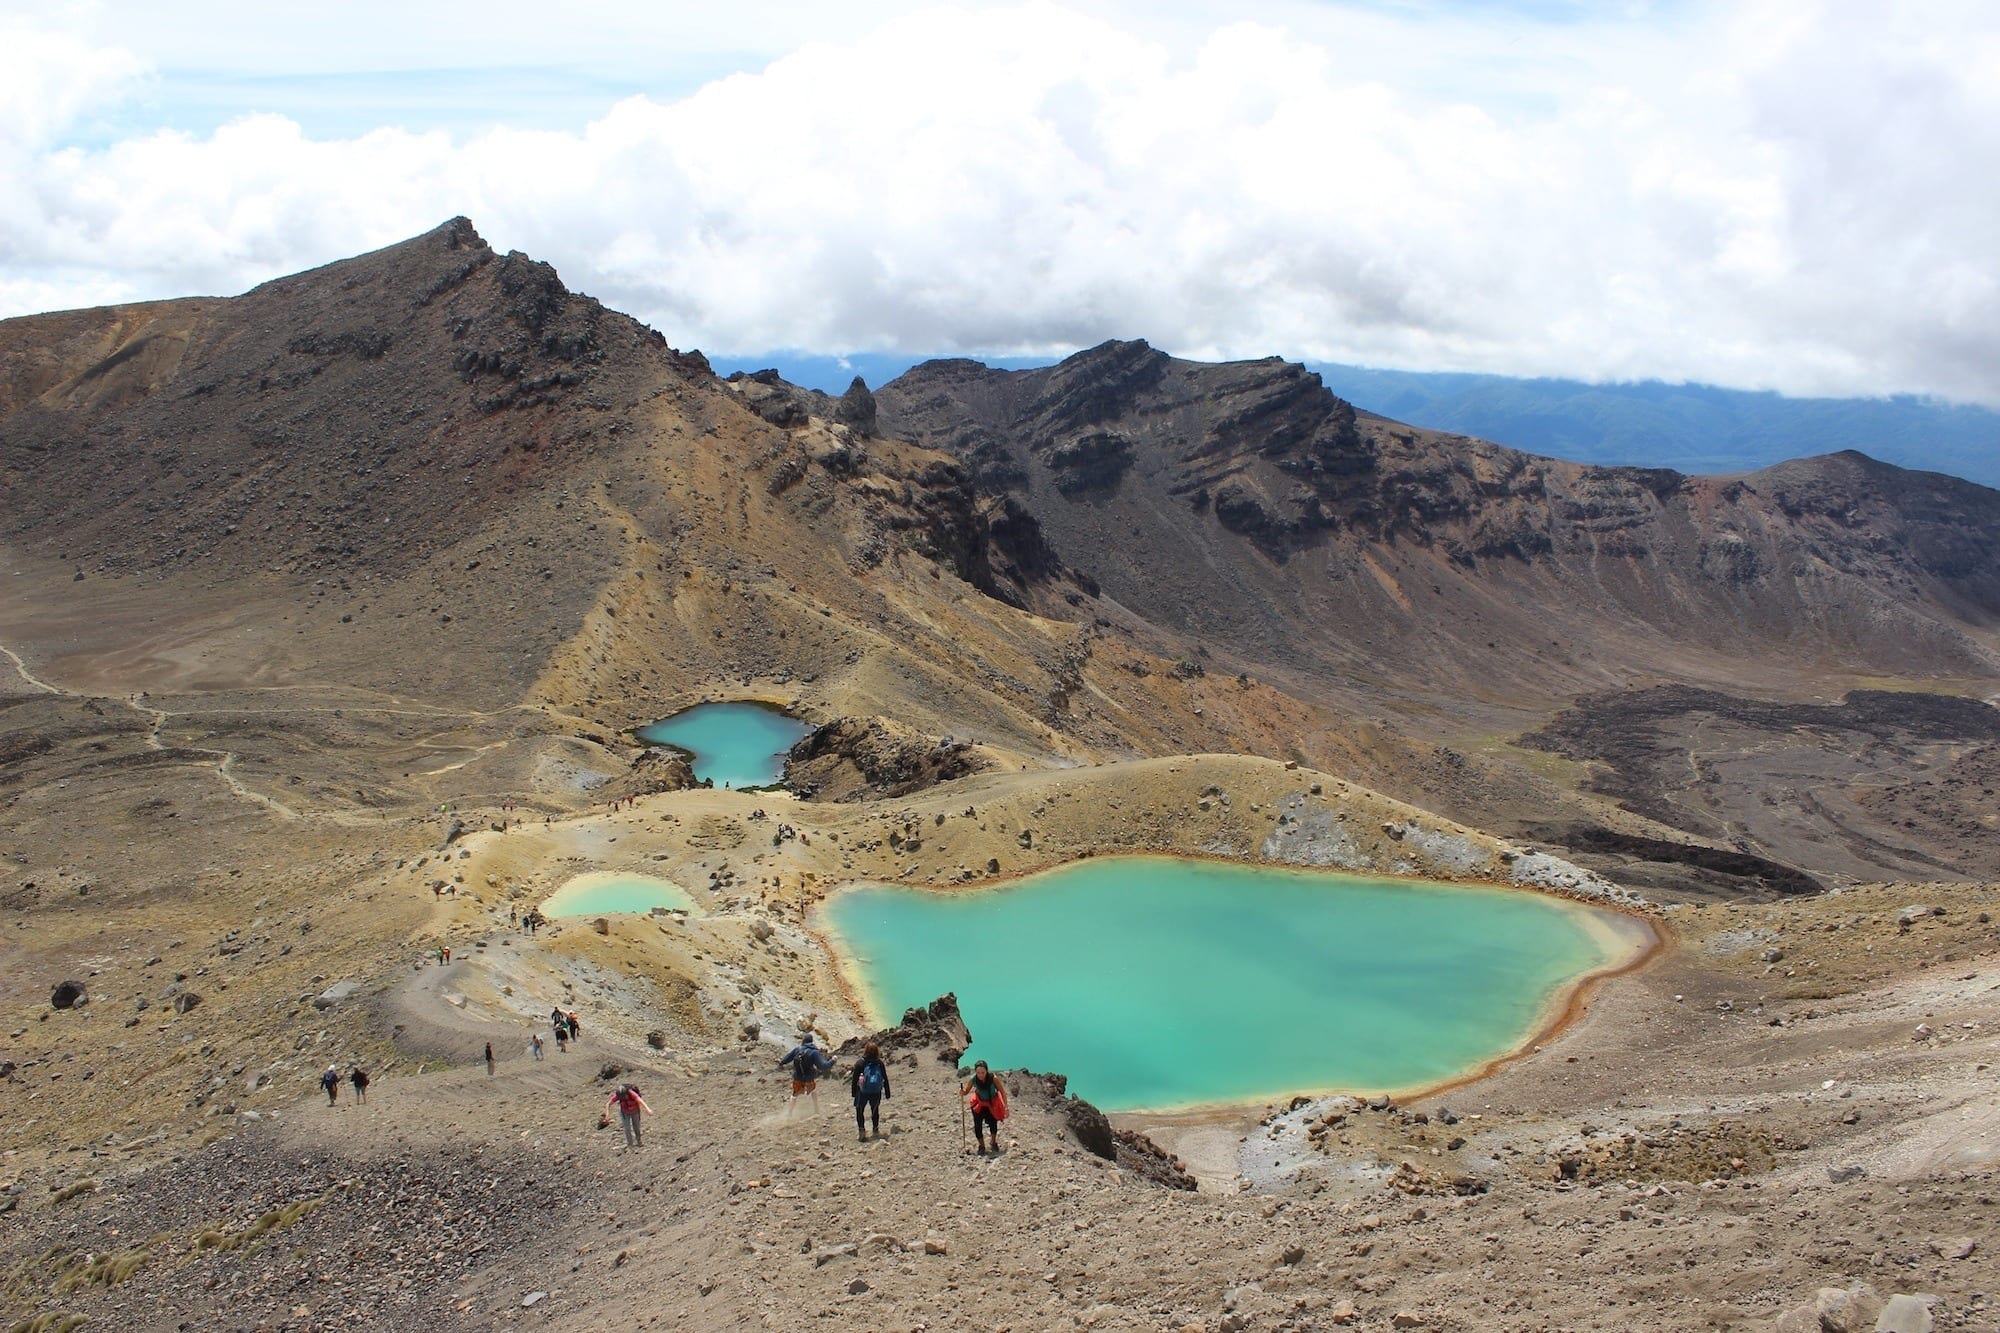
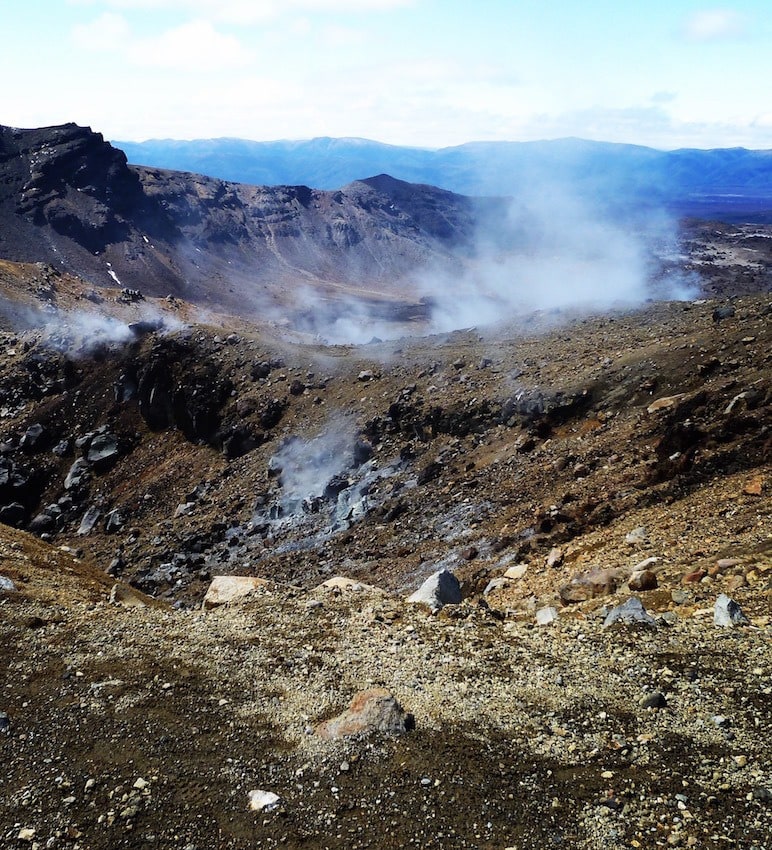
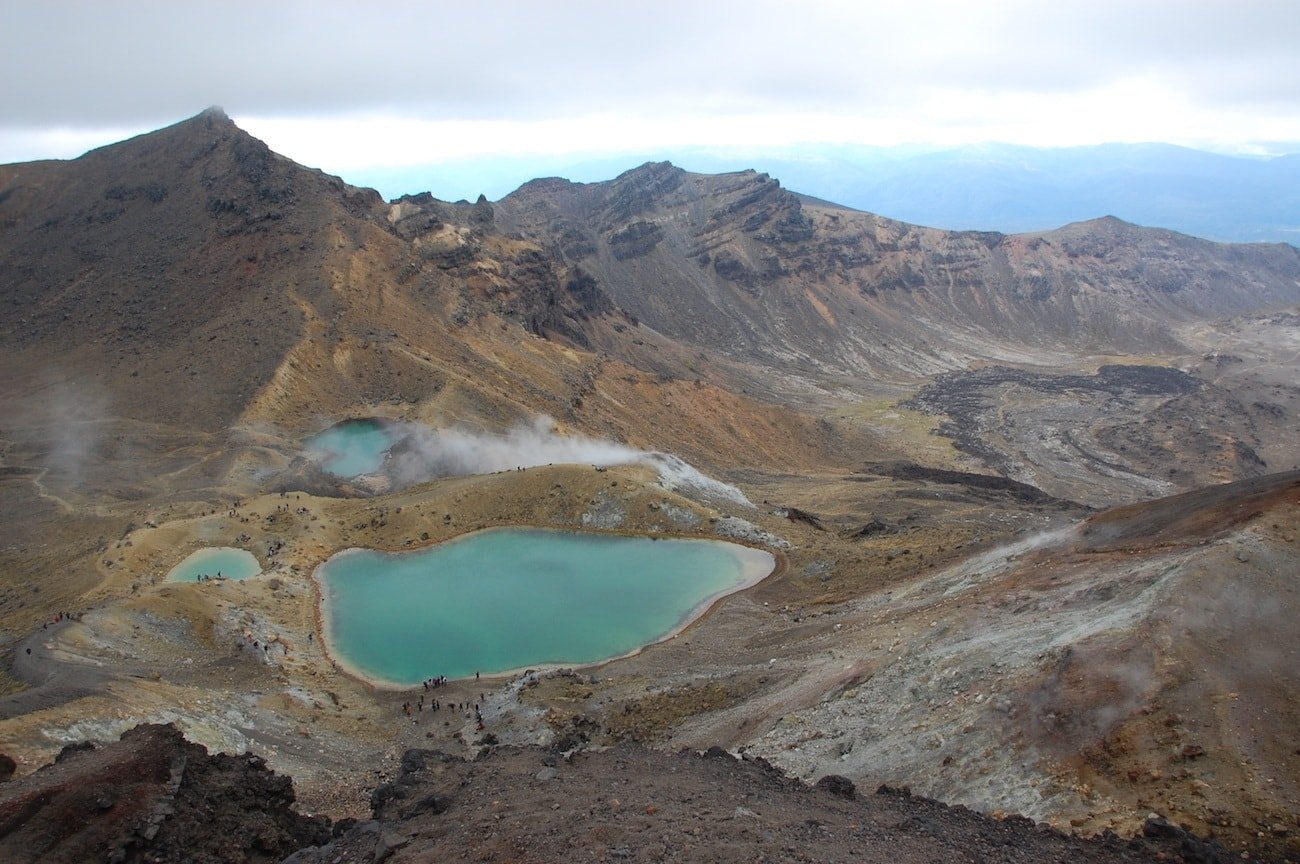
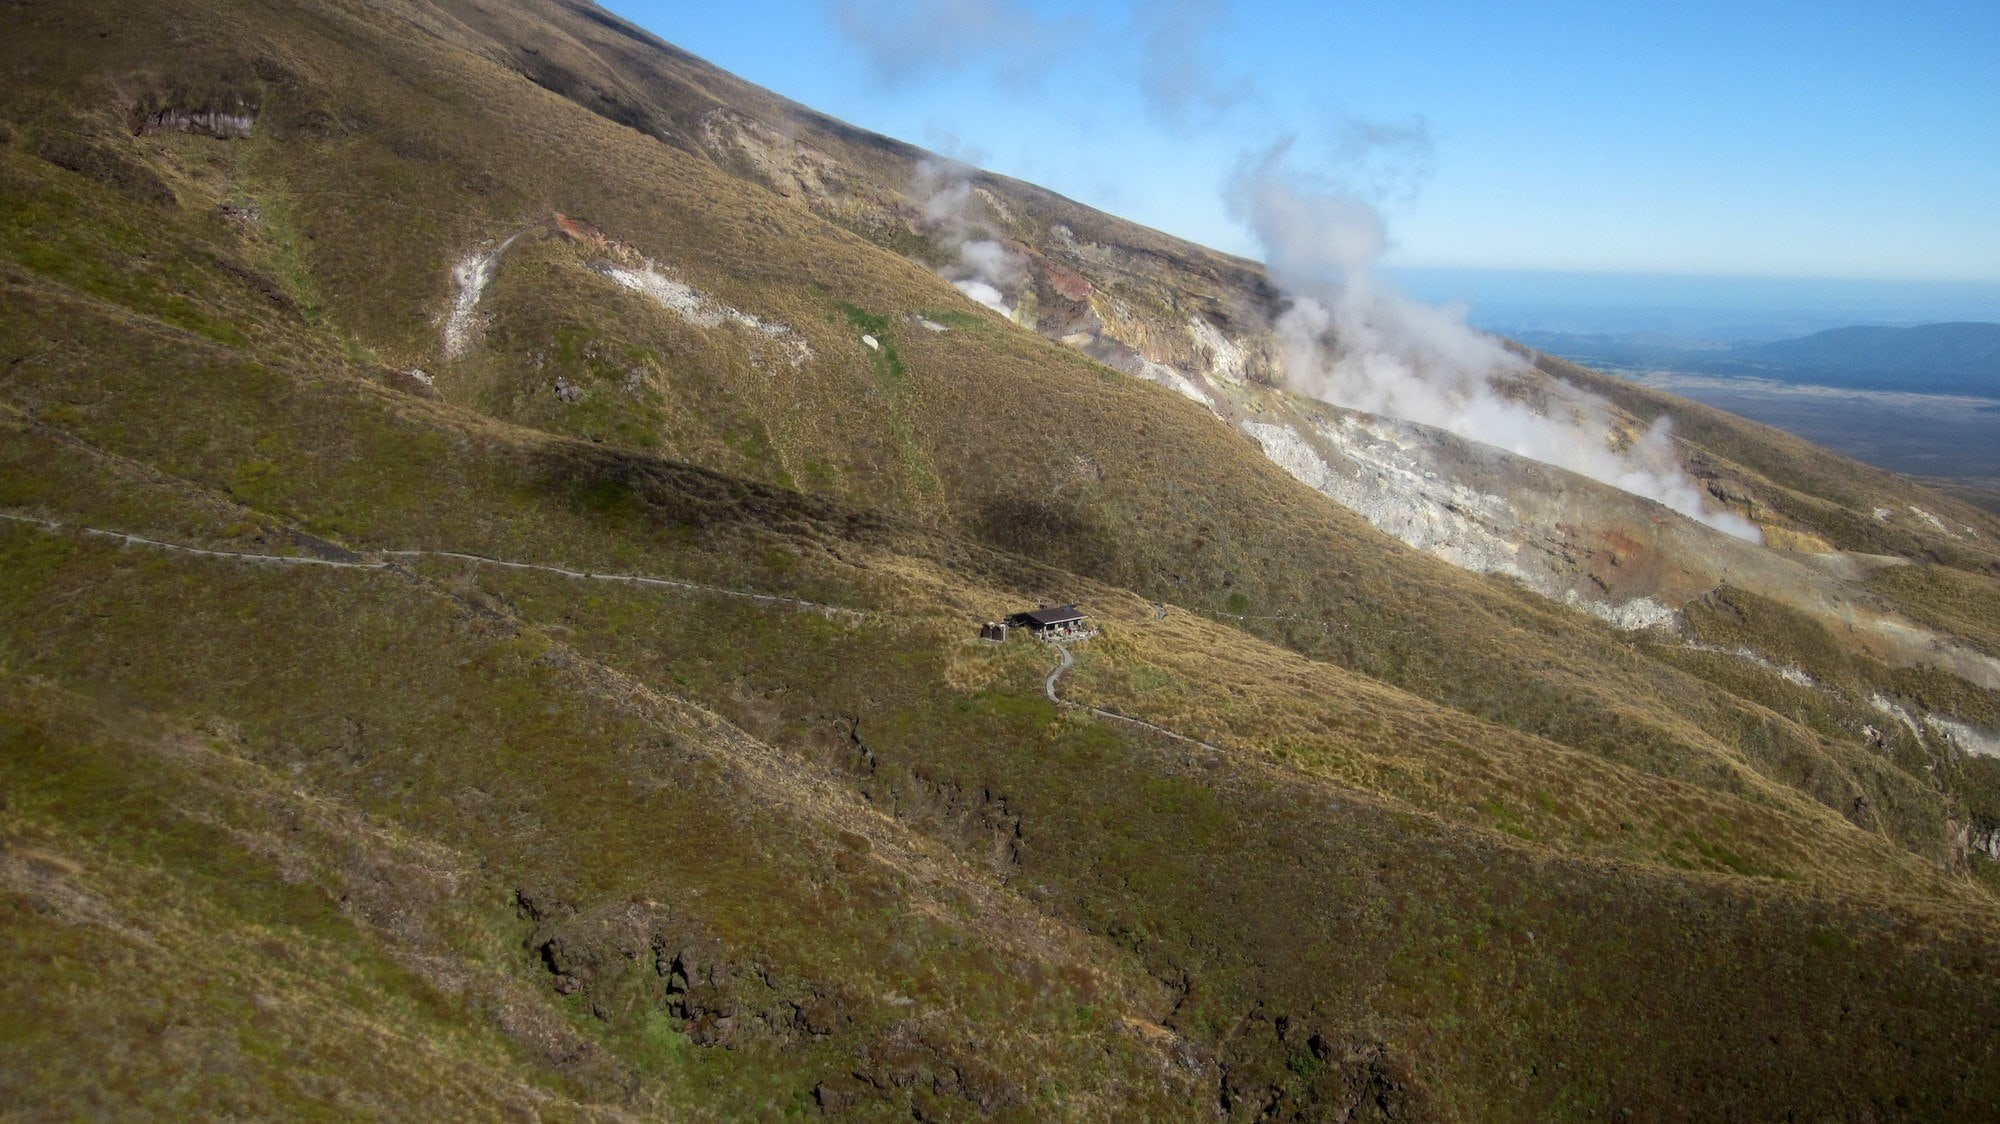
Hiking through heath and moorland on the slopes, through the bleak alpine desert, you’ll be rewarded with views of the Red Crater, the Emerald Lakes and the Blue Lake all the way to Lake Taupo. You’ll see steam vents and smell the sulfurous gases from the volcanic fumaroles. It’s spectacular! The Tongariro Crossing hike should be on your New Zealand bucket list if you plan to visit New Zealand. It’s spectacular, dramatic and very different from any other hike I’ve been on.
 Photo Cred: russellstreet
This post may contain affiliate links.
Tongariro Crossing Basic Facts
- Length: 12 mile through-hike, allow 6-9 hours
- Location: Tongariro National Park, Manawatu-Wanganui, New Zealand.
- No permits required, and it’s free! You can hike alone or choose to take a guide.
- Elevation Change: Starting elevation is 1100 m (Mangatepopo car park) and ending elevation is 800 m (Ketetahi car park)
- Highest Point (Red Crater) Elevation: 1886 m
- Side hikes: Soda Springs (15 minutes), Mt Ngauruhoe (3 hours), Mt Tongariro (2 hours)
- Getting there: book a shuttle bus to transport you from your accommodation to the trail head.
Save this post!
Enter your email & I'll send this post to your inbox! You'll also receive my weekly newsletter full of helpful advice for planning your adventures.
Best times for the Tongariro Crossing Hike
The Tongariro Alpine crossing can be completed year-round. In winter, when it is covered in a blanket of snow, you’ll need to be proficient with ice-axe and crampons and go with an experienced guide. (Note: you cannot climb Mt Ngauruhoe in winter).
Spring and Autumn are arguably the best times to tackle the crossing. You’ll avoid the summer crowds, although the weather can be very unpredictable, so be prepared! Early spring sees the mountains still with their snowy mantle and the track may have some remnants of snow underfoot.
Summer is busy, very busy. On a bright day the sun will be brutal and temperatures can stretch into the 30’s (centigrade). The weather is more reliable in the summer, although being New Zealand there will be plenty of rainy days!
Getting to the Tongariro Crossing
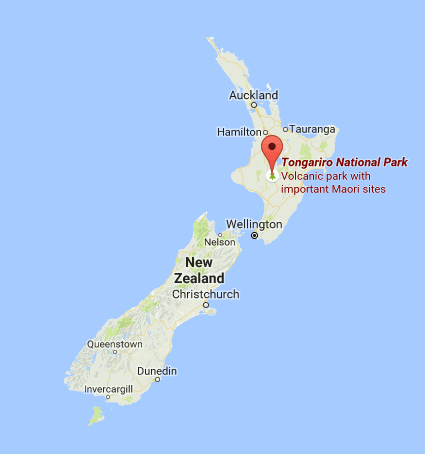
Around 4 hours drive south of Auckland, the Tongariro National Park is near to some of the best of New Zealand’s central North Island destinations.
Turangi is the closest town to the Tongariro National Park, and is a lovely place to stay with bars, restaurants and quaint motels. Next to the Tongariro river, it is popular with fly fishermen. The nearby hot pools are a great way to relax those sore muscles after a day’s hiking.
A little further afield is Taupo. On the shores of Lake Taupo there are numerous accommodation options, as well as plenty of activities both land and water-based. This is a great choice if you’ve got a few days as you won’t be stuck for what to do if the weather is poor on the Tongariro Crossing.
Since the crossing is one-way, you’ll need transport to get you from your accommodation to the trailhead. There are several bus companies that can pick you up from your hotel/hostel in Taupo, Turangi or nearby villages. Alternatively, you can leave your car at the end-point of the hike and have a shuttle from there to take you to the trailhead – which is cheaper.
The advantage of taking an organized bus service is that they will keep a checklist of who is on the mountain, and if you don’t meet your last bus back – they’ll call search and rescue for you! Some good options are:
What to Know Before You Attempt the Tongariro Crossing
Assess your fitness: you don’t need to be an athlete to complete this trek, but it’s a 7-8 hour hike over sometimes difficult terrain. The uphill sections are steep and taxing, the downhill sections relentless. A reasonably active person with no medical conditions or injuries should be able to complete the hike.
 Elevation Guide Courtesy of the New Zealand Department of Conservation

Be prepared to change your plans at the last minute. If the weather is poor, you’ll have a miserable (and potentially dangerous) time. Don’t underestimate how quickly weather conditions in the mountains can change.
Take the right gear! (See packing list below) If you don’t have all the gear you need, it is possible to rent it from the shuttle-bus companies.
If you plan to climb Mt Ngauruhoe or Mt Tongariro, it’s best to leave on the “early” bus service (departs Turangi at 6am) to ensure you’ve got enough time and are not in a hurry.
Check weather with MetService.
Check volcanic activity with GeoNet – yes, it’s a volcanic region and the last eruption was in 2012!
If you drive to the Park, stop in the Department of Conservation Office and ask about current conditions and grab a map.
Packing for the Tongariro Crossing Hike
Sturdy hiking boots, preferably with ankle support – the terrain is rocky, the volcanic scree can be slippery and you don’t want to turn over an ankle half way up! Gaiters are optional, but good for protecting your legs from the dusty volcanic scree and keeping small rocks out of your boots.
Layers – whilst the start may be warm (t-shirt) it can be bitterly cold as you gain elevation. I recommend a base layer, a fleece and a jacket in addition to your waterproofs. Waterproofs are absolutely essential. Weather in the mountains can change rapidly, and being cold as well as wet can quickly become dangerous. Zip-off “convertible” hiking pants are a great option for being able to quickly go from shorts to pants. For winter hiking, you’ll need full winter gear in addition to ice axe and crampons.
Sun protection, as in sunglasses and sunscreen, is key as New Zealand’s sun can be brutal, with “burn-time” of about 3 minutes in summer. Hat – a brimmed hat to keep the sun off your face, and a beanie to keep you warm on the exposed areas where the mountain wind is icy.
Trekking pole(s) – optional, but I relied on mine to stay balanced on some of the steeper sections (both up and down).
Cell phone for dialing 111 (the emergency service number in New Zealand). A map is also essential for safety, they are free from the bus service. The trail is well signposted with poles to mark the way.
Personal first-aid kit – for minor scrapes and blisters. Don’t forget to include toilet paper and ziplock bags for any garbage. There are toilets at Soda Springs Hut and then none until Ketatahi Hut.
Lots of high energy and caloric rich snacks to keep you fueled. Also remember to bring lots of water – it might be heavy, but there is nowhere to fill your water bottle on the trail. The water from the lakes and streams is not drinkable due to volcanic mineral deposits. (2-4 liters recommended)
Bug spray (summer only)
Read Next: What to Wear Hiking
The Tongariro Crossing Trail
 Map Courtesy of New Zealand Department of Conservation
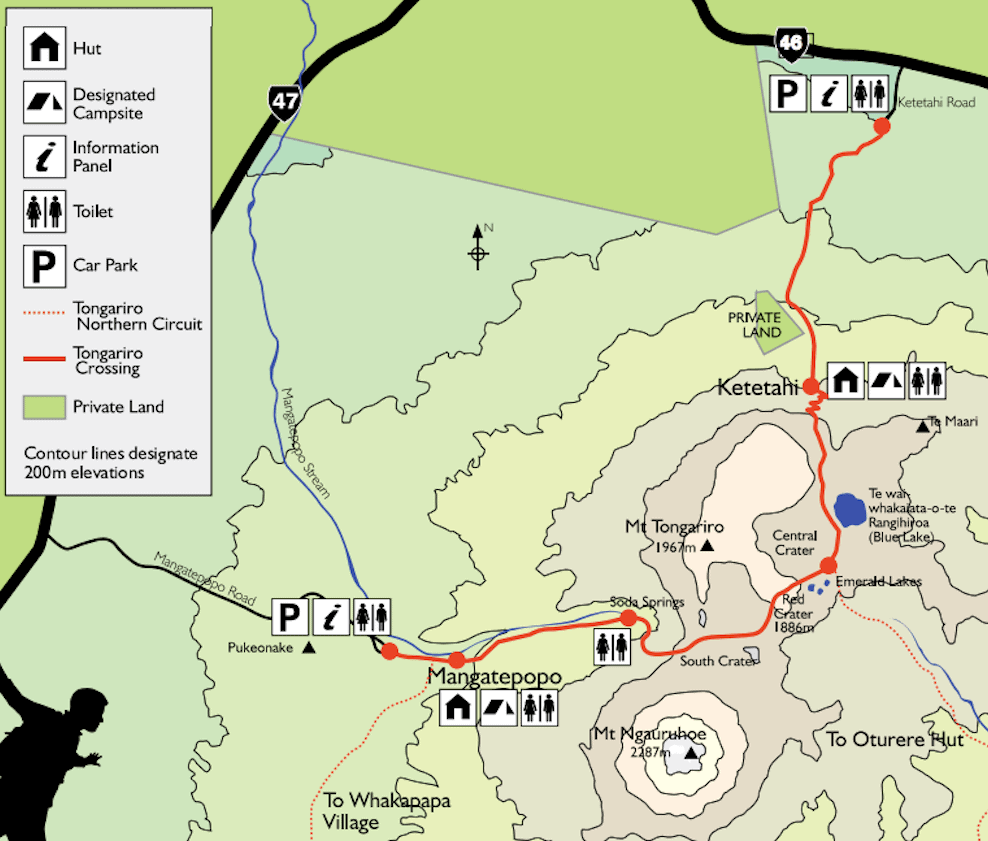
The trailhead begins at the Mangatepopo car park on the South-West end of the trail. There are toilets here and a shelter with some useful information about the hike. Note the reminders that there are no trash cans en route, so please “Leave No Trace” and pack out ALL of your trash.
Mangatepopo Car Park to Soda Springs (~1-1.5 hours)
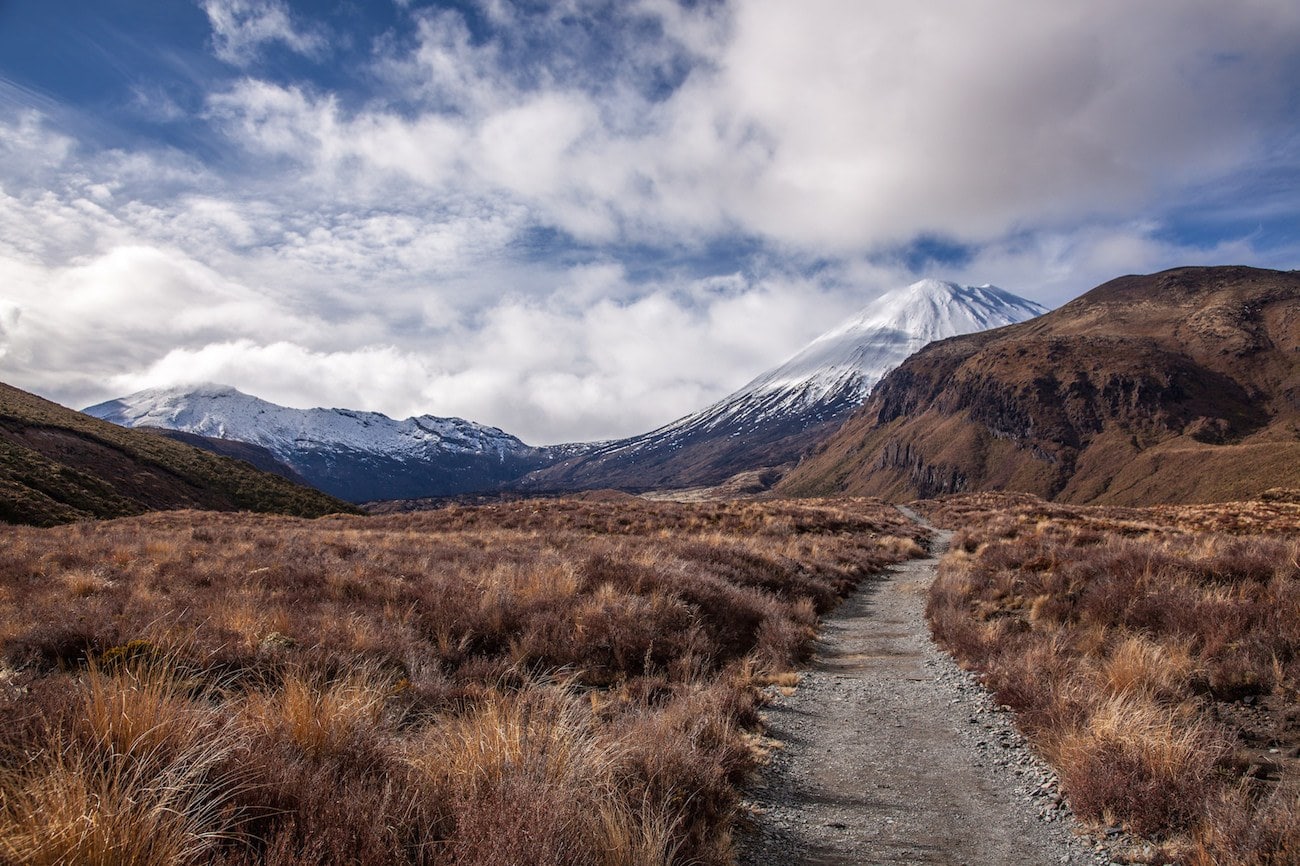
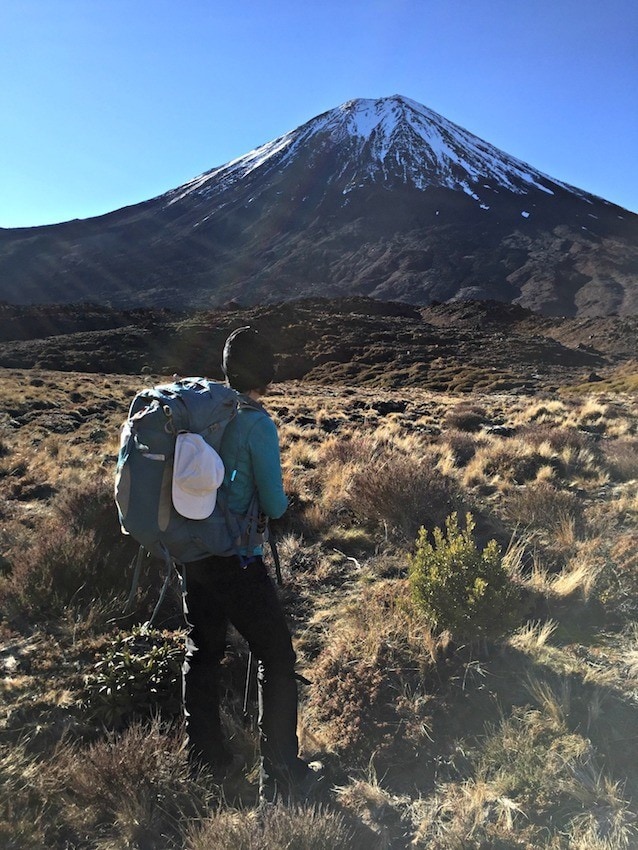
Setting off through scrubby grassland, towards the Mangatepopo Valley with views of Mt Ruapehu to the left, the trail is flat and well-maintained. Closer to the valley are some boggy patches, but there is a boardwalk for hikers to use that helps protect the fragile environment. Rounding a corner, Mt Ngauruhoe comes into view looming ominously in the distance. A perfect stratovolcano, when the top is still covered with the remnants of snow, it’s easy to imagine how this was the inspiration for Peter Jackson’s “Mt Doom”.
It’s an easy hike through dramatic countryside, with a gentle incline. You hike up out of the valley and there is a flat, rather barren-looking plateau. The heather at the start of the trail gradually recedes, leaving only tussocky grasses and rough alpine plants in the moorland zone. The area becomes more rocky, across the pyroclastic flow from various eruptions of Mt Ngauruhoe reminding you that this is a volcanic region.
The main track diverts towards the actual Soda Springs – it’s about 15-30 minutes, and there are multiple signs posted.
The toilets mark the end of this section. These are the last toilets until Ketetahi hut which is over 8 kilometres away.
Rounding a corner, it’s clear that the easy part is over…
Soda Springs to South Crater (~1 hour)
Through the volcanic rock and scree, you are greeted by a sign:
“STOP. Are you really prepared to continue your Alpine crossing trek? Is the weather okay? Do you have the right equipment & clothing? Are you fit enough? If you have answered no to any of these questions, seriously consider turning back”.
The next section is called the Devil’s Staircase. This section is steep, climbing about 280 meters out of the Mangatepopo Valley across lava flows, both ancient and modern. The track is rough in parts, and has well-maintained wooden stairs in others. Overall, it’s hard-going. Taking it slowly and resting to admire the spectacular views along the way, makes it more bearable!
Hiking this section would be pretty tough in rain or bad weather, so do heed the advice of the notice! Looking down across the Mangatepopo Valley, you can clearly see the different colors of the lava flows: the darker they are, the younger they are! On a clear day, you can see all the way to Mt Taranaki.
Reaching the top of the Devil’s Staircase, you can choose to go straight across South Crater to the Red Crater, or take a side-hike up to the summit of Mt Ngauruhoe. This is a 650m ascent through volcanic scree – there are no clear tracks up to the summit. On the day I went, I could not do it, as there had been an accident the day before from a rock slide. You should allow an extra 3 hours if you do intend to summit. Make sure to take the opportunity to catch your breath as the trail flattens out across the South Crater.
 Photo Cred Remon Rijper
— South Crater to Red Crater (~1 hour) —
This flat plateau was covered in snow in early spring, adding to the generally bleak and inhospitable environment. The dramatic Mt Ngauruhoe towers over. It’s an easy hike, but see that ridge up ahead? It looks steep.
Approaching the ridge, the combination of compacted snow and scree can make the trail slippery. I was glad I’d brought my hiking pole! Much more rugged than the Devil’s Staircase, the trail climbs up exposed tracks over rocks with a rather precipitous drop to one side.
Sections of this path have chains where you can literally haul yourselves up with your arms, if you can’t get a proper foothold. I won’t lie, it was exhausting and only a little bit terrifying at times!
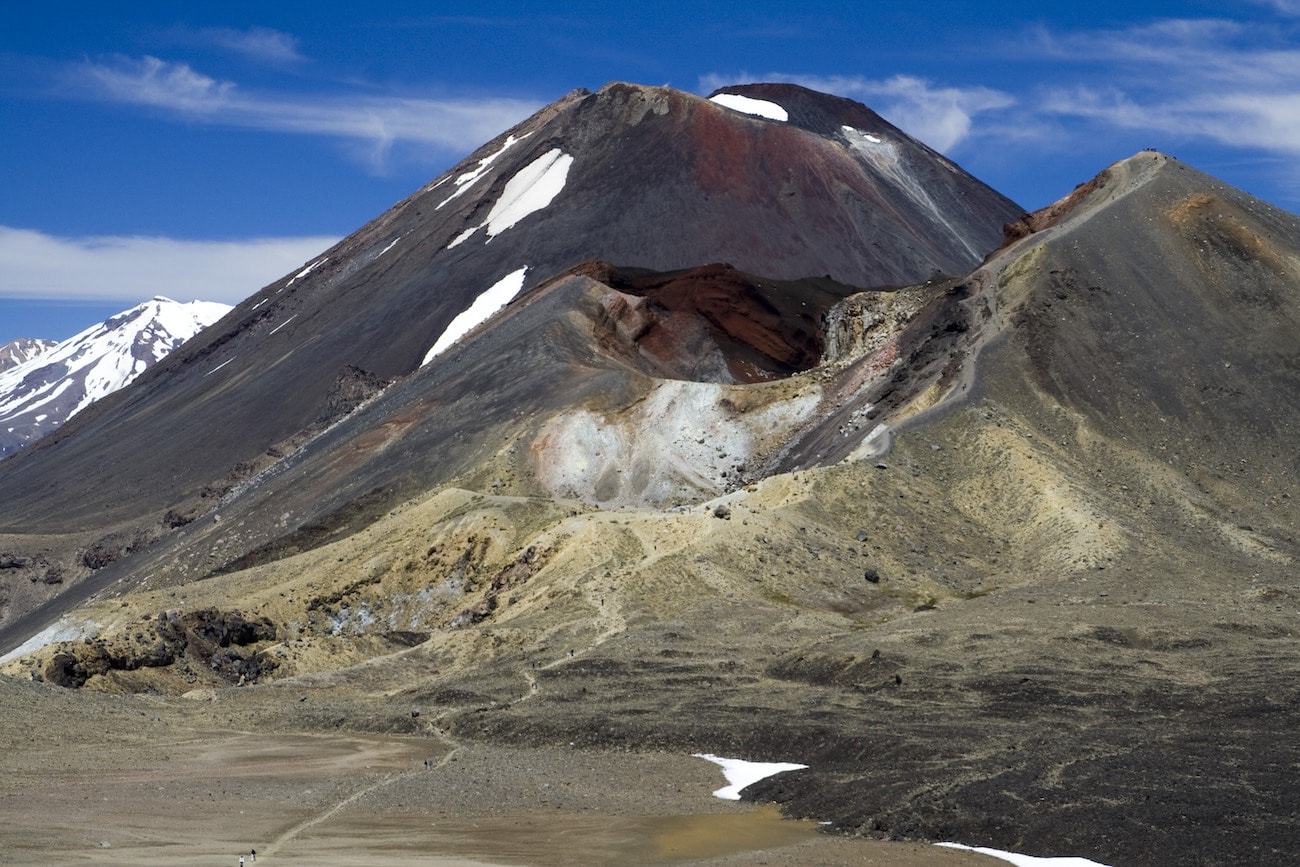
At the top of the ridge, you go around the Red Crater. It’s a slippery, narrow track, exposed on both sides. I can’t imagine what it would be like on a windy day. The Red Crater – it really is red, from the iron deposits – drops away steeply, deep into the volcano. Steam wafts from the fumaroles, it’s like another planet.
Mt Doom watches over, close-by now. You can smell the sulphur in the air. If it’s a clear day, you will have views across the Oturere Valley, the Rangipo Desert, out over the Kaimanawa Ranges.
If you are planning to hike to the summit of Mt Tongariro, you will turn off from the track that leads around the Red Crater. Going to your left, the track is clear, and you should allow 1.5-2 hours round trip.
Once you are past the Red Crater, the Emerald Lakes come into view. But first you have to go down!
Red Crater to Emerald Lakes (~15-20 minutes)
Descending from the Red Crater really is a straight-down approach, through volcanic scree. It’s quite exposed, and I found the only way to remain upright was to crab-step and go very slowly. It can be quite slippery and finding a foothold can be tricky. I did see a few people going very fast and attempting to “ski” down it.
At the bottom, you will be rewarded by the Emerald Lakes. The Emerald color comes from leached minerals from the volcanoes. Sulphur deposits can be seen on the slopes, and the scent of rotten eggs pervades from the surrounding fumaroles.
This is a good place to stop for lunch, as the really tricky bits are out-of-the-way.
 Photo Cred: Pierre Roudier
— Emerald Lakes to Blue Lake (~30 minutes) —
The trail descends into the Central Crater, another barren hike. You can see the flow of black lava to your left and behind you are views of the Red Crater and Mt Ngauruhoe in the background.
It’s uphill again to the ridge on the north-east side of the crater to the Blue Lake. This section is short, and easy – particularly when compared to the hike to Red Crater!
The Blue Lake is a cold, acidic lake formed in an old lava vent. Sacred in Maori tradition, it is disrespectful to eat or drink on it’s shores, or swim in the water. In Spring there was still some snow which looked like a white “beach”, contrasting with the blue of the water.

Blue Lake to Ketetahi Hut (~1 hr)
Leaving the Blue lake, the trail continues upwards to the edge of the North Crater. Then begins the descent into the valley. The landscape becomes less rugged and the heath and moorland plants are in evidence again. Once out of the valley the trail continues on a well-maintained path, which can seem quite long thanks to all the switchbacks.
You will pass the area that erupted in August 2012, a large hole in the landscape with plumes of steam. You can see the sulphurous deposits on the side of the Te Maari crater. To the north you are afforded views of Lake Taupo and Lake Rotoaira.
The path can feel somewhat relentless by this stage, as it’s non-stop downhill. I made sure to tighten my boot laces to prevent injury to my toenails! Anyone with knee problems will want to take it slowly.
 Photo Cred: Department of Conservation
After about an hour or so, you arrive at Ketetahi Hut. There are toilets here, but no drinking water. The hut is largely closed as it sustained extensive damage from flying rocks when Te Maari crater erupted in 2012. Thankfully, it was empty at the time, and no one was injured.
There is a turnoff to another trail which is closed to the public. The Ketetahi Springs is a thermal area on privately owned land. If you look carefully, you’ll see the steam rising.
Ketetahi Hut to Ketetahi Car Park (~2 hours)
The same well-maintained trail continues downwards. The moorland gives way to thicker, heather-type bush and the temperature is warmer, with no icy mountain winds. By this stage, it’s just a case of “keep going,” as most of the dramatic landscape is behind you.
Then the forest appears. A dense, montane forest, with a stream roaring through it. There is a sign that says “if you hear a noise from upstream, do not enter” – it’s a live volcanic area and the Department of Conservation advises you to move quickly and not delay!
The track becomes a bit rougher, though wooden stairs take care of the steeper parts. After the trail winds through the forest and over a little bridge, eventually, the hustle and bustle of the car park appears.
You’ll certainly have earned your dinner!
The Tongariro Alpine Crossing was our favourite hike in New Zealand for sure! I\’m amazed how a little snow can change the views so drastically. We did the hike in autumn, so there was no snow and the colours seemed brighter. You have to be very lucky with the weather indeed, and we were! I spoke another hiker that had been waiting 2 days for decent weather conditions. Our timing was on point for a change! 😉 No rain and a clear day. Apart from the strong winds, it was a perfect hiking day!
We stayed in Whakapapa, the main entrance of Tongariro National Park. There\’s not really anything to do apart from the national park, but you\’re only a 20 min drive from the Tongariro Alpine Crossing Trailhead. Roam picked us up from the campsite and brought us back after completing the hike. We really did deserve our dinner! 😀
We wrote a guide as well, if you\’re interested: http://wandering.world/tongariro-alpine-crossing-the-best-day-hike-in-new-zealand/
Keep Wandering the World!